This is the multi-page printable view of this section. Click here to print.
User Scenarios
- 1: ClusterProfile Access Providers
- 2: Deploy Kubernetes resources to the managed clusters
- 3: Distribute workload with placement selected managed clusters
- 4: Extend the multicluster scheduling capabilities with placement
- 5: Extending managed clusters with custom attributes
- 6: Integration with Argo CD
- 7: Manage a cluster with multiple hubs
- 8: Migrate workload with placement
- 9: Pushing Kubernetes API requests to the managed clusters
- 10: Register a cluster to hub through proxy server
- 11: Register CAPI Cluster
- 12: Spread workload across failure domains using decision groups
1 - ClusterProfile Access Providers
The Cluster Inventory API provides a standardized interface for representing cluster properties and status. OCM’s ClusterProfile access provider feature enables applications running on the hub cluster to discover and access managed clusters dynamically without managing kubeconfig files directly.
Hub applications (such as MultiKueue, Argo CD, or custom controllers) can reference ClusterProfile objects to obtain credentials and connection information automatically. This significantly reduces the management overhead for multi-cluster applications.
How It Works
When enabled, OCM creates ClusterProfile objects that contain:
- Cluster connection information (API server endpoint, certificate authority)
- Access provider references (credentials for authentication)
Hub applications can then:
- Discover available clusters by querying ClusterProfile objects
- Authenticate using the access provider plugin (
cp-creds) - Dynamically connect to managed clusters as needed
ClusterProfile objects are scoped to namespaces via ManagedClusterSetBinding, providing permission isolation between different hub applications.
Hub Cluster Setup
Step 1: Enable ClusterProfile Feature Gate
Initialize or update the OCM hub with the ClusterProfile feature gate:
clusteradm init --feature-gates=ClusterProfile=true
This enables the registration controller to maintain ClusterProfile objects for managed clusters. Instead of creating ClusterProfile objects for all managed clusters, the controller only creates them for clusters selected by a ManagedClusterSet that is bound to a ManagedClusterSetBinding.
This design provides permission isolation - different hub applications can access different sets of clusters. For example:
- MultiKueue can bind to a ManagedClusterSet with compute clusters in the
kueue-systemnamespace - Argo CD can bind to a different ManagedClusterSet with deployment targets in the
argocdnamespace
Step 2: Create ManagedClusterSet and ManagedClusterSetBinding
For each consumer application, create a namespace and bind it to a ManagedClusterSet. This makes ClusterProfile objects available in the consumer’s namespace.
Example for a consumer application in namespace my-app:
apiVersion: cluster.open-cluster-management.io/v1beta2
kind: ManagedClusterSet
metadata:
  name: my-app-clusters
spec:
  clusterSelector:
    labelSelector: {}  # Adjust to select specific clusters
    selectorType: LabelSelector
---
apiVersion: cluster.open-cluster-management.io/v1beta2
kind: ManagedClusterSetBinding
metadata:
  name: my-app-clusters
  namespace: my-app
spec:
  clusterSet: my-app-clusters
Verify ClusterProfile objects are created:
kubectl -n my-app get clusterprofiles
Step 3: Install cluster-proxy Addon
The cluster-proxy addon provides connectivity from the hub to managed cluster API servers and provisions access providers for ClusterProfile objects.
Important: You must enable the following flags for ClusterProfile support:
userServer.enabled=true- Enable the user server for cluster proxyenableServiceProxy=true- Enable service proxy functionalityfeatureGates.clusterProfileAccessProvider=true- Required to provision access providers for ClusterProfile
helm install cluster-proxy ocm/cluster-proxy \
  -n open-cluster-management-addon \
  --create-namespace \
  --set userServer.enabled=true \
  --set enableServiceProxy=true \
  --set featureGates.clusterProfileAccessProvider=true
Step 4: Install managed-serviceaccount Addon
The managed-serviceaccount addon enables hub applications to authenticate to managed clusters using dynamically provisioned service account tokens.
Important: You must enable the feature gate for ClusterProfile credential syncing:
featureGates.clusterProfileCredSyncer=true- Required to sync ManagedServiceAccount credentials to ClusterProfile objects
helm install managed-serviceaccount ocm/managed-serviceaccount \
  -n open-cluster-management-addon \
  --create-namespace \
  --set featureGates.clusterProfileCredSyncer=true
Step 5: Create ManagedServiceAccount Resources
Create a ManagedServiceAccount in each managed cluster’s namespace on the hub. These service accounts will be created on the managed clusters and their tokens synced to the ClusterProfile.
Important: The label authentication.open-cluster-management.io/sync-to-clusterprofile: "true" is required to sync credentials to ClusterProfile objects.
Example for accessing managed clusters cluster1 and cluster2 from a consumer named my-app:
apiVersion: authentication.open-cluster-management.io/v1beta1
kind: ManagedServiceAccount
metadata:
  name: my-app
  namespace: cluster1
  labels:
    authentication.open-cluster-management.io/sync-to-clusterprofile: "true"
spec:
  rotation:
    enabled: true
    validity: 8640h0m0s
---
apiVersion: authentication.open-cluster-management.io/v1beta1
kind: ManagedServiceAccount
metadata:
  name: my-app
  namespace: cluster2
  labels:
    authentication.open-cluster-management.io/sync-to-clusterprofile: "true"
spec:
  rotation:
    enabled: true
    validity: 8640h0m0s
Step 6: Install cluster-permission Addon (Optional)
To grant specific permissions to the managed service accounts on managed clusters, install the cluster-permission addon:
helm install cluster-permission ocm/cluster-permission \
  -n open-cluster-management \
  --create-namespace
Then create ClusterPermission resources in each managed cluster namespace to define the required RBAC permissions.
Consumer Application Setup
Applications consuming ClusterProfile objects need to:
- Mount the
cp-credsexecutable plugin - Configure the credentials provider in their application config
Mount the Access Provider Plugin
The ClusterProfile access provider uses an executable plugin (cp-creds) that must be available in the consumer application’s pods. The plugin is included in the managed-serviceaccount image.
Option 1: Using initContainers
Use an initContainer to copy the plugin to a shared volume:
apiVersion: apps/v1
kind: Deployment
metadata:
  name: my-app-controller
  namespace: my-app
spec:
  template:
    spec:
      initContainers:
      - name: install-cp-creds
        image: quay.io/open-cluster-management/cp-creds:latest
        command: ["cp", "/cp-creds", "/plugins/cp-creds"]
        volumeMounts:
        - name: clusterprofile-plugins
          mountPath: "/plugins"
      containers:
      - name: controller
        volumeMounts:
        - name: clusterprofile-plugins
          mountPath: "/plugins"
      volumes:
      - name: clusterprofile-plugins
        emptyDir: {}
Option 2: Using Image Volumes (Kubernetes 1.35+)
Kubernetes 1.35+ supports mounting content from OCI registries directly:
apiVersion: apps/v1
kind: Deployment
metadata:
  name: my-app-controller
  namespace: my-app
spec:
  template:
    spec:
      containers:
      - name: controller
        volumeMounts:
        - name: clusterprofile-plugins
          mountPath: "/plugins"
      volumes:
      - name: clusterprofile-plugins
        image:
          reference: quay.io/open-cluster-management/cp-creds:latest
          pullPolicy: IfNotPresent
Configure the Credentials Provider
Configure your application to use the ClusterProfile credentials provider. The configuration method varies by application.
Key configuration elements:
- Provider name: Must match the
accessProvidersname in ClusterProfile objects (useopen-cluster-management) - Command: Path to the
cp-credsexecutable (e.g.,/plugins/cp-creds) - ManagedServiceAccount name: The name of the ManagedServiceAccount resources created in step 5
The plugin uses the Kubernetes client-go credential plugin mechanism with execConfig.
Verify the Setup
Verify that ClusterProfile objects contain the access provider configuration:
kubectl -n my-app get clusterprofile <cluster-name> -o yaml
Look for the accessProviders section with provider name open-cluster-management, an example of clusterprofile would be like:
apiVersion: multicluster.x-k8s.io/v1alpha1
kind: ClusterProfile
metadata:
  labels:
    multicluster.x-k8s.io/clusterset: default
    open-cluster-management.io/cluster-name: cluster1
    x-k8s.io/cluster-manager: open-cluster-management
  name: cluster1
spec:
  clusterManager:
    name: open-cluster-management
  displayName: cluster1
status:
  accessProviders:
  - cluster:
      certificate-authority-data: <ENCODED_CA_DATA>
      extensions:
      - extension:
          clusterName: cluster1
        name: client.authentication.k8s.io/exec
      server: https://cluster-proxy-addon-user.open-cluster-management-addon:9092/cluster1
    name: open-cluster-management
Example: MultiKueue Integration
This example shows complete configuration for MultiKueue, which uses ClusterProfile to discover and access worker clusters for federated job scheduling.
Create ManagedClusterSet for MultiKueue
apiVersion: cluster.open-cluster-management.io/v1beta2
kind: ManagedClusterSet
metadata:
  name: multikueue
spec:
  clusterSelector:
    labelSelector: {}
    selectorType: LabelSelector
---
apiVersion: cluster.open-cluster-management.io/v1beta2
kind: ManagedClusterSetBinding
metadata:
  name: multikueue
  namespace: kueue-system
spec:
  clusterSet: multikueue
Create ManagedServiceAccounts
apiVersion: authentication.open-cluster-management.io/v1beta1
kind: ManagedServiceAccount
metadata:
  name: multikueue
  namespace: cluster1
  labels:
    authentication.open-cluster-management.io/sync-to-clusterprofile: "true"
spec:
  rotation:
    enabled: true
    validity: 8640h0m0s
---
apiVersion: authentication.open-cluster-management.io/v1beta1
kind: ManagedServiceAccount
metadata:
  name: multikueue
  namespace: cluster2
  labels:
    authentication.open-cluster-management.io/sync-to-clusterprofile: "true"
spec:
  rotation:
    enabled: true
    validity: 8640h0m0s
Configure Kueue Controller
Update the Kueue manager configuration:
apiVersion: v1
kind: ConfigMap
metadata:
  name: kueue-manager-config
  namespace: kueue-system
data:
  controller_manager_config.yaml: |
    apiVersion: config.kueue.x-k8s.io/v1beta2
    kind: Configuration
    featureGates:
      MultiKueueClusterProfile: true
    multiKueue:
      clusterProfile:
        credentialsProviders:
        - name: open-cluster-management
          execConfig:
            apiVersion: client.authentication.k8s.io/v1
            command: /plugins/cp-creds
            args:
            - --managed-serviceaccount=multikueue
            provideClusterInfo: true
            interactiveMode: Never
Mount Plugin in Kueue Deployment
Patch the Kueue controller to mount the plugin (using image volume):
kubectl patch deploy kueue-controller-manager -n kueue-system --type='json' -p='[
  {
    "op": "add",
    "path": "/spec/template/spec/volumes/-",
    "value": {
      "name": "clusterprofile-plugins",
      "image": {
        "reference": "quay.io/open-cluster-management/cp-creds:latest",
        "pullPolicy": "IfNotPresent"
      }
    }
  },
  {
    "op": "add",
    "path": "/spec/template/spec/containers/0/volumeMounts/-",
    "value": {
      "name": "clusterprofile-plugins",
      "mountPath": "/plugins"
    }
  }
]'
Create MultiKueueCluster Resources
Create MultiKueueCluster resources that reference the ClusterProfile objects:
apiVersion: kueue.x-k8s.io/v1beta2
kind: MultiKueueCluster
metadata:
  name: cluster1
spec:
  clusterSource:
    clusterProfileRef:
      name: cluster1
---
apiVersion: kueue.x-k8s.io/v1beta2
kind: MultiKueueCluster
metadata:
  name: cluster2
spec:
  clusterSource:
    clusterProfileRef:
      name: cluster2
Verify MultiKueue Setup
# Check ClusterProfiles
kubectl -n kueue-system get clusterprofiles

# Check MultiKueueClusters
kubectl get multikueuecluster

# Verify a specific MultiKueueCluster is active
kubectl get multikueuecluster cluster1 -o jsonpath='{.status.conditions}'
2 - Deploy Kubernetes resources to the managed clusters
After bootstrapping an OCM environment of at least one managed clusters, now
it’s time to begin your first journey of deploying Kubernetes resources into
your managed clusters with OCM’s ManifestWork API.
Prerequisites
Before we get started with the following tutorial, let’s clarify a few terms we’re going to use in the context.
-
Cluster namespace: After a managed cluster is successfully registered into the hub, the hub registration controller will be automatically provisioning a
cluster namespacededicated for the cluster of which the name will be the same as the managed cluster. Thecluster namespaceis used for storing any custom resources/configurations that effectively belongs to the managed cluster. -
ManifestWork: A custom resource in the hub cluster that groups a list of kubernetes resources together and meant for dispatching them into the managed cluster if the
ManifestWorkis created in a validcluster namespace, see details in this page.
Deploy the resource to a target cluster
Now you can deploy a set of kubernetes resources defined in files to any clusters managed by the hub cluster.
Connect to your hub cluster and you have 2 options to create a ManifestWork:
-
Use
clusteradmcommandclusteradm create work my-first-work -f <kubernetes yaml file or directory> --clusters <cluster name>where kubernetes yaml file should be kubernetes definitions, a sample:
apiVersion: v1 kind: ServiceAccount metadata: namespace: default name: my-sa --- apiVersion: apps/v1 kind: Deployment metadata: namespace: default name: nginx-deployment labels: app: nginx spec: replicas: 3 selector: matchLabels: app: nginx template: metadata: labels: app: nginx spec: serviceAccountName: my-sa containers: - name: nginx image: nginx:1.14.2 ports: - containerPort: 80 -
Use
kubectlto create theManifestWorkkubectl apply -f <kubernetes yaml file or directory>where kubernetes yaml file should be kubernetes definitions wrapped by
ManifestWork, a sample:apiVersion: work.open-cluster-management.io/v1 kind: ManifestWork metadata: namespace: cluster1 name: my-first-work spec: workload: manifests: - apiVersion: v1 kind: ServiceAccount metadata: namespace: default name: my-sa - apiVersion: apps/v1 kind: Deployment metadata: namespace: default name: nginx-deployment labels: app: nginx spec: replicas: 3 selector: matchLabels: app: nginx template: metadata: labels: app: nginx spec: serviceAccountName: my-sa containers: - name: nginx image: nginx:1.14.2 ports: - containerPort: 80
The above command should create a ManifestWork in cluster namespace of your hub cluster. To see the detailed status of this ManifestWork, you can run:
clusteradm get works my-first-work --cluster <cluster name>
If you have some change on the manifest files, you can apply the change to the targeted cluster by running:
clusteradm create work my-first-work -f <kubernetes yaml file or directory> --clusters <cluster name> --overwrite
To remove the resources deployed on the targeted cluster, run:
kubectl delete manifestwork my-first-work -n <cluster name>
What happens behind the scene
Say we would like to deploy a nginx together with a service account into “cluster1”.
A ManifestWork can be defined as follows:
apiVersion: work.open-cluster-management.io/v1
kind: ManifestWork
metadata:
  namespace: cluster1
  name: my-first-work
spec:
  workload:
    manifests:
      - apiVersion: v1
        kind: ServiceAccount
        metadata:
          namespace: default
          name: my-sa
      - apiVersion: apps/v1
        kind: Deployment
        metadata:
          namespace: default
          name: nginx-deployment
          labels:
            app: nginx
        spec:
          replicas: 3
          selector:
            matchLabels:
              app: nginx
          template:
            metadata:
              labels:
                app: nginx
            spec:
              serviceAccountName: my-sa
              containers:
                - name: nginx
                  image: nginx:1.14.2
                  ports:
                    - containerPort: 80
In this example:
-
A
ManifestWorknamed “my-first-work” will be created into a “cluster namespace” named “cluster1”.$ kubectl get manifestwork -A --context kind-hub NAMESPACE NAME AGE cluster1 my-first-work 2m59s -
The resources in the
ManifestWorkincluding a service-account, a deployment will be created to the cluster “cluster1”.$ kubectl get deployment --context kind-cluster1 NAME READY UP-TO-DATE AVAILABLE AGE nginx-deployment 3/3 3 3 4m10s $ kubectl get sa my-sa --context kind-cluster1 NAME SECRETS AGE my-sa 1 4m23s -
In the status of
ManifestWorkwe can check out the aggregated status indicating whether the prescribed resources are successfully deployed by the conditions in the field.status.conditions[*]:Applied: Whether all the resources from the spec are successfully applied since the last observed generation ofManifestWork.Available: Whether all the resources from the spec are existing in the target managed cluster.
-
Beside the aggregated status, the
ManifestWorkis also tracking the per-resource status under.status.resourceStatus[*]where we can discriminate different resource types via the.status.resourceStatus[*].resourceMetafield. e.g.:
resourceStatus:
  manifests:
  - conditions:
    - lastTransitionTime: "2021-11-25T10:17:43Z"
      message: Apply manifest complete
      reason: AppliedManifestComplete
      status: "True"
      type: Applied
    - lastTransitionTime: "2021-11-25T10:17:43Z"
      message: Resource is available
      reason: ResourceAvailable
      status: "True"
      type: Available
    resourceMeta:
      group: apps
      kind: Deployment
      name: nginx-deployment
      namespace: default
      ordinal: 1
      resource: deployments
      version: v1
  ...
If possible, you can also switch the context of your kubeconfig to “cluster1”
to check out the new resources delivered by ManifestWork:
$ kubectl --context kind-cluster1 get pod
NAME                                READY   STATUS    RESTARTS   AGE
nginx-deployment-556c5468f7-d5h2m   1/1     Running   0          33m
nginx-deployment-556c5468f7-gf574   1/1     Running   0          33m
nginx-deployment-556c5468f7-hhmjf   1/1     Running   0          33m
Updating the ManifestWork
Any updates applied to the ManifestWork are expected to take effect
immediately as long as the work agent deployed in the managed cluster
are healthy and actively in touch with the hub cluster.
The work agent will be dynamically computing a hash
from the prescribed resources, and a corresponding AppliedManifestWork
of which the name contains the hash value will be persisted to the managed
cluster and replacing the previously persisted AppliedManifestWork
connected to the same ManifestWork after the latest resources are applied.
$ kubectl --context kind-cluster1 get appliedmanifestwork
NAME                                                                                                   AGE
ed59251487ad4e4465fa2990b36a1cc398b83e63b59fa16b83591f5afdc3dd6d-my-first-work                  59m
Note that if the work agent was disconnected from the hub control plane for
a period of time and missed the new updates upon ManifestWork. The work
agent will be catching up the latest state of ManifestWork as soon as it
re-connects.
Deleting the ManifestWork
The local resources deployed in the managed cluster should be cleaned up upon
receiving the deletion event from the corresponding ManifestWork. The resource
ManifestWork in the hub cluster will be protected by the finalizer named:
- “cluster.open-cluster-management.io/manifest-work-cleanup”
It will be removed if the corresponding AppliedManifestWork is gracefully
removed from the managed cluster. Meanwhile, the AppliedManifestWork resource
is also protected by another finalizer named:
- “cluster.open-cluster-management.io/applied-manifest-work-cleanup”
This finalizer is supposed to be detached after the deployed local resources
are completely removed from the managed cluster. With that being said, if any
deployed local resources are holding at the “Terminating” due to graceful
deletion. Both of its ManifestWork and AppliedManifestWork should stay
undeleted.
Troubleshoot
In case of run into any unexpected failures, you can make sure your environment by checking the following conditions:
-
The CRD
ManifestWorkis installed in the hub cluster:$ kubectl get crd manifestworks.work.open-cluster-management.io -
The CRD
AppliedManifestWorkis installed in the managed cluster:$ kubectl get crd appliedmanifestworks.work.open-cluster-management.io -
The work agent is successfully running in the managed cluster:
$ kubectl -n open-cluster-management-agent get pod
NAME                                             READY   STATUS    RESTARTS   AGE
klusterlet-registration-agent-598fd79988-jxx7n   1/1     Running   0          20d
klusterlet-work-agent-7d47f4b5c5-dnkqw           1/1     Running   0          20d
3 - Distribute workload with placement selected managed clusters
The Placement API is used to dynamically select a set of ManagedCluster in
one or multiple ManagedClusterSets so that the workloads can be deployed to
these clusters.
If you define a valid Placement, the placement controller generates a
corresponding PlacementDecision with the selected clusters listed in the
status. As an end-user, you can parse the selected clusters and then operate on
the target clusters. You can also integrate a high-level workload orchestrator
with the PlacementDecision to leverage its scheduling capabilities.
For example, with OCM addon policy
installed, a Policy that includes a Placement mapping can distribute the
Policy to the managed clusters.
For details see this example.
Some popular open source projects also integrate with the Placement API. For
example Argo CD, it can leverage the
generated PlacementDecision to drive the assignment of Argo CD Applications to a
desired set of clusters, details see this example.
And KubeVela, as an implementation of
the open application model, also will take advantage of the Placement API for
workload scheduling.
And in this article, we want to show you how to use clusteradm to deploy
ManifestWork to Placement selected clusters.
Prerequisites
Before starting with the following steps, we suggest you understand the content below.
-
Placement: The
PlacementAPI is used to dynamically select a set ofManagedClusterin one or multipleManagedClusterSetsso that higher-level users can either replicate Kubernetes resources to the member clusters or run their advanced workload i.e. multi-cluster scheduling. -
ManifestWork: A custom resource in the hub cluster that groups a list of Kubernetes resources together and is meant for dispatching them into the managed cluster if the
ManifestWorkis created in a validcluster namespace.
Deploy manifestwork to placement selected managed clusters
In deploy Kubernetes resources to the managed clusters,
it shows you how to use clusteradm to create a ManifestWork and deploy it
onto a specific managed clusters. As Placement can dynamically select a set of
ManagedCluster, the next steps will show you how clusteradm leverages
placement scheduling ability and dynamically deploy ManifestWork to a set of
managed clusters.
-
Following setup dev environment by kind to prepare an environment.
curl -sSL https://raw.githubusercontent.com/open-cluster-management-io/OCM/main/solutions/setup-dev-environment/local-up.sh | bash -
Confirm there are 2
ManagedClusterand a defaultManagedClusterSetcreated.$ clusteradm get clusters NAME ACCEPTED AVAILABLE CLUSTERSET CPU MEMORY KUBERNETES VERSION cluster1 true True default 24 49265496Ki v1.23.4 cluster2 true True default 24 49265496Ki v1.23.4 $ clusteradm get clustersets NAME BOUND NAMESPACES STATUS default 2 ManagedClusters selected -
Bind the default
ManagedClusterSetto defaultNamespace.clusteradm clusterset bind default --namespace default$ clusteradm get clustersets NAME BOUND NAMESPACES STATUS default default 2 ManagedClusters selectedNote: click here to see more details about how to operate
ManagedClusterSetusingclusteradm. -
Create a
Placementplacement1 to select the two clusters in defaultManagedClusterSet.cat << EOF | kubectl apply -f - apiVersion: cluster.open-cluster-management.io/v1beta1 kind: Placement metadata: name: placement1 namespace: default spec: numberOfClusters: 2 clusterSets: - default EOF -
Use
clusteradmcommand to createManifestWorkmy-first-work withPlacementplacement1.clusteradm create work my-first-work -f work.yaml --placement default/placement1The
work.yamlcontains kubernetes resource definitions, for sample:apiVersion: v1 kind: ServiceAccount metadata: namespace: default name: my-sa --- apiVersion: apps/v1 kind: Deployment metadata: namespace: default name: nginx-deployment labels: app: nginx spec: replicas: 3 selector: matchLabels: app: nginx template: metadata: labels: app: nginx spec: serviceAccountName: my-sa containers: - name: nginx image: nginx:1.14.2 ports: - containerPort: 80 -
Check the
ManifestWork, it should be distributed to both cluster1 and cluster2.$ kubectl get manifestwork -A NAMESPACE NAME AGE cluster1 my-first-work 28s cluster2 my-first-work 28s -
Update the
Placementplacement1 to select only one managed cluster.kubectl patch placement placement1 --patch '{"spec": {"clusterSets": ["default"],"numberOfClusters": 1}}' --type=merge -
As the placement decision changes, running below command to reschedule
ManifestWorkmy-first-work to the newly selected cluster.clusteradm create work my-first-work -f work.yaml --placement default/placement1 --overwrite -
Check the
ManifestWorkagain, now it’s only deployed to cluster1.$ kubectl get manifestwork -A NAMESPACE NAME AGE cluster1 my-first-work 18m
What happens behind the scene
The main idea is that clusteradm parse the selected clusters generated by
Placement, and fill in that as ManifestWork namespace. Then create the
ManifestWork and it would be distributed to a set of clusters.
Let’s see more details.
-
Placementplacement1 generates aPlacementDecisionplacement1-decision-1.$ kubectl get placementdecision -n default -l cluster.open-cluster-management.io/placement=placement1 -oyaml apiVersion: v1 items: - apiVersion: cluster.open-cluster-management.io/v1beta1 kind: PlacementDecision metadata: creationTimestamp: "2022-07-06T15:03:12Z" generation: 1 labels: cluster.open-cluster-management.io/placement: placement1 name: placement1-decision-1 namespace: default ownerReferences: - apiVersion: cluster.open-cluster-management.io/v1beta1 blockOwnerDeletion: true controller: true kind: Placement name: placement1 uid: aa339f57-0eb7-4260-8d4d-f30c1379fd35 resourceVersion: "47679" uid: 9f948619-1647-429d-894d-81e11dd8bcf1 status: decisions: - clusterName: cluster1 reason: "" - clusterName: cluster2 reason: "" kind: List metadata: resourceVersion: "" selfLink: "" -
clusteradmget thePlacementDecisiongenerated byPlacementplacement1 with labelcluster.open-cluster-management.io/placement: placement1, reference code. Then parse the clusterName cluster1 and cluster2, fill in that asManifestWorknamespace, reference code. Then installsManifestWorkto namespace cluster1 and cluster2, which will finally be distributed to the two clusters.$ kubectl get manifestwork -A NAMESPACE NAME AGE cluster1 my-first-work 28s cluster2 my-first-work 28s
4 - Extend the multicluster scheduling capabilities with placement
The Placement API is used to dynamically select a set of ManagedCluster in one or multiple ManagedClusterSets so that the workloads can be deployed to these clusters. You can use placement to filter clusters by label or claim selector, also placement provides some default prioritizers which can be used to sort and select the most suitable clusters.
One of the default prioritizers are ResourceAllocatableCPU and ResourceAllocatableMemory. They provide the capability to sort clusters based on the allocatable CPU and memory. However, when considering the resource based scheduling, there’s a gap that the cluster’s “AllocatableCPU” and “AllocatableMemory” are static values that won’t change even if “the cluster is running out of resources”. And in some cases, the prioritizer needs more extra data to calculate the score of the managed cluster. For example, there is a requirement to schedule based on resource monitoring data from the cluster. For this reason, we need a more extensible way to support scheduling based on customized scores.
What is Placement extensible scheduling?
OCM placement introduces an API AddOnPlacementScore to support scheduling based on customized scores. This API supports storing the customized scores and being used by placement. Details of the API’s definition refer to types_addonplacementscore.go. An example of AddOnPlacementScore is as below.
apiVersion: cluster.open-cluster-management.io/v1alpha1
kind: AddOnPlacementScore
metadata:
name: default
namespace: cluster1
status:
conditions:
- lastTransitionTime: "2021-10-28T08:31:39Z"
message: AddOnPlacementScore updated successfully
reason: AddOnPlacementScoreUpdated
status: "True"
type: AddOnPlacementScoreUpdated
validUntil: "2021-10-29T18:31:39Z"
scores:
- name: "cpuAvailable"
value: 66
- name: "memAvailable"
value: 55
conditions. Conditions contain the different condition statuses for thisAddOnPlacementScore.validUntil. ValidUntil defines the valid time of the scores. After this time, the scores are considered to be invalid by placement. nil means never expire. The controller owning this resource should keep the scores up-to-date.scores. Scores contain a list of score names and values of this managed cluster. In the above example, the API contains a list of customized scores: cpuAvailable and memAvailable.
All the customized scores information is stored in status, as we don’t expect end users to update it.
- As a score provider, a 3rd party controller could run on either hub or managed cluster, to maintain the lifecycle of
AddOnPlacementScoreand update the score into thestatus. - As an end user, you need to know the resource name “default” and customized score name “cpuAvailable"and “memAvailable” , so you can specify the name in placement yaml to select clusters. For example, the below placement wants to select the top 3 clusters with the highest cpuAvailable score.
apiVersion: cluster.open-cluster-management.io/v1beta1 kind: Placement metadata: name: placement namespace: ns1 spec: numberOfClusters: 3 prioritizerPolicy: mode: Exact configurations: - scoreCoordinate: type: AddOn addOn: resourceName: default scoreName: cpuAvailable weight: 1 - In placement, if the end-user defines the scoreCoordinate type as AddOn, the placement controller will get the
AddOnPlacementScoreresource with the name “default” in each cluster’s namespace, read score “cpuAvailable” in the score list, and use that score to sort clusters.
You can refer to the enhancements to learn more details about the design. In the design, how to maintain the lifecycle (create/update/delete) of the AddOnPlacementScore CRs is not covered, as we expect the customized score provider itself to manage it. In this article, we will use an example to show you how to implement a 3rd part controller to update your own scores and extend the multiple clusters scheduling capability with your own scores.
How to implement a customized score provider
The example code is in GitHub repo resource-usage-collect-addon. It provides the score of the cluster’s available CPU and available memory, which can reflect the cluster’s real-time resource utilization. It is developed with OCM addon-framework and can be installed as an addon plugin to update customized scores into AddOnPlacementScore. (This article won’t talk many details about addon-framework, referring to Add-on Developer Guide to learn how to develop an addon.)
The resource-usage-collect addon follows the hub-agent architecture as below.
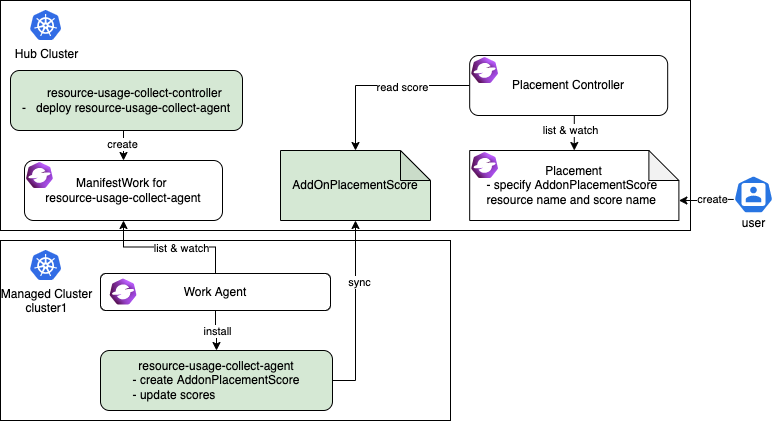
The resource-usage-collect addon contains a controller and an agent.
- On the hub cluster, the resource-usage-collect-controller is running. It is responsible for creating the
ManifestWorkfor resource-usage-collect-agent in each cluster namespace. - On each managed cluster, the work agent watches the
ManifestWorkand installs the resource-usage-collect-agent on each cluster. The resource-usage-collect-agent is the core part of this addon, it creates theAddonPlacementScorefor each cluster on the Hub cluster, and refreshes thescoresandvalidUntilevery 60 seconds.
When the AddonPlacementScore is ready, the end user can specify the customized core in a placement to select clusters.
The working flow and logic of resource-usage-collect addon are quite easy to understand. Now let’s follow the below steps to get started!
Prepare an OCM environment with 2 ManagedClusters.
- Following setup dev environment by kind to prepare an environment.
curl -sSL https://raw.githubusercontent.com/open-cluster-management-io/OCM/main/solutions/setup-dev-environment/local-up.sh | bash
- Confirm there are 2
ManagedClusterand a defaultManagedClusterSetcreated.
$ clusteradm get clusters
NAME       ACCEPTED   AVAILABLE   CLUSTERSET   CPU   MEMORY       KUBERNETES VERSION
cluster1   true       True        default      24    49265496Ki   v1.23.4
cluster2   true       True        default      24    49265496Ki   v1.23.4

$ clusteradm get clustersets
NAME      BOUND NAMESPACES   STATUS
default                      2 ManagedClusters selected
- Bind the default
ManagedClusterSetto defaultNamespace.
clusteradm clusterset bind default --namespace default
$ clusteradm get clustersets
NAME      BOUND NAMESPACES   STATUS
default   default            2 ManagedClusters selected
Install the resource-usage-collect addon.
- Git clone the source code.
git clone git@github.com:open-cluster-management-io/addon-contrib.git
cd addon-contrib/resource-usage-collect-addon
- Prepare the image.
# Set image name, this is an optional step.
export IMAGE_NAME=quay.io/haoqing/resource-usage-collect-addon:latest
# Build image
make images
If your are using kind, load image into kind cluster.
kind load docker-image $IMAGE_NAME --name <cluster_name> # kind load docker-image $IMAGE_NAME --name hub
- Deploy the resource-usage-collect addon.
make deploy
- Verify the installation.
On the hub cluster, verify the resource-usage-collect-controller pod is running.
$ kubectl get pods -n open-cluster-management | grep resource-usage-collect-controller
resource-usage-collect-controller-55c58bbc5-t45dh   1/1     Running   0          71s
On the hub cluster, verify the AddonPlacementScore is generated for each managed cluster.
$ kubectl get addonplacementscore -A
NAMESPACE   NAME                   AGE
cluster1    resource-usage-score   3m23s
cluster2    resource-usage-score   3m24s
The AddonPlacementScore status should contain a list of scores as below.
$ kubectl get addonplacementscore -n cluster1 resource-usage-score -oyaml
apiVersion: cluster.open-cluster-management.io/v1alpha1
kind: AddOnPlacementScore
metadata:
  creationTimestamp: "2022-08-08T06:46:04Z"
  generation: 1
  name: resource-usage-score
  namespace: cluster1
  resourceVersion: "3907"
  uid: 6c4280e4-38be-4d45-9c73-c18c84799781
status:
  scores:
  - name: cpuAvailable
    value: 12
  - name: memAvailable
    value: 4
If AddonPlacementScore is not created or there are no scores in the status, go into the managed cluster, and check if the resource-usage-collect-agent pod is running well.
$ kubectl get pods -n default | grep resource-usage-collect-agent
resource-usage-collect-agent-5b85cbf848-g5kqm   1/1     Running   0          2m
Select clusters with the customized scores.
If everything is running well, now you can try to create placement and select clusters with the customized scores.
- Create a placement to select 1 cluster with the highest cpuAvailable score.
cat << EOF | kubectl apply -f -
apiVersion: cluster.open-cluster-management.io/v1beta1
kind: Placement
metadata:
  name: placement1
  namespace: default
spec:
  numberOfClusters: 1
  clusterSets:
    - default
  prioritizerPolicy:
    mode: Exact
    configurations:
      - scoreCoordinate:
          type: AddOn
          addOn:
            resourceName: resource-usage-score
            scoreName: cpuAvailable
        weight: 1
EOF
- Verify the placement decision.
$ kubectl describe placementdecision -n default | grep Status -A 3
Status:
  Decisions:
    Cluster Name:  cluster1
    Reason:
Cluster1 is selected by PlacementDecision.
Running below command to get the customized score in AddonPlacementScore and the cluster score set by Placement.
You can see that the “cpuAvailable” score is 12 in AddonPlacementScore, and this value is also the cluster score in Placement events, this indicates that placement is using the customized score to select clusters.
$ kubectl get addonplacementscore -A -o=jsonpath='{range .items[*]}{.metadata.namespace}{"\t"}{.status.scores}{"\n"}{end}'
cluster1        [{"name":"cpuAvailable","value":12},{"name":"memAvailable","value":4}]
cluster2        [{"name":"cpuAvailable","value":12},{"name":"memAvailable","value":4}]
$ kubectl describe placement -n default placement1 | grep Events -A 10
Events:
  Type    Reason          Age   From                 Message
  ----    ------          ----  ----                 -------
  Normal  DecisionCreate  50s   placementController  Decision placement1-decision-1 is created with placement placement1 in namespace default
  Normal  DecisionUpdate  50s   placementController  Decision placement1-decision-1 is updated with placement placement1 in namespace default
  Normal  ScoreUpdate     50s   placementController  cluster1:12 cluster2:12
Now you know how to install the resource-usage-collect addon and consume the customized score to select clusters. Next, let’s take a deeper look into some key points when you consider implementing a customized score provider.
1. Where to run the customized score provider
The customized score provider could run on either hub or managed cluster. Combined with user stories, you should be able to distinguish whether the controller should be placed in a hub or a managed cluster.
In our example, the customized score provider is developed with addon-famework, it follows the hub-agent architecture. The resource-usage-collect-agent is the real score provider, it is installed on each managed cluster, it gets the available CPU and memory of the managed cluster, calculates a score, and updates it into AddonPlacementScore. The resource-usage-collect-controller just takes care of installing the agent.
In other cases, for example, if you want to use the metrics from Thanos to calculate a score for each cluster, then the customized score provider only needs to be placed on the hub, as Thanos has all the metrics collected from each managed cluster.
2. How to maintain the AddOnPlacementScore CR lifecycle
In our example, the code to maintain the AddOnPlacementScore CR is in pkg/addon/agent/agent.go.
-
When should the score be created?
The
AddOnPlacementScoreCR can be created with the existence of a ManagedCluster, or on demand for the purpose of reducing objects on the hub.In our example, the addon creates an
AddOnPlacementScorefor each Managed Cluster if it does not exist, and a score will be calculated when creating the CR for the first time. -
When should the score be updated?
We recommend that you set
ValidUntilwhen updating the score so that the placement controller can know if the score is still valid in case it failed to update for a long time.The score could be updated when your monitoring data changes, or at least you need to update it before it expires.
In our example, in addition to recalculate and update the score every 60 seconds, the update will also be triggered when the node or pod resource in the managed cluster changes.
3. How to calculate the score
The code to calculate the score is in pkg/addon/agent/calculate.go. A valid score must be in the range -100 to 100, you need to normalize the scores before updating it into AddOnPlacementScore.
When normalizing the score, you might meet the below cases.
-
The score provider knows the max and min value of the customized scores.
In this case, it is easy to achieve smooth mapping by formula. Suppose the actual value is X, and X is in the interval [min, max], then
score = 200 * (x - min) / (max - min) - 100. -
The score provider doesn’t know the max and min value of the customized scores.
In this case, you need to set a maximum and minimum value by yourself, as without a max and min value, is unachievable to map a single value X to the range [-100, 100].
Then when the X is greater than this maximum value, the cluster can be considered healthy enough to deploy applications, and the score can be set as 100. And if X is less than the minimum value, the score can be set as -100.
if X >= max
  score = 100
if X <= min
  score = -100
In our example, the resource-usage-collect-agent running on each managed cluster doesn’t have a whole picture view to know the max/min value of CPU/memory usage of all the clusters, so we manually set the max value as MAXCPUCOUNT and MAXMEMCOUNT in code, min value is set as 0. The score calculation formula can be simplified: score = x / max * 100.
Summary
In this article, we introduced what is the placement extensible scheduling and used an example to show how to implement a customized score provider. Also, this article list 3 key points the developer needs to consider when implementing a 3rd party score provider. Hope after reading this article, you can have a clear view of how placement extensible scheduling can help you extend the multicluster scheduling capabilities.
Feel free to raise your question in the Open-cluster-management-io GitHub community or contact us using Slack.
5 - Extending managed clusters with custom attributes
Under some cases we need a convenient way to extend OCM’s Managed Cluster data model so that our own custom multi-cluster system can easily work over the OCM’s native cluster api otherwise we will have to maintain an additional Kubernetes’ CustomResourceDefinition in the project. OCM definitely supports developers to decorate the cluster api with minimal effort, and in the following content we will walk through that briefly.
The original cluster model in OCM “Managed Cluster” is designed to be a
neat and light-weight placeholder resource of which the spec doesn’t
require any additional information other than “whether the cluster is
accepted or not” i.e. .spec.hubAcceptsClient, and all the other fields
in the spec are totally optional, e.g. .spec.managedClusterClientConfigs
is only required until we install some addons that replying on that
information.
Overall in OCM we can decorate the original cluster model with custom attributes in the following approaches:
Label: The common label primitive in terms of a Kubernetes resource.Cluster Claim: A custom resource available inside the managed cluster which will be consistently reported to the hub cluster.
Labeling managed cluster
Any kubernetes resource can be attached with labels in the metadata in the form of:
metadata:
  labels:
    <domain name>/<label name>: <label string value>
...
However, there’re some restrictions to the label value such as the content length, and legal charset etc, so it’s not convenient to put some structuralized or comprehensive data in the label value.
Additionally, due to the fact that the finest granularity of authorization mechanism in Kubernetes is “resource”, so it’s also not convenient for us to protect these extended labels from unexpected modification unless intercepting the writes the “Managed Cluster” with an admission webhook which brings additional costs in cluster administration and operation. So generally it’s recommended to put those immutable or static attributes (that doesn’t frequently change over time) such as:
- data-center information
- network infrastructure information
- geography attributes like cluster’s region
- …
Last but not least, it’s generally not recommended to grant permission to the managed cluster to update non-status fields on the “Managed Cluster” so these custom attributes in labels should only be manipulated by hub cluster admins/operators. If you are looking for a way to make the local agents in the managed clusters to be capable of reporting attributes in a “bottom-up” pattern, go ahead read the “Cluster Claim” section below.
Decorating managed cluster with cluster claim
The cluster claim is a cluster-scoped custom resource working from the managed clusters and proactively projecting custom attributes towards the hub cluster’s “Managed Cluster” model. Note that the hub cluster is not supposed to make any direct modification upon the projected claims on the “ManagedCluster”, i.e. read-only to the hub cluster.
A sample of cluster claim will be like:
apiVersion: cluster.open-cluster-management.io/v1alpha1
kind: ClusterClaim
metadata:
  name: id.open-cluster-management.io
spec:
  value: 95f91f25-d7a2-4fc3-9237-2ef633d8451c
After applying the cluster claim above to any managed cluster, the value of the claims will be instantly reflected in the cluster model. e.g.:
apiVersion: cluster.open-cluster-management.io/v1
kind: ManagedCluster
metadata: ...
spec: ...
status:
  clusterClaims:
    - name: id.open-cluster-management.io
      value: 95f91f25-d7a2-4fc3-9237-2ef633d8451c
And any future updates upon the claim will also be reported from the registration agent to the hub cluster.
The claims are useful if we want the hub cluster to perform different actions or behaviors reactively based on the feedback of reported values. They’re typically applicable to describe the information that changes in the managed cluster frequently. e.g.:
- aggregated resource information (node counts, pod counts)
- cluster resource watermark/budget
- any cluster-scoped knowledge of the managed cluster…
Next
After extending your “Managed Cluster” with customized attributes, now we can try the advanced cluster selection using the placement policies, which is provided ny another module of OCM helpful for building your own advanced multi-cluster systems.
6 - Integration with Argo CD
Argo CD is a declarative, GitOps continuous delivery tool, which allows developers to define and control deployment of Kubernetes application resources from within their existing Git workflow. By integrating Open Cluster Management (OCM) with Argo CD, it enables both automation and greater flexibility managing Argo CD Applications across a large number of OCM managed clusters.
In this article, we want to show you how to integrate Argo CD with OCM and deploy application to OCM managed clusters by leveraging the Placement API, which supports multi-cluster scheduling.
Before starting with the following steps, we suggest you understand the content below:
- Argo CD ApplicationSet. It adds Application automation and seeks to improve multi-cluster support and cluster multitenant support within Argo CD.
- OCM Placement API. It is used to dynamically select a set of ManagedClusters in one or multiple ManagedClusterSets so that the workloads can be deployed to these clusters.
The first half of the KubeCon NA 2022 - OCM Multicluster App & Config Management also covers the integration with ArgoCD.
How it works

1. Import Kubernetes clusters to the OCM hub as managed clusters and organize them with managed clustersets.
2. Register the OCM managed clusters to ArgoCD.
The OCM managed clusters can be registered to Argo CD one by one manually by using Argo CD CLI. It may take time to finish it if there are a large number of clusters. In order to make the cluster registration easier, consider to use multicloud-integrations to automate the procedure.
3. Create a configuration of Cluster Decision Resource generator by using OCM Placement API.
cat << EOF | kubectl apply -f -
apiVersion: v1
kind: ConfigMap
metadata:
  name: ocm-placement-generator
  namespace: argocd
data:
  apiVersion: cluster.open-cluster-management.io/v1beta1
  kind: placementdecisions
  statusListKey: decisions
  matchKey: clusterName
EOF
With reference to this generator, an ApplicationSet can target the application to the clusters listed in the status of a set of PlacementDecision, which belong to a certain Placement.
4. Grant Argo CD permissions to access OCM resources.
cat << EOF | kubectl apply -f -
apiVersion: rbac.authorization.k8s.io/v1
kind: Role
metadata:
  name: ocm-placement-consumer
  namespace: argocd
rules:
- apiGroups: ["cluster.open-cluster-management.io"]
  resources: ["placementdecisions"]
  verbs: ["get", "list"]

---
apiVersion: rbac.authorization.k8s.io/v1
kind: RoleBinding
metadata:
  name: ocm-placement-consumer:argocd
  namespace: argocd
roleRef:
  apiGroup: rbac.authorization.k8s.io
  kind: Role
  name: ocm-placement-consumer
subjects:
- kind: ServiceAccount
  namespace: argocd
  name: argocd-applicationset-controller
EOF
5. Bind at least one managed clusterset to the argocd namespace.
For example, in order to bind the global managed clusterset to the argocd namespace, the user must have an RBAC rule to create on the virtual subresource of managedclustersets/bind of the global managed clusterset.
clusteradm clusterset bind global --namespace argocd
The above command will create a ManagedClusterSetBinding resource in the argocd namespace. Normally, it should not be included by an application in the git repo because applying it to a Kubernetes cluster needs additional permissions.
6. Create a placement in the argocd namespace to select some managed clusters.
cat << EOF | kubectl apply -f -
apiVersion: cluster.open-cluster-management.io/v1beta1
kind: Placement
metadata:
  name: guestbook-app-placement
  namespace: argocd
spec:
  numberOfClusters: 10
EOF
7. Create an ApplicationSet in the argocd namespace.
The ApplicationSet has references to the Cluster Decision Resource generator previously created and placement. This will help Argo CD to determine where the application should be deployed. The managed clusters selected by the referenced placement may be changed dynamically. By setting requeueAfterSeconds of the generator in the ApplicationSet spec, the Argo CD will check the cluster decisions of the referenced placement periodically and ensure the application is deployed to the correct managed clusters.
cat << EOF | kubectl apply -f -
apiVersion: argoproj.io/v1alpha1
kind: ApplicationSet
metadata:
  name: guestbook-app
  namespace: argocd
spec:
  generators:
    - clusterDecisionResource:
        configMapRef: ocm-placement-generator
        labelSelector:
          matchLabels:
            cluster.open-cluster-management.io/placement: guestbook-app-placement
        requeueAfterSeconds: 30
  template:
    metadata:
      name: '{{clusterName}}-guestbook-app'
    spec:
      project: default
      source:
        repoURL: 'https://github.com/argoproj/argocd-example-apps.git'
        targetRevision: HEAD
        path: guestbook
      destination:
        name: '{{clusterName}}'
        namespace: guestbook
      syncPolicy:
        automated:
          prune: true
        syncOptions:
          - CreateNamespace=true
EOF
8. Check the status of the ApplicationSet and the Application.
Confirm the ApplicationSet is created and an Application is generated for each selected managed cluster.
$ kubectl -n argocd get applicationsets
NAME            AGE
guestbook-app   4s

$ kubectl -n argocd get applications
NAME                     SYNC STATUS   HEALTH STATUS
cluster1-guestbook-app   Synced        Progressing
cluster2-guestbook-app   Synced        Progressing
And on each selected managed cluster confirm the Application is running.
$ kubectl -n guestbook get pods
NAME                           READY   STATUS    RESTARTS   AGE
guestbook-ui-6b689986f-cdrk8   1/1     Running   0          112s
What’s next
To build an OCM environment integrated with Argo CD with KinD clusters, see Deploy applications with Argo CD for more details.
7 - Manage a cluster with multiple hubs
Normally an Open Cluster Management (OCM) hub manages multiple managed clusters and a cluster only registers to one OCM hub. While there might be some user scenarios, where a single cluster may want to join more than one OCM hub as a managed cluster, including:
- In an organization, each department may setup an OCM hub to manage clusters owned by this department, and all clusters are managed by a central OCM hub owned by IT department to enforce organization wide security policies.
- A service provider creates clusters for customers. The underlying system of the service provider uses OCM hubs to manage all the clusters. Once customer gets a cluster from the service provider, they may also want to manage this cluster with customer’s OCM hub.
This document shows how to achieve it with OCM.
Since the OCM agent is hub specific, that means an agent can connect to only one hub. In order to connect to multiple hubs, each hub should have its own agent running. Depdends on where the agent is running, there are two solutions:
- Run all agents on the managed cluster;
- Run the agents in the hosted mode on the hosting clusters;
Run all the agents on the managed cluster
Since there are multiple OCM agents are running on the managed cluster, each of them must have an unique agent namespace. So only one agent can be deployed in the default agent namespace open-cluster-management-agent.
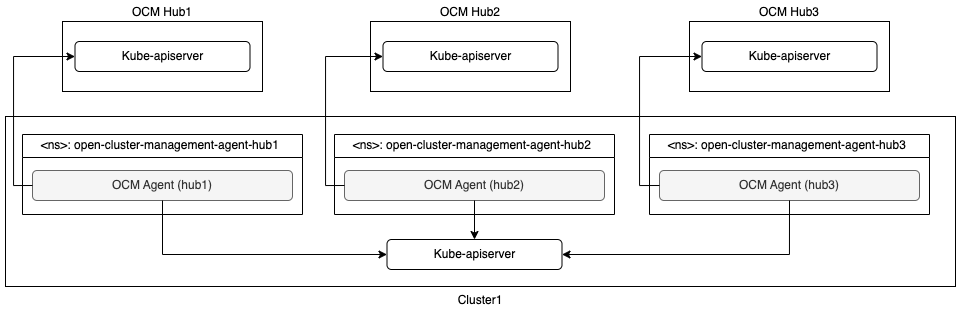
With this architecture, the managed cluster needs more resources, including CPUs and memory, to run agents for multiple hubs. And it’s a challenge to handle the version skew of the OCM hubs.
An example built with kind and clusteradm can be found in Manage a cluster with multiple hubs.
Run the agents in the hosted mode on the hosting clusters
By leveraging the hosted deployment mode, it’s possible to run OCM agent outside of the managed cluster on a hosting cluster. The hosting cluster could be a managed cluster of the same hub.
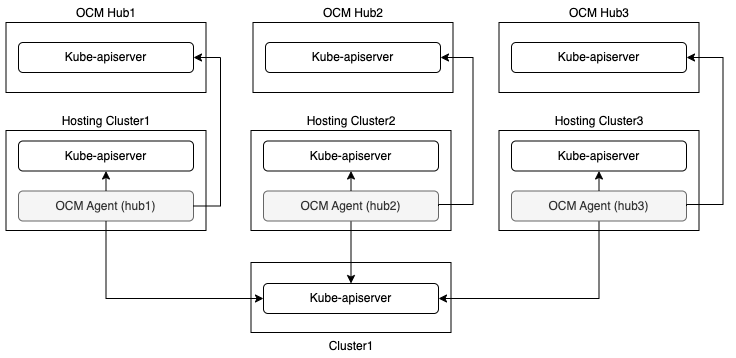
At most one agent can run in the default mode on the managed cluster in this solution.

In order to reduce the number of the hosting clusters, agents running in the hosted mode can share the hosting clusters.
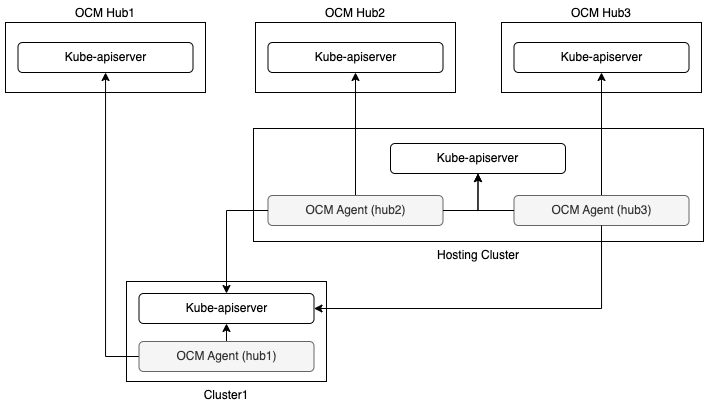
With this architecture, the managed cluster itself needs less resources because at most one agent runs on the managed cluster, while it needs at least one extra cluster as hosting cluster. Since each agent could run on different cluster (managed cluster or hosting cluster), it will not result in any problem if OCM hubs have different versions.
An example built with kind and clusteradm can be found in Manage a cluster with multiple hubs in hosted mode.
8 - Migrate workload with placement
The Placement API is used to dynamically select a set of ManagedCluster in
one or multiple ManagedClusterSets so that the workloads can be deployed to
these clusters.
If you define a valid Placement, the placement controller generates a
corresponding PlacementDecision with the selected clusters listed in the
status. As an end-user, you can parse the selected clusters and then operate on
the target clusters. You can also integrate a high-level workload orchestrator
with the PlacementDecision to leverage its scheduling capabilities.
For example, with OCM addon policy
installed, a Policy that includes a Placement mapping can distribute the
Policy to the managed clusters.
For details see this example.
Some popular open source projects also integrate with the Placement API. For
example Argo CD, it can leverage the
generated PlacementDecision to drive the assignment of Argo CD Applications to a
desired set of clusters, details see this example.
And KubeVela, as an implementation of
the open application model, also will take advantage of the Placement API for
workload scheduling.
In this article, we use ArgoCD pull model as an example to demonstrate how, with the integration of OCM, you can migrate ArgoCD Applications among clusters. This is useful for scenarios such as application disaster recovery or application migration during cluster maintenance.
Prerequisites
Before starting with the following steps, we recommend that you familiarize yourself with the content below.
-
Taints of ManagedClusters: Taints are properties of
ManagedClusters, they allow aPlacementto repel a set ofManagedClusters. -
Tolerations of Placement: Tolerations are applied to
Placements, and allowPlacementsto selectManagedClusterswith matching taints. -
ArgoCD Pull Model Integration: The ArgoCD application controller uses the hub-spoke pattern or pull model mechanism for decentralized resource delivery to remote clusters. By using Open Cluster Management (OCM) APIs and components, the ArgoCD Applications will be pulled from the multi-cluster control plane hub cluster down to the registered OCM managed clusters
Setup the environment
Follow the deploy ArgoCD pull model steps to set up an environment with OCM and ArgoCD pull model installed.
If the above steps run successfully, on the hub cluster, you could see the application is deployed to both cluster1 and cluster2.
$ kubectl -n argocd get app
NAME                     SYNC STATUS   HEALTH STATUS
cluster1-guestbook-app   Synced        Healthy
cluster2-guestbook-app   Synced        Healthy
Migrate application to another cluster automatically when one cluster is down
-
To demonstrate how an application can be migrated to another cluster, let’s first deploy the application in a single cluster.
Patch the existing
Placementto select only one cluster.$ kubectl patch placement -n argocd guestbook-app-placement --patch '{"spec": {"numberOfClusters": 1}}' --type=merge placement.cluster.open-cluster-management.io/guestbook-app-placement patchedUse
clusteradmto check the placement of selected clusters.$ clusteradm get placements -otable NAME STATUS REASON SELETEDCLUSTERS guestbook-app-placement False Succeedconfigured [cluster1] -
Confirm the application is only deployed to cluster1.
$ kubectl -n argocd get app NAME SYNC STATUS HEALTH STATUS cluster1-guestbook-app Synced Healthy -
Pause the cluster1 to simulate a cluster going down.
Use
docker ps -ato get the cluster1 container ID.$ docker ps -a CONTAINER ID IMAGE COMMAND CREATED STATUS PORTS NAMES 499812ada5bd kindest/node:v1.25.3 "/usr/local/bin/entr…" 9 hours ago Up 9 hours 127.0.0.1:37377->6443/tcp cluster2-control-plane 0b9d110e1a1f kindest/node:v1.25.3 "/usr/local/bin/entr…" 9 hours ago Up 9 hours 127.0.0.1:34780->6443/tcp cluster1-control-plane 0a327d4a5b41 kindest/node:v1.25.3 "/usr/local/bin/entr…" 9 hours ago Up 9 hours 127.0.0.1:44864->6443/tcp hub-control-planeUse
docker pauseto pause the cluster1.$ docker pause 0b9d110e1a1f 0b9d110e1a1f -
Wait for a few minutes, check the
ManagedClusterstatus, cluster1 available status should become “Unknown”.$ kubectl get managedcluster NAME HUB ACCEPTED MANAGED CLUSTER URLS JOINED AVAILABLE AGE cluster1 true https://cluster1-control-plane:6443 True Unknown 9h cluster2 true https://cluster2-control-plane:6443 True True 9hUse
clusteradmto check the placement of selected clusters.$ clusteradm get placements -otable NAME STATUS REASON SELETEDCLUSTERS guestbook-app-placement False Succeedconfigured [cluster2] -
Confirm the application is now deployed to cluster2.
$ kubectl -n argocd get app
NAME                     SYNC STATUS   HEALTH STATUS
cluster2-guestbook-app   Synced        Healthy
What happens behind the scene
Refer to Taints of ManagedClusters,
when pausing cluster1, the status of condition ManagedClusterConditionAvailable
becomes Unknown. The taint cluster.open-cluster-management.io/unreachable is automatically
added to cluster1, with the effect NoSelect and an empty value.
```shell
$ kubectl get managedcluster cluster1 -oyaml
apiVersion: cluster.open-cluster-management.io/v1
kind: ManagedCluster
metadata:
  name: cluster1
  labels:
    cluster.open-cluster-management.io/clusterset: default
spec:
...
  taints:
  - effect: NoSelect
    key: cluster.open-cluster-management.io/unreachable
    timeAdded: "2023-11-13T16:26:16Z"
status:
...
```
Since the Placement guestbook-app-placement doesn’t define any toleration to match the taint,
cluster1 will be filtered from the decision. In the demo environment, once cluster1 is down,
placement will select one cluster from the rest clusters, which is cluster2.
Taints of ManagedClusters
also describes other scenarios where taints are automatically added. In some scenarios you may not want to
migrate the application immediately when a taint is added, with placement TolerationSeconds defined, it could tolerates the taint
for a period of time before repelling it. In above example, the TolerationSeconds could be defined as below:
apiVersion: cluster.open-cluster-management.io/v1beta1
kind: Placement
metadata:
  name: guestbook-app-placement
  namespace: argocd
spec:
  numberOfClusters: 1
  tolerations:
    - key: cluster.open-cluster-management.io/unreachable
      operator: Exists
      tolerationSeconds: 300
tolerationSeconds is 300 means that the application will be migrated to cluster2 after 5 minutes when cluster1 is down.
Migrate application to another cluster manually for cluster maintenance
The above example shows how a taint is automatically added to a cluster and how the application is migrated to another cluster. You can also choose to add a taint manually and repel the application to other clusters.
In the following example, suppose you are going to maintain cluster2, and want to repel the application to cluster1.
-
Before starting, let’s first restart the paused cluster1.
Use
docker restartto restart the cluster1.$ docker restart 0b9d110e1a1f 0b9d110e1a1fWait for a few minutes, check the
ManagedClusterstatus, cluster1 available status should become “True”.$ kubectl get managedcluster NAME HUB ACCEPTED MANAGED CLUSTER URLS JOINED AVAILABLE AGE cluster1 true https://cluster1-control-plane:6443 True True 9h cluster2 true https://cluster2-control-plane:6443 True True 9h -
Add the taint
maintenanceto cluster2 manually.$ kubectl patch managedcluster cluster2 -p '{"spec":{"taints":[{"effect":"NoSelect","key":"maintenance"}]}}' --type=merge managedcluster.cluster.open-cluster-management.io/cluster2 patched -
Use
clusteradmto check the placement selected clusters.$ clusteradm get placements -otable NAME STATUS REASON SELETEDCLUSTERS guestbook-app-placement False Succeedconfigured [cluster1] -
Confirm the application is now deployed to cluster1.
$ kubectl -n argocd get app
NAME                     SYNC STATUS   HEALTH STATUS
cluster1-guestbook-app   Synced        Healthy
Summary
In this article, we use the ArgoCD pull model in OCM as an example, showing you how to migrate the ArgoCD applications automatically or manually when the cluster is down or during the cluster maintenance time.
The concept of Taints and Tolerations can be used for any components that consume OCM Placement, such as add-ons and ManifestworkReplicaSet. If you have any questions, feel free to raise them in our slack channel.
9 - Pushing Kubernetes API requests to the managed clusters
By following the instructions in this document, an OCM hub admin will be able to “push” Kubernetes API requests to the managed clusters. The benefit of using this method for “pushing” requests in OCM is that we don’t need to explicitly configure any API endpoint for the managed clusters or provide any client credentials as preparation. We just need to enable/install the following OCM addons:
- Cluster-Proxy: Setting up the konnectivity tunnels between the hub cluster and the managed clusters so the hub cluster can connect/access the managed cluster from anywhere.
- Managed-ServiceAccount: Automating the lifecycle of the local service account in the managed clusters and projecting the tokens back to the hub cluster so that the Kubernetes API clients from the hub can make authenticated requests.
- Cluster-Gateway: An aggregated apiserver providing a “proxy” subresource which helps the hub admin to gracefully access the managed clusters by standard Kubernetes API calls (including long-running calls).
Prerequisite
You must meet the following prerequisites to install the managed service account:
- Ensure your
open-cluster-managementrelease is greater thanv0.5.0. - Ensure
kubectlis installed. - Ensure
helmis installed.
Installation
Adding helm chart repo
Making sure the following OCM addons are discovered by your helm environment:
$ helm repo add ocm https://open-cluster-management.io/helm-charts
$ helm repo update
$ helm search repo ocm
NAME                             	CHART VERSION	APP VERSION	DESCRIPTION
ocm/cluster-gateway-addon-manager	1.3.2       	1.0.0      	A Helm chart for Cluster-Gateway Addon-Manager
ocm/cluster-proxy                	0.2.0        	1.0.0      	A Helm chart for Cluster-Proxy OCM Addon
ocm/managed-serviceaccount       	0.2.0        	1.0.0      	A Helm chart for Managed ServiceAccount Addon
Install the OCM addons
By the following helm commands to install the addons:
$ helm -n open-cluster-management-addon install cluster-proxy ocm/cluster-proxy
$ helm -n open-cluster-management-addon install managed-serviceaccount ocm/managed-serviceaccount
$ helm -n open-cluster-management-addon install cluster-gateway ocm/cluster-gateway-addon-manager  \
    # Delegating for secret discovery to "managed-serviceaccount" addon.                           \
    # Skip the option for manual secret management.                                                \
    --set manualSecretManagement=false                                                             \
    # Enabling konnectivity tunnels via "cluster-proxy" addon.                                     \
    # Skip the option if the hub cluster and the managed clusters are already mutually accessible. \
    --set konnectivityEgress=true
Confirm addon installation
The commands above installs the addon manager into the hub cluster, and the
manager will creating ManagedClusterAddOn automatically into the cluster
namespaces representing the addon is plumbed into the managed cluster. In order
to check their status, run:
$ kubectl get managedclusteraddon -A
NAMESPACE   NAME                     AVAILABLE   DEGRADED   PROGRESSING
managed1    cluster-gateway          True
managed1    cluster-proxy            True
managed1    managed-serviceaccount   True
Furthermore, after the addons are all deployed successfully, the hub admin will
be able to see a new resource named ClusterGateway registered into the hub
cluster:
$ kubectl get clustergateway
NAME       PROVIDER   CREDENTIAL-TYPE       ENDPOINT-TYPE
managed1              ServiceAccountToken   ClusterProxy
Usage
Now the gateway is ready for proxying your requests to the managed clusters dynamically. The easiest way to verify if the proxying framework is working is to run the following command:
$ export CLUSTER_NAME=managed1 # Or any other valid managed cluster name
$ kubectl get --raw="/apis/cluster.core.oam.dev/v1alpha1/clustergateways/${CLUSTER_NAME}/proxy/healthz"
ok
Another nice feature is that you can also easily convert the kubeconfig of the hub cluster into a managed cluster’s kubeconfig by adding the api suffix to the cluster endpoint in your kubeconfig:
$ # Copy and edit your original hub kubeconfig into e.g. managed1.kubeconfig
apiVersion: v1
clusters:
...
---    server: https://x.x.x.x
+++    server: https://x.x.x.x/apis/cluster.core.oam.dev/v1alpha1/clustergateways/${CLUSTER_NAME}/proxy
Then we can access the managed cluster directly via kubectl with the tweaked kubeconfig:
$ KUBECONFIG=managed1.kubeconfig kubectl get ns
However upon your first-time installation, you may encounter the RBAC restriction message such as:
Error from server (Forbidden): namespaces is forbidden: User "system:serviceaccount:open-cluster-management-managed-serviceaccount:cluster-gateway" cannot list resource "namespaces" in API group "" at the cluster scope
That is because we haven’t set up proper RBAC permissions for the egress
service account managed by the ManagedServiceAccount yet. After granting
sufficient permissions for the service account in the managed clusters, you
will be able to freely operate the managed cluster from the hub without asking
for any credential or kubeconfig from the managed clusters. Note that the
service account is also periodically rotated by the addons so there’s no need
to worry in sustainable credential management.
Insight
Overall, the following picture of architecture reveals the internal technique of the request “pushing” framework in the OCM:
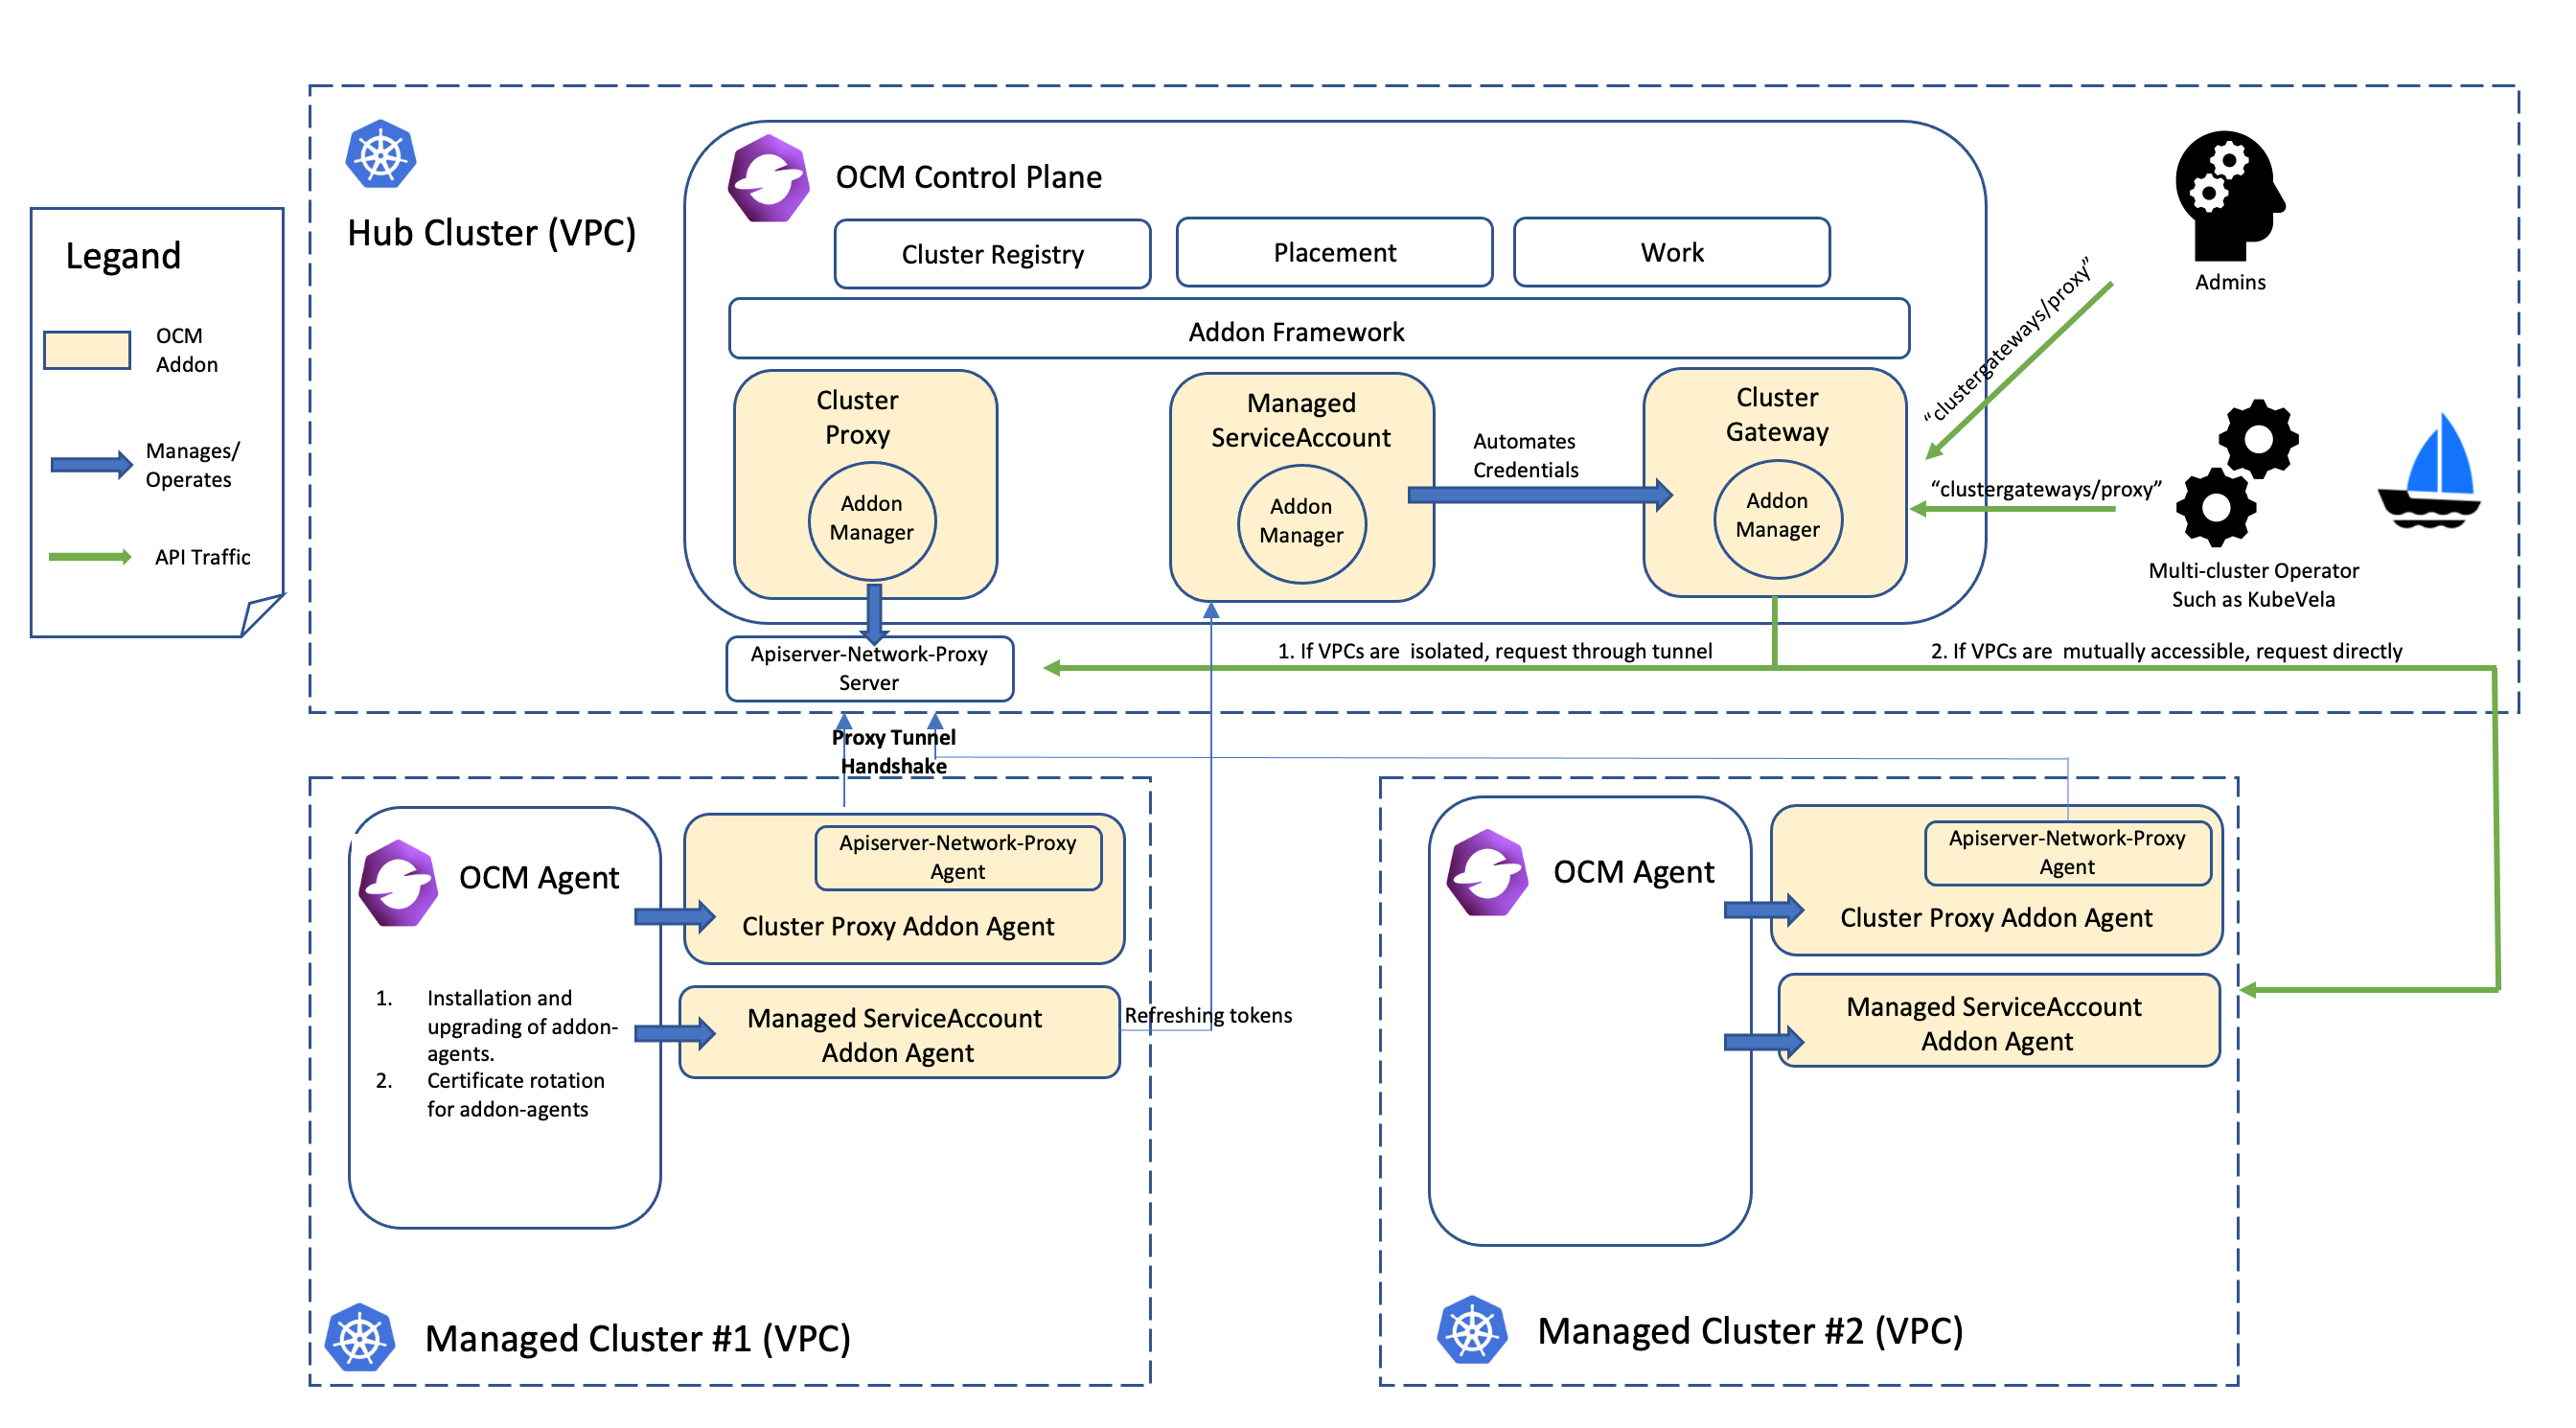
With the help of the framework, we can easily develop a web service or an operator that runs in the hub cluster and is able to access to the managed clusters through the gateway. Note that it’s generally not recommended to list-watch the managed clusters from the hub because it’s in a sense violating the original philosophy of “pull” or “hub-agent” architecture of OCM. In order to coordinate the hub cluster and the managed clusters in your custom system, consider build your own OCM addon based on the addon-framework which provides you utilities for further customization.
10 - Register a cluster to hub through proxy server
When registering a cluster to an Open Cluster Management (OCM) hub, there is a network requirement for the managed cluster. It must be able to reach the hub cluster. Sometimes the managed cluster cannot directly connect to the hub cluster. For example, the hub cluster is in a public cloud, and the managed cluster is in a private cloud environment behind firewalls. The communications out of the private cloud can only go through a HTTP or HTTPS proxy server.
In this scenario, you need to configure the proxy settings to allow the communications from the managed cluster to access the hub cluster through a forward proxy server.
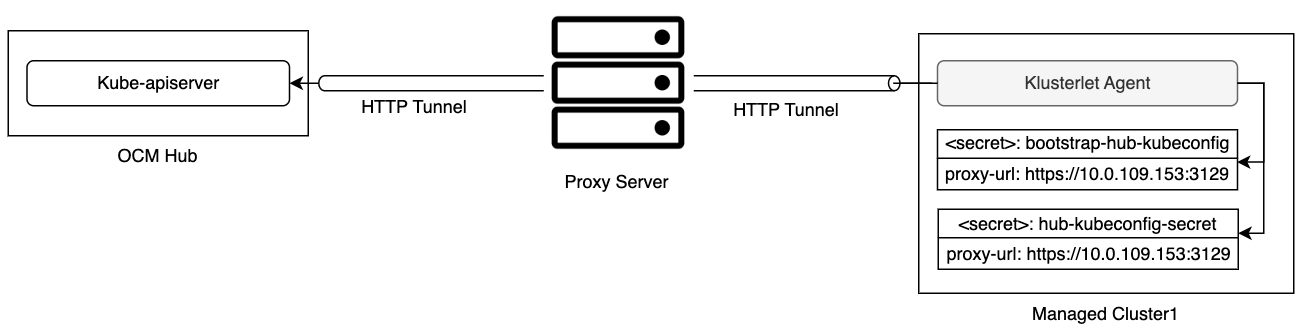
Klusterlet proxy settings
During the cluster registration, a bootstrap kubeconfig is required by the Klusterlet agent running on the managed cluster to connect to the hub cluster. When the agent accesses the hub cluster through a proxy server, the URL of the proxy server should be specified in cluster.proxy-url of the bootstrap kubeconfig. If a HTTPS proxy server is used, the proxy CA certificate should be appended to cluster.certificate-authority-data of the bootstrap kubeconfig as well.
apiVersion: v1
clusters:
  - cluster:
      certificate-authority-data: LS0tLS...LS0tCg==
      server: https://api.server-foundation-sno-x4lcs.dev04.red-chesterfield.com:6443
      proxy-url: https://10.0.109.153:3129
    name: default-cluster
contexts:
  - context:
      cluster: default-cluster
      namespace: default
      user: default-auth
    name: default-context
current-context: default-context
kind: Config
preferences: {}
users:
  - name: default-auth
    user:
      token: eyJh...8PwGo
Since the communication between the managed cluster and the hub cluster leverages mTLS, the SSL connection should not be terminated on the proxy server. So the proxy server needs to support HTTP tunneling (for example, HTTP CONNECT method), which will establish a tunnel between the managed cluster and the hub cluster and forward the traffic from the managed cluster through this tunnel.
Once the Klusterlet agent finishes the cluster registration, a secret hub-kubeconfig-secret is generated with a new kubeconfig. It has the similar proxy settings and the appropriate permissions. The Klusterlet agent then uses this kubeconfig to access the hub cluster.
You can find an example built with kind and clusteradm in Join hub through a forward proxy server.
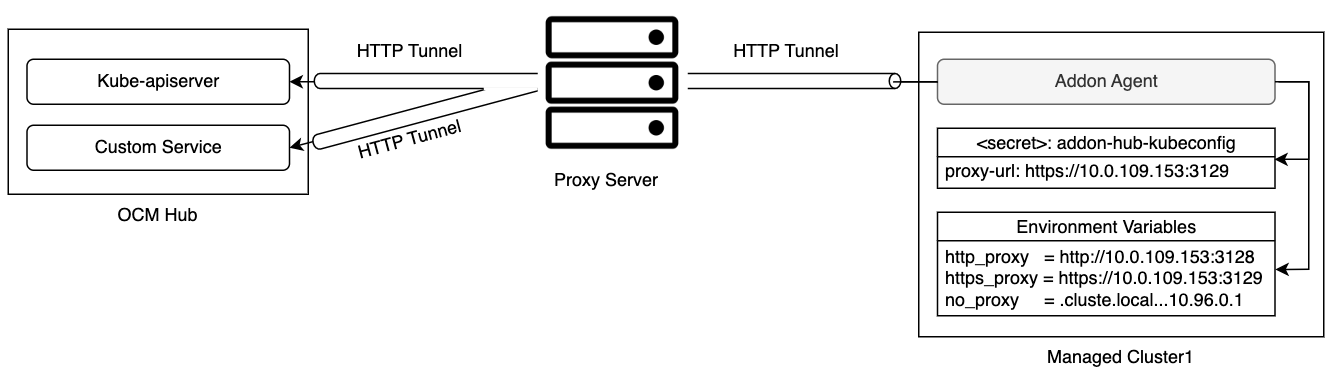
Add-on proxy settings
Typically the add-on agent running on the managed cluster also needs a kubeconfig to access the resources of the kube-apiserver on the hub cluster. The Klusterlet agent will generate this kubeconfig during the add-on registration. If the Klusterlet agent bootstraps with a proxy settings, the same settings will be put into the add-on kubeconfig as well. While agents of some add-ons may access services other than kube-apiserver on the hub cluster. For those add-ons, you may need to add additional configuration with proxy settings by creating a AddOnDeploymentConfig.
apiVersion: addon.open-cluster-management.io/v1alpha1
kind: AddOnDeploymentConfig
metadata:
  name: addon-proxy-settings
  namespace: cluster1
spec:
  proxyConfig:
    httpProxy: "http://10.0.109.153:3128"
    httpsProxy: "https://10.0.109.153:3129"
    noProxy: ".cluster.local,.svc,10.96.0.1"
    caBundle: LS0tLS...LS0tCg==
The IP address of the kube-apiserver on the managed cluster should be included in the field noProxy. To get the IP address, run following command on the managed cluster:
kubectl -n default describe svc kubernetes | grep IP:
You also need to associate the configuration to the ManagedClusterAddOn by adding an item to spec.configs.
apiVersion: addon.open-cluster-management.io/v1alpha1
kind: ManagedClusterAddOn
metadata:
  name: my-addon
  namespace: cluster1
spec:
  installNamespace: open-cluster-management-agent-addon
  configs:
  - group: addon.open-cluster-management.io
    resource: addondeploymentconfigs
    name: addon-proxy-settings
    namespace: cluster1
With the above configuration, the add-on manager of this add-on running on the hub cluster can fetch the proxy settings and then propagate it to the managed cluster side, for example as environment variables by using ManifestWork API. And then the add-on agent can initiate the communication to a particular service on the hub cluster with the proxy settings.
Once both the klusterlet agent and the add-on agents are able to communicate with the hub cluster through the forward proxy server, workloads, like applications, can be scheduled to the managed cluster.
11 - Register CAPI Cluster
Cluster API (CAPI) is a Kubernetes sub-project focused on providing declarative APIs and tooling to simplify provisioning, upgrading, and operating multiple Kubernetes clusters. This document provides a guideline on how to use the Cluster API project and the Open Cluster Management (OCM) project together.
Prerequisites
Initialize Cluster API Management Plane
Refer to the Cluster API (CAPI) official documentation to initialize the Cluster API management plane on the Hub cluster.
You can create CAPI clusters after the Cluster API management plane is installed on the Hub cluster.
Register CAPI Cluster via clusteradm
The clusteradm supports joining a CAPI cluster starting from version 0.14.0.
clusteradm join --hub-token <hub token> --hub-apiserver <hub apiserver> --cluster-name <cluster_name> --capi-import --capi-cluster-name <capi cluster name>
Auto Register CAPI Cluster
OCM supports registering CAPI clusters automatically starting from version 1.1.0.
- Enable feature gates for auto registration.
apiVersion: operator.open-cluster-management.io/v1
kind: ClusterManager
metadata:
  name: cluster-manager
spec:
  registrationConfiguration:
    featureGates:
    - feature: ClusterImporter
      mode: Enable
    - feature: ManagedClusterAutoApproval
      mode: Enable
    autoApproveUsers:
    - system:serviceaccount:multicluster-engine:agent-registration-bootstrap
- Create ManagedCluster
Create a ManagedCluster for the CAPI cluster.
Add the annotation cluster.x-k8s.io/cluster: <namespace>/<CAPI cluster name> if the ManagedCluster name is different from the CAPI cluster namespace. Otherwise, the cluster name should be the same as the CAPI cluster namespace.
apiVersion: cluster.open-cluster-management.io/v1
kind: ManagedCluster
metadata:
  name: <cluster name>
  annotations:
    cluster.x-k8s.io/cluster: <namespace>/<CAPI cluster name> # optional
spec:
  hubAcceptsClient: true
- Create cluster-import-config Secret
Create the cluster-import-config secret that includes the values.yaml of the klusterlet Helm chart in the cluster namespace.
apiVersion: v1
kind: Secret
metadata:
  name: cluster-import-config
  namespace: <cluster name>
type: Opaque
data:
  values.yaml: <klusterlet helm chart values.yaml | base64>
An example for the values.yaml, more fields description can be found in the helm chart values.yaml file.
affinity: {}
bootstrapHubKubeConfig: |
  apiVersion: v1
  clusters:
  - cluster:
      certificate-authority-data: hub cluster ca
      server: https://api.hubcluster.com:6443
    name: hub cluster name
  contexts:
  - context:
      cluster: hub cluster name
      namespace: default
      user: default-auth
    name: default-context
  current-context: default-context
  kind: Config
  ...
createNamespace: true
images:
  imageCredentials:
    createImageCredentials: true
    dockerConfigJson: |
      {
        "auths": {
          "quay.io": {
            "auth": "my auth",
            "email": "my email"
          }
        }
      }
  imagePullPolicy: IfNotPresent
  overrides:
    operatorImage: quay.io/stolostron/registration-operator:v1.1.0
    registrationImage: quay.io/stolostron/registration:v1.1.0
    workImage: quay.io/stolostron/work:v1.1.0
klusterlet:
  clusterName: managed cluster name
  mode: Singleton
  name: klusterlet
  namespace: open-cluster-management-agent
  nodePlacement:
    tolerations:
    - effect: NoSchedule
      key: node-role.kubernetes.io/infra
      operator: Exists
  registrationConfiguration:
    bootstrapKubeConfigs: {}
    registrationDriver:
      authType: csr
  workConfiguration: {}
podSecurityContext:
  runAsNonRoot: true
replicaCount: 1
resources:
  limits:
    memory: 2Gi
  requests:
    cpu: 50m
    memory: 64Mi
securityContext:
  allowPrivilegeEscalation: false
  capabilities:
    drop:
    - ALL
  privileged: false
  readOnlyRootFilesystem: true
  runAsNonRoot: true
tolerations:
- effect: NoSchedule
  key: node-role.kubernetes.io/infra
  operator: Exists
The ManagedCluster will be registered automatically after the cluster-import-config secret is created.
12 - Spread workload across failure domains using decision groups
This guide demonstrates how to distribute workloads across cluster topology domains (such as zones, regions, and cloud providers) for high availability and disaster tolerance using Placement’s decision strategy feature.
Overview
When deploying critical workloads across multiple clusters, you often need to spread them across different failure domains to ensure high availability and disaster recovery. Open Cluster Management’s Placement API provides decision groups to help you organize and distribute clusters based on topology.
Background
In a multi-cluster environment, clusters are typically distributed across hierarchical failure domains:
- Cloud Provider: AWS, Alibaba Cloud, Azure, GCP
- Region: Geographic regions (e.g., us-east, us-west, cn-hangzhou)
- Availability Zone: Zones within regions (e.g., us-east-1a, us-east-1b)
Spreading workloads across these domains provides high availability, disaster recovery, and better resource utilization across infrastructure.
Prerequisites
Before starting, we suggest you understand the content below:
Example Topology
Throughout this guide, we use the following example topology:
| Provider | Region | Zone |
|---|---|---|
| aws | us-east | us-east-1a |
| aws | us-east | us-east-1b |
| aws | us-west | us-west-1a |
Use Case 1: Spread Across Zones (Even Spread and Skew Control)
This use case shows how to spread workloads across availability zones. The same decision group configuration can be used for both even spread and skew control scenarios.
Scenario 1 - Even Spread: Deploy 4 clusters evenly across zones in the us-east region (2 from us-east-1a, 2 from us-east-1b).
Scenario 2 - Skew Control: Deploy up to 4 clusters across zones, but limit the maximum skew to 2. For example, if us-east-1a has 3 clusters and us-east-1b has only 1 cluster, you may select 2 from us-east-1a and 1 from us-east-1b (total 3 clusters) to keep skew ≤ 2 (skew = selected_clusters_in_current_topology - min(selected_clusters_in_a_topology)).
Solution: Using Decision Groups
apiVersion: cluster.open-cluster-management.io/v1beta1
kind: Placement
metadata:
  name: zone-spread-placement
  namespace: default
spec:
  numberOfClusters: 4
  predicates:
  - requiredClusterSelector:
      labelSelector:
        matchLabels:
          region: us-east
  decisionStrategy:
    groupStrategy:
      decisionGroups:
      - groupName: us-east-1a
        groupClusterSelector:
          labelSelector:
            matchLabels:
              zone: us-east-1a
      - groupName: us-east-1b
        groupClusterSelector:
          labelSelector:
            matchLabels:
              zone: us-east-1b
How it works
For Even Spread:
- The placement controller creates separate decision groups for each zone
- PlacementDecisions will have labels, for example
cluster.open-cluster-management.io/decision-group-name: us-east-1aindicating which decision group they belong to - The consumer (such as a workload deployer or operator) selects equal numbers of clusters from each decision group to achieve even distribution
For Skew Control:
- The placement controller organizes clusters into decision groups by zone
- The consumer reviews the available clusters in each decision group
- The consumer calculates the skew:
skew = max_count - min_count - The consumer decides whether to proceed based on the maxSkew tolerance and selects clusters to stay within the skew limit
Limitations
- You must explicitly define all decision groups (enumerate each zone)
- The consumer is responsible for selecting clusters from decision groups
- The placement controller doesn’t automatically enforce even distribution or skew constraints
- The consumer must calculate skew for skew control scenarios
Use Case 2: Hierarchical Spreading (Region → Zone)
Scenario: Deploy 4 clusters from aws provider, spreading first across regions, then across zones within each region.
Expected Distribution:
- us-east region: 2 clusters (1 from us-east-1a, 1 from us-east-1b)
- us-west region: 2 clusters (2 from us-west-1a)
Solution: Using Decision Groups
apiVersion: cluster.open-cluster-management.io/v1beta1
kind: Placement
metadata:
  name: hierarchical-spread-placement
  namespace: default
spec:
  numberOfClusters: 4
  predicates:
  - requiredClusterSelector:
      labelSelector:
        matchLabels:
          provider: aws
  decisionStrategy:
    groupStrategy:
      decisionGroups:
      - groupName: us-east-1a
        groupClusterSelector:
          labelSelector:
            matchLabels:
              region: us-east
              zone: us-east-1a
      - groupName: us-east-1b
        groupClusterSelector:
          labelSelector:
            matchLabels:
              region: us-east
              zone: us-east-1b
      - groupName: us-west-1a
        groupClusterSelector:
          labelSelector:
            matchLabels:
              region: us-west
              zone: us-west-1a
How it works
- The placement defines decision groups that combine both region and zone labels
- The placement controller organizes clusters into decision groups based on the combined region-zone labels
- The consumer selects clusters to achieve hierarchical distribution:
- First, distribute across regions (us-east and us-west)
- Within each region, distribute across zones
Limitations
- Must explicitly define all region-zone combinations
- Cannot define nested decision groups
- The consumer is responsible for orchestrating the hierarchical distribution
Summary
While OCM has a Spread Policy API designed to simplify topology-aware workload distribution, it is not currently implemented. Decision groups provide an easy and flexible way to achieve the same spreading behavior with explicit control over cluster selection and distribution.
If you have any questions or run into issues using decision groups for topology spreading, feel free to raise your question in the Open-cluster-management-io GitHub community or contact us using Slack.