Enhance the open-cluster-management core control plane with optional add-ons and integrations.
This is the multi-page printable view of this section. Click here to print.
Add-ons and Integrations
- 1: Policy
- 1.1: Policy framework
- 1.2: Policy API concepts
- 1.3: Configuration Policy
- 1.4: Open Policy Agent Gatekeeper
- 2: Application lifecycle management
- 3: Cluster proxy
- 4: Managed service account
- 5: Multicluster Control Plane
- 6: FleetConfig Controller
1 - Policy
The Policy Add-on enables auditing and enforcement of configuration across clusters managed by OCM, enhancing security, easing maintenance burdens, and increasing consistency across the clusters for your compliance and reliability requirements.
View the following sections to learn more about the Policy Add-on:
-
Policy framework
Learn about the architecture of the Policy Add-on that delivers policies defined on the hub cluster to the managed clusters and how to install and enable the add-on for your OCM clusters.
-
Policy API concepts
Learn about the APIs that the Policy Add-on uses and how the APIs are related to one another to deliver policies to the clusters managed by OCM.
-
Supported managed cluster policy engines
-
Configuration policy
The
ConfigurationPolicyis provided by OCM and defines Kubernetes manifests to compare with objects that currently exist on the cluster. The action that theConfigurationPolicywill take is determined by itscomplianceType. Compliance types includemusthave,mustnothave, andmustonlyhave.musthavemeans the object should have the listed keys and values as a subset of the larger object.mustnothavemeans an object matching the listed keys and values should not exist.mustonlyhaveensures objects only exist with the keys and values exactly as defined. -
Open Policy Agent Gatekeeper
Gatekeeper is a validating webhook with auditing capabilities that can enforce custom resource definition-based policies that are run with the Open Policy Agent (OPA). Gatekeeper
ConstraintTemplatesand constraints can be provided in an OCMPolicyto sync to managed clusters that have Gatekeeper installed on them.
-
1.1 - Policy framework
The policy framework provides governance capabilities to OCM managed Kubernetes clusters. Policies provide visibility and drive remediation for various security and configuration aspects to help IT administrators meet their requirements.
API Concepts
View the Policy API page for additional details about the Policy API managed by the Policy Framework components, including:
Architecture

The governance policy framework distributes policies to managed clusters and collects results to send back to the hub cluster.
Prerequisite
You must meet the following prerequisites to install the policy framework:
-
Ensure the
open-cluster-managementcluster manager is installed. See Start the control plane for more information. -
Ensure the
open-cluster-managementklusterlet is installed. See Register a cluster for more information. -
If you are using
PlacementRuleswith your policies, ensure theopen-cluster-managementapplication is installed . See Application management for more information. If you are using the defaultPlacementAPI, you can skip the Application management installation, but you do need to install thePlacementRuleCRD with this command:kubectl apply -f https://raw.githubusercontent.com/open-cluster-management-io/multicloud-operators-subscription/main/deploy/hub-common/apps.open-cluster-management.io_placementrules_crd.yaml
Install the governance-policy-framework hub components
Install via Clusteradm CLI
Ensure clusteradm CLI is installed and is at least v0.3.0. Download and extract the
clusteradm binary. For more details see the
clusteradm GitHub page.
-
Deploy the policy framework controllers to the hub cluster:
# The context name of the clusters in your kubeconfig # If the clusters are created by KinD, then the context name will the follow the pattern "kind-<cluster name>". export CTX_HUB_CLUSTER=<your hub cluster context> # export CTX_HUB_CLUSTER=kind-hub export CTX_MANAGED_CLUSTER=<your managed cluster context> # export CTX_MANAGED_CLUSTER=kind-cluster1 # Set the deployment namespace export HUB_NAMESPACE="open-cluster-management" # Deploy the policy framework hub controllers clusteradm install hub-addon --names governance-policy-framework --context ${CTX_HUB_CLUSTER} -
Ensure the pods are running on the hub with the following command:
$ kubectl get pods -n ${HUB_NAMESPACE} NAME READY STATUS RESTARTS AGE governance-policy-addon-controller-bc78cbcb4-529c2 1/1 Running 0 94s governance-policy-propagator-8c77f7f5f-kthvh 1/1 Running 0 94s- See more about the governance-policy-framework components:
Deploy the synchronization components to the managed cluster(s)
Deploy via Clusteradm CLI
-
To deploy the synchronization components to a self-managed hub cluster:
clusteradm addon enable --names governance-policy-framework --clusters <managed_hub_cluster_name> --annotate addon.open-cluster-management.io/on-multicluster-hub=true --context ${CTX_HUB_CLUSTER}To deploy the synchronization components to a managed cluster:
clusteradm addon enable --names governance-policy-framework --clusters <cluster_name> --context ${CTX_HUB_CLUSTER} -
Verify that the governance-policy-framework-addon controller pod is running on the managed cluster with the following command:
$ kubectl get pods -n open-cluster-management-agent-addon
NAME                                                     READY   STATUS    RESTARTS   AGE
governance-policy-framework-addon-57579b7c-652zj         1/1     Running   0          87s
What is next
Install the policy controllers to the managed clusters.
1.2 - Policy API concepts
Overview
The policy framework has the following API concepts:
- Policy Templates are the policies that perform a desired check or action on a managed cluster. For
example,
ConfigurationPolicy
objects are embedded in
Policyobjects under thepolicy-templatesarray. - A
Policyis a grouping mechanism for Policy Templates and is the smallest deployable unit on the hub cluster. Embedded Policy Templates are distributed to applicable managed clusters and acted upon by the appropriate policy controller. - A
PolicySetis a grouping mechanism ofPolicyobjects. Compliance of all groupedPolicyobjects is summarized in thePolicySet. APolicySetis a deployable unit and its distribution is controlled by a Placement. - A
PlacementBindingbinds a Placement to aPolicyorPolicySet.
Additional resources:
- View the following resources to learn more about the Policy Addon:
Policy
A Policy is a grouping mechanism for Policy Templates and is the smallest deployable unit on the hub cluster.
Embedded Policy Templates are distributed to applicable managed clusters and acted upon by the appropriate
policy controller. The compliance state and status of a Policy
represents all embedded Policy Templates in the Policy. The distribution of Policy objects is controlled by a
Placement.
View a simple example of a Policy that embeds a ConfigurationPolicy policy template to manage a namespace called
“prod”.
apiVersion: policy.open-cluster-management.io/v1
kind: Policy
metadata:
  name: policy-namespace
  namespace: policies
  annotations:
    policy.open-cluster-management.io/standards: NIST SP 800-53
    policy.open-cluster-management.io/categories: CM Configuration Management
    policy.open-cluster-management.io/controls: CM-2 Baseline Configuration
spec:
  remediationAction: enforce
  disabled: false
  policy-templates:
    - objectDefinition:
        apiVersion: policy.open-cluster-management.io/v1
        kind: ConfigurationPolicy
        metadata:
          name: policy-namespace-example
        spec:
          remediationAction: inform
          severity: low
          object-templates:
            - complianceType: musthave
              objectDefinition:
                kind: Namespace # must have namespace 'prod'
                apiVersion: v1
                metadata:
                  name: prod
The annotations are standard annotations for informational purposes and can be used by user interfaces, custom report
scripts, or components that integrate with OCM.
The optional spec.remediationAction field dictates whether the policy controller should inform or enforce when
violations are found and overrides the remediationAction field on each policy template. When set to inform, the
Policy will become noncompliant if the underlying policy templates detect that the desired state is not met. When set
to enforce, the policy controller applies the desired state when necessary and feasible.
The policy-templates array contains an array of Policy Templates. Here a
single ConfigurationPolicy called policy-namespace-example defines a Namespace manifest to compare with objects on
the cluster. It has the remediationAction set to inform but it is overridden by the optional global
spec.remediationAction. The severity is for informational purposes similar to the annotations.
Inside of the embedded ConfigurationPolicy, the object-templates section describes the prod Namespace object
that the ConfigurationPolicy applies to. The action that the ConfigurationPolicy will take is determined by the
complianceType. In this case, it is set to musthave which means the prod Namespace object will be created if it
doesn’t exist. Other compliance types include mustnothave and mustonlyhave. mustnothave would delete the prod
Namespace object. mustonlyhave would ensure the prod Namespace object only exists with the fields defined in the
ConfigurationPolicy. See the
ConfigurationPolicy page for more information
or see the templating in configuration policies topic for advanced templating
use cases with ConfigurationPolicy.
When the Policy is bound to a Placement using a PlacementBinding, the
Policy status will report on each cluster that matches the bound Placement:
status:
  compliant: Compliant
  placement:
    - placement: placement-hub-cluster
      placementBinding: binding-policy-namespace
  status:
    - clustername: local-cluster
      clusternamespace: local-cluster
      compliant: Compliant
To fully explore the Policy API, run the following command:
kubectl get crd policies.policy.open-cluster-management.io -o yaml
To fully explore the ConfigurationPolicy API, run the following command:
kubectl get crd configurationpolicies.policy.open-cluster-management.io -o yaml
PlacementBinding
A PlacementBinding binds a Placement to a Policy or PolicySet.
Below is an example of a PlacementBinding that binds the policy-namespace Policy to the placement-hub-cluster
Placement.
apiVersion: policy.open-cluster-management.io/v1
kind: PlacementBinding
metadata:
  name: binding-policy-namespace
  namespace: policies
placementRef:
  apiGroup: cluster.open-cluster-management.io
  kind: Placement
  name: placement-hub-cluster
subjects:
  - apiGroup: policy.open-cluster-management.io
    kind: Policy
    name: policy-namespace
Once the Policy is bound, it will be distributed to and acted upon by the managed clusters that match the Placement.
PolicySet
A PolicySet is a grouping mechanism of Policy objects. Compliance of all grouped Policy objects is
summarized in the PolicySet. A PolicySet is a deployable unit and its distribution is controlled by a
Placement when bound through a PlacementBinding.
This enables a workflow where subject matter experts write Policy objects and then an IT administrator creates a
PolicySet that groups the previously written Policy objects and binds the PolicySet to a Placement that deploys
the PolicySet.
An example of a PolicySet is shown below.
apiVersion: policy.open-cluster-management.io/v1beta1
kind: PolicySet
metadata:
  name: ocm-hardening
  namespace: policies
spec:
  description: Apply standard best practices for hardening your Open Cluster Management installation.
  policies:
    - policy-check-backups
    - policy-managedclusteraddon-available
    - policy-subscriptions
Managed cluster policy controllers
The Policy on the hub delivers the policies defined in spec.policy-templates to the managed clusters via
the policy framework controllers. Once on the managed cluster, these Policy Templates are acted upon by the associated
controller on the managed cluster. The policy framework supports delivering the Policy Template kinds listed here:
-
Configuration policy
The
ConfigurationPolicyis provided by OCM and defines Kubernetes manifests to compare with objects that currently exist on the cluster. The action that theConfigurationPolicywill take is determined by itscomplianceType. Compliance types includemusthave,mustnothave, andmustonlyhave.musthavemeans the object should have the listed keys and values as a subset of the larger object.mustnothavemeans an object matching the listed keys and values should not exist.mustonlyhaveensures objects only exist with the keys and values exactly as defined. See the page on Configuration Policy for more information. -
Open Policy Agent Gatekeeper
Gatekeeper is a validating webhook with auditing capabilities that can enforce custom resource definition-based policies that are run with the Open Policy Agent (OPA). Gatekeeper
ConstraintTemplatesand constraints can be provided in an OCMPolicyto sync to managed clusters that have Gatekeeper installed on them. See the page on Gatekeeper integration for more information.
Templating in configuration policies
Configuration policies support the inclusion of Golang text templates in the object definitions. These templates are resolved at runtime either on the hub cluster or the target managed cluster using configurations related to that cluster. This gives you the ability to define configuration policies with dynamic content and to inform or enforce Kubernetes resources that are customized to the target cluster.
The template syntax must follow the Golang template language specification, and the resource definition generated from the resolved template must be a valid YAML. (See the Golang documentation about package templates for more information.) Any errors in template validation appear as policy violations. When you use a custom template function, the values are replaced at runtime.
Template functions, such as resource-specific and generic lookup template functions, are available for referencing
Kubernetes resources on the hub cluster (using the {{hub ... hub}} delimiters), or managed cluster (using the
{{ ... }} delimiters). See the Hub cluster templates section for more details. The
resource-specific functions are used for convenience and makes content of the resources more accessible. If you use the
generic function, lookup, which is more advanced, it is best to be familiar with the YAML structure of the resource
that is being looked up. In addition to these functions, utility functions like base64encode, base64decode,
indent, autoindent, toInt, and toBool are also available.
To conform templates with YAML syntax, templates must be set in the policy resource as strings using quotes or a block
character (| or >). This causes the resolved template value to also be a string. To override this, consider using
toInt or toBool as the final function in the template to initiate further processing that forces the value to be
interpreted as an integer or boolean respectively.
To bypass template processing you can either:
- Override a single template by wrapping the template in additional braces. For example, the template
{{ template content }}would become{{ '{{ template content }}' }}. - Override all templates in a
ConfigurationPolicyby adding thepolicy.open-cluster-management.io/disable-templates: "true"annotation in theConfigurationPolicysection of yourPolicy. Template processing will be bypassed for thatConfigurationPolicy.
Hub cluster templating in configuration policies
Hub cluster templates are used to define configuration policies that are dynamically customized to the target cluster. This reduces the need to create separate policies for each target cluster or hardcode configuration values in the policy definitions.
Hub cluster templates are based on Golang text template specifications, and the {{hub … hub}} delimiter indicates a
hub cluster template in a configuration policy.
A configuration policy definition can contain both hub cluster and managed cluster templates. Hub cluster templates are processed first on the hub cluster, then the policy definition with resolved hub cluster templates is propagated to the target clusters. On the managed cluster, the Configuration Policy controller processes any managed cluster templates in the policy definition and then enforces or verifies the fully resolved object definition.
In OCM versions 0.9.x and older, policies are processed on the hub cluster only upon creation or after an update. Therefore, hub cluster templates are only resolved to the data in the referenced resources upon policy creation or update. Any changes to the referenced resources are not automatically synced to the policies.
A special annotation, policy.open-cluster-management.io/trigger-update can be used to indicate changes to the data
referenced by the templates. Any change to the special annotation value initiates template processing, and the latest
contents of the referenced resource are read and updated in the policy definition that is the propagator for processing
on managed clusters. A typical way to use this annotation is to increment the value by one each time.
Templating value encryption
The encryption algorithm uses AES-CBC with 256-bit keys. Each encryption key is unique per managed cluster and is automatically rotated every 30 days. This ensures that your decrypted value is never stored in the policy on the managed cluster.
To force an immediate encryption key rotation, delete the policy.open-cluster-management.io/last-rotated annotation on
the policy-encryption-key Secret in the managed cluster namespace on the hub cluster. Policies are then reprocessed to
use the new encryption key.
Templating functions
| Function | Description | Sample |
|---|---|---|
fromSecret |
Returns the value of the given data key in the secret. | PASSWORD: '{{ fromSecret "default" "localsecret" "PASSWORD" }}' |
fromConfigmap |
Returns the value of the given data key in the ConfigMap. | log-file: '{{ fromConfigMap "default" "logs-config" "log-file" }}' |
fromClusterClaim |
Returns the value of spec.value in the ClusterClaim resource. |
platform: '{{ fromClusterClaim "platform.open-cluster-management.io" }}' |
lookup |
Returns the Kubernetes resource as a JSON compatible map. Note that if the requested resource does not exist, an empty map is returned. | metrics-url: |http://{{ (lookup "v1" "Service" "default" "metrics").spec.clusterIP }}:8080 |
base64enc |
Returns a base64 encoded value of the input string. |
USER_NAME: '{{ fromConfigMap "default" "myconfigmap" "admin-user" | base64enc }}' |
base64dec |
Returns a base64 decoded value of the input string. |
app-name: |"{{ ( lookup "v1" "Secret" "testns" "mytestsecret") .data.appname ) | base64dec }}" |
indent |
Returns the input string indented by the given number of spaces. | Ca-cert: |{{ ( index ( lookup "v1" "Secret" "default" "mycert-tls" ).data "ca.pem" ) | base64dec | indent 4 }} |
autoindent |
Acts like the indent function but automatically determines the number of leading spaces needed based on the number of spaces before the template. |
Ca-cert: |{{ ( index ( lookup "v1" "Secret" "default" "mycert-tls" ).data "ca.pem" ) | base64dec | autoindent }} |
toInt |
Returns the integer value of the string and ensures that the value is interpreted as an integer in the YAML. | vlanid: |{{ (fromConfigMap "site-config" "site1" "vlan") | toInt }} |
toBool |
Returns the boolean value of the input string and ensures that the value is interpreted as a boolean in the YAML. | enabled: |{{ (fromConfigMap "site-config" "site1" "enabled") | toBool }} |
protect |
Encrypts the input string. It is decrypted when the policy is evaluated. On the replicated policy in the managed cluster namespace, the resulting value resembles the following: $ocm_encrypted:<encrypted-value> |
enabled: |{{hub "(lookup "route.openshift.io/v1" "Route" "openshift-authentication" "oauth-openshift").spec.host | protect hub}} |
Additionally, OCM supports the following template functions that are included from the sprig open source project:
catcontainsdefaultemptyfromJsonhasPrefixhasSuffixjoinlistlowermustFromJsonquotereplacesemversemverComparesplitsplitnternarytrimuntiluntilStepupper
See the Sprig documentation for more details.
1.3 - Configuration Policy
The ConfigurationPolicy defines Kubernetes manifests to compare with objects that currently exist on the cluster. The
Configuration policy controller is provided by Open Cluster Management and runs on managed clusters.
View the Policy API concepts page to learn more
about the ConfigurationPolicy API.
Prerequisites
You must meet the following prerequisites to install the configuration policy controller:
-
Ensure Golang is installed, if you are planning to install from the source.
-
Ensure the
open-cluster-managementpolicy framework is installed. See Policy Framework for more information.
Installing the configuration policy controller
Deploy via Clusteradm CLI
Ensure clusteradm CLI is installed and is newer than v0.3.0. Download and extract the
clusteradm binary. For more details see the
clusteradm GitHub page.
-
Deploy the configuration policy controller to the managed clusters (this command is the same for a self-managed hub):
# Deploy the configuration policy controller clusteradm addon enable addon --names config-policy-controller --clusters <cluster_name> --context ${CTX_HUB_CLUSTER} -
Ensure the pod is running on the managed cluster with the following command:
$ kubectl get pods -n open-cluster-management-agent-addon
NAME                                               READY   STATUS    RESTARTS   AGE
config-policy-controller-7f8fb64d8c-pmfx4          1/1     Running   0          44s
Sample configuration policy
After a successful deployment, test the policy framework and configuration policy controller with a sample policy.
For more information on how to use a ConfigurationPolicy, read the
Policy API concept section.
-
Run the following command to create a policy on the hub that uses
Placement:# Configure kubectl to point to the hub cluster kubectl config use-context ${CTX_HUB_CLUSTER} # Apply the example policy and placement kubectl apply -n default -f https://raw.githubusercontent.com/open-cluster-management-io/policy-collection/main/community/CM-Configuration-Management/policy-pod-placement.yaml -
Update the
Placementto distribute the policy to the managed cluster with the following command (thisclusterSelectorwill deploy the policy to all managed clusters):kubectl patch -n default placement.cluster.open-cluster-management.io/placement-policy-pod --type=merge -p "{\"spec\":{\"predicates\":[{\"requiredClusterSelector\":{\"labelSelector\":{\"matchExpressions\":[]}}}]}}" -
Make sure the
defaultnamespace has aManagedClusterSetBindingfor aManagedClusterSetwith at least one managed cluster resource in theManagedClusterSet. See Bind ManagedClusterSet to a namespace for more information on this. -
To confirm that the managed cluster is selected by the
Placement, run the following command:$ kubectl get -n default placementdecision.cluster.open-cluster-management.io/placement-policy-pod-decision-1 -o yaml ... status: decisions: - clusterName: <managed cluster name> reason: "" ... -
Enforce the policy to make the configuration policy automatically correct any misconfigurations on the managed cluster:
$ kubectl patch -n default policy.policy.open-cluster-management.io/policy-pod --type=merge -p "{\"spec\":{\"remediationAction\": \"enforce\"}}" policy.policy.open-cluster-management.io/policy-pod patched -
After a few seconds, your policy is propagated to the managed cluster. To confirm, run the following command:
$ kubectl config use-context ${CTX_MANAGED_CLUSTER} $ kubectl get policy -A NAMESPACE NAME REMEDIATION ACTION COMPLIANCE STATE AGE cluster1 default.policy-pod enforce Compliant 4m32s -
The missing pod is created by the policy on the managed cluster. To confirm, run the following command on the managed cluster:
$ kubectl get pod -n default
NAME               READY   STATUS    RESTARTS   AGE
sample-nginx-pod   1/1     Running   0          23s
1.4 - Open Policy Agent Gatekeeper
Gatekeeper is a validating webhook with auditing capabilities that can enforce custom resource definition-based policies that are run with the Open Policy Agent (OPA). Gatekeeper constraints can be used to evaluate Kubernetes resource compliance. You can leverage OPA as the policy engine, and use Rego as the policy language.
Installing Gatekeeper
See the Gatekeeper documentation to install the desired version of Gatekeeper to the managed cluster.
Sample Gatekeeper policy
Gatekeeper policies are written using constraint templates and constraints. View the following YAML examples that use
Gatekeeper constraints in an OCM Policy:
-
ConstraintTemplatesand constraints: Use the Gatekeeper integration feature by using OCM policies for multicluster distribution of Gatekeeper constraints and Gatekeeper audit results aggregation on the hub cluster. The following example defines a GatekeeperConstraintTemplateand constraint (K8sRequiredLabels) to ensure the “gatekeeper” label is set on all namespaces:apiVersion: policy.open-cluster-management.io/v1 kind: Policy metadata: name: require-gatekeeper-labels-on-ns spec: remediationAction: inform # (1) disabled: false policy-templates: - objectDefinition: apiVersion: templates.gatekeeper.sh/v1beta1 kind: ConstraintTemplate metadata: name: k8srequiredlabels spec: crd: spec: names: kind: K8sRequiredLabels validation: openAPIV3Schema: properties: labels: type: array items: string targets: - target: admission.k8s.gatekeeper.sh rego: | package k8srequiredlabels violation[{"msg": msg, "details": {"missing_labels": missing}}] { provided := {label | input.review.object.metadata.labels[label]} required := {label | label := input.parameters.labels[_]} missing := required - provided count(missing) > 0 msg := sprintf("you must provide labels: %v", [missing]) } - objectDefinition: apiVersion: constraints.gatekeeper.sh/v1beta1 kind: K8sRequiredLabels metadata: name: ns-must-have-gk spec: enforcementAction: dryrun match: kinds: - apiGroups: [""] kinds: ["Namespace"] parameters: labels: ["gatekeeper"]- Since the remediationAction is set to “inform”, the
enforcementActionfield of the Gatekeeper constraint is overridden to “warn”. This means that Gatekeeper detects and warns you about creating or updating a namespace that is missing the “gatekeeper” label. If the policyremediationActionis set to “enforce”, the Gatekeeper constraintenforcementActionfield is overridden to “deny”. In this context, this configuration prevents any user from creating or updating a namespace that is missing the gatekeeper label.
With the previous policy, you might receive the following policy status message:
warn - you must provide labels: {“gatekeeper”} (on Namespace default); warn - you must provide labels: {“gatekeeper”} (on Namespace gatekeeper-system).
Once a policy containing Gatekeeper constraints or
ConstraintTemplatesis deleted, the constraints andConstraintTemplatesare also deleted from the managed cluster.Notes:
- The Gatekeeper audit functionality runs every minute by default. Audit results are sent back to the hub cluster to be viewed in the OCM policy status of the managed cluster.
- Since the remediationAction is set to “inform”, the
-
Auditing Gatekeeper events: The following example uses an OCM configuration policy within an OCM policy to check for Kubernetes API requests denied by the Gatekeeper admission webhook:
apiVersion: policy.open-cluster-management.io/v1
kind: Policy
metadata:
  name: policy-gatekeeper-admission
spec:
  remediationAction: inform
  disabled: false
  policy-templates:
    - objectDefinition:
      apiVersion: policy.open-cluster-management.io/v1
      kind: ConfigurationPolicy
      metadata:
        name: policy-gatekeeper-admission
      spec:
        remediationAction: inform # will be overridden by remediationAction in parent policy
        severity: low
        object-templates:
          - complianceType: mustnothave
            objectDefinition:
              apiVersion: v1
              kind: Event
              metadata:
                namespace: gatekeeper-system # set it to the actual namespace where gatekeeper is running if different
                annotations:
                  constraint_action: deny
                  constraint_kind: K8sRequiredLabels
                  constraint_name: ns-must-have-gk
                  event_type: violation
2 - Application lifecycle management
After the setup of Open Cluster Management (OCM) hub and managed clusters, you could install the OCM built-in application management add-on. The OCM application management add-on leverages the Argo CD to provide declarative GitOps based application lifecycle management across multiple Kubernetes clusters.
Architecture
Traditional Argo CD resource delivery primarily uses a push model, where resources are deployed from a centralized Argo CD instance to remote or managed clusters.

With the OCM Argo CD add-ons, users can leverage a pull based resource delivery model, where managed clusters pull and apply application configurations. OCM provides two pull model options:
| Feature | Basic Pull Model (argocd) |
Advanced Pull Model (argocd-agent) |
|---|---|---|
| How it works | Wraps Applications in ManifestWork, distributed via OCM agent | Direct gRPC communication between hub principal and managed agents |
| Argo CD on hub | Full Argo CD instance required | Argo CD + Agent Principal |
| Argo CD on managed | Local Argo CD controller | Argo CD Agent + controller/repo-server |
| Status feedback | Basic status via ManifestWork | Full status sync via gRPC |
| Load Balancer | Not required | Required on hub cluster |
| Use Case | Simpler setup, moderate scale | Large fleets, full Argo CD UI integration |
For more details, visit the Argo CD Pull Integration GitHub page.
Prerequisites
You must meet the following prerequisites to install the application lifecycle management add-on:
-
Ensure kubectl is installed.
-
Ensure the OCM cluster manager is installed. See Start the control plane for more information.
-
Ensure the OCM klusterlet is installed. See Register a cluster for more information.
-
Ensure
clusteradmCLI tool is installed. Download and extract the clusteradm binary. For more details see the clusteradm GitHub page.
Basic Pull Model Installation
The basic pull model uses the standard Argo CD with a lightweight integration controller.
Install Argo CD on the Hub cluster
kubectl create namespace argocd
kubectl apply -n argocd -f https://raw.githubusercontent.com/argoproj/argo-cd/stable/manifests/install.yaml
See Argo CD website for more details.
Install the OCM Argo CD add-on
clusteradm install hub-addon --names argocd
If your hub controller starts successfully, you should see:
$ kubectl -n argocd get deploy argocd-pull-integration
NAME                      READY   UP-TO-DATE   AVAILABLE   AGE
argocd-pull-integration   1/1     1            1           55s
Enable the add-on for Managed clusters
clusteradm addon enable --names argocd --clusters cluster1,cluster2
Replace cluster1 and cluster2 with your Managed cluster names.
If your add-on starts successfully, you should see:
$ kubectl -n cluster1 get managedclusteraddon argocd
NAME     AVAILABLE   DEGRADED   PROGRESSING
argocd   True                   False
Deploy Applications
On the Hub cluster, apply the example guestbook-app-set manifest:
kubectl apply -f https://raw.githubusercontent.com/open-cluster-management-io/ocm/refs/heads/main/solutions/deploy-argocd-apps-pull/example/guestbook-app-set.yaml
Note: The Application template inside the ApplicationSet must contain the following content:
labels:
  apps.open-cluster-management.io/pull-to-ocm-managed-cluster: 'true'
annotations:
  argocd.argoproj.io/skip-reconcile: 'true'
  apps.open-cluster-management.io/ocm-managed-cluster: '{{name}}'
The label allows the pull model controller to select the Application for processing.
The skip-reconcile annotation is to prevent the Application from reconciling on the Hub cluster.
The ocm-managed-cluster annotation is for the ApplicationSet to generate multiple Application based on each cluster generator targets.
When this guestbook ApplicationSet reconciles, it will generate an Application for the registered Managed clusters. For example:
$ kubectl -n argocd get appset
NAME            AGE
guestbook-app   84s
$ kubectl -n argocd get app
NAME                     SYNC STATUS   HEALTH STATUS
cluster1-guestbook-app
cluster2-guestbook-app
On the Hub cluster, the pull controller will wrap the Application with a ManifestWork. For example:
$ kubectl -n cluster1 get manifestwork
NAME                          AGE
cluster1-guestbook-app-d0e5   2m41s
On a Managed cluster, you should see that the Application is pulled down successfully. For example:
$ kubectl -n argocd get app
NAME                     SYNC STATUS   HEALTH STATUS
cluster1-guestbook-app   Synced        Healthy
$ kubectl -n guestbook get deploy
NAME           READY   UP-TO-DATE   AVAILABLE   AGE
guestbook-ui   1/1     1            1           7m36s
On the Hub cluster, the status controller will sync the dormant Application with the ManifestWork status feedback. For example:
$ kubectl -n argocd get app
NAME                     SYNC STATUS   HEALTH STATUS
cluster1-guestbook-app   Synced        Healthy
cluster2-guestbook-app   Synced        Healthy
Advanced Pull Model Installation (Argo CD Agent)
The advanced pull model uses Argo CD Agent to offload compute-intensive parts of Argo CD (application controller, repository server) to managed clusters while maintaining centralized control and observability on the hub.
Prerequisites for Advanced Pull Model
- The Hub cluster must have a load balancer. For KinD clusters, you can use MetalLB. See the OCM solutions guide for setup instructions.
Install the OCM Argo CD Agent add-on
clusteradm install hub-addon --names argocd-agent --create-namespace
This will install all necessary components including:
- Argo CD Operator
- Argo CD Agent principal
- OCM integration controller
If your hub controller starts successfully, you should see:
$ kubectl -n argocd get pods
NAME                                                  READY   STATUS    RESTARTS   AGE
argocd-agent-principal-xxx                            1/1     Running   0          2m
argocd-pull-integration-controller-xxx                1/1     Running   0          2m
argocd-applicationset-controller-xxx                  1/1     Running   0          2m
...
Verify the add-on is enabled on Managed clusters
The Argo CD Agent add-on is automatically enabled for all managed clusters via the GitOpsCluster Placement.
$ kubectl get managedclusteraddon --all-namespaces
NAMESPACE   NAME                 AVAILABLE   DEGRADED   PROGRESSING
cluster1    argocd-agent-addon   True                   False
On the managed cluster, verify the agent is running:
$ kubectl -n argocd get pods
NAME                                  READY   STATUS    RESTARTS   AGE
argocd-agent-agent-xxx                1/1     Running   0          2m
argocd-application-controller-0       1/1     Running   0          2m
...
Deploy Applications
Create an AppProject on the hub cluster:
kubectl apply -f - <<EOF
apiVersion: argoproj.io/v1alpha1
kind: AppProject
metadata:
  name: default
  namespace: argocd
spec:
  clusterResourceWhitelist:
    - group: '*'
      kind: '*'
  destinations:
    - namespace: '*'
      server: '*'
  sourceNamespaces:
    - '*'
  sourceRepos:
    - '*'
EOF
First, create the target namespace on the managed cluster:
# kubectl config use-context <managed-cluster>
kubectl create namespace guestbook
Then create an Application on the hub cluster:
kubectl apply -f - <<EOF
apiVersion: argoproj.io/v1alpha1
kind: Application
metadata:
  name: guestbook
  namespace: cluster1  # replace with managed cluster name
spec:
  project: default
  source:
    repoURL: https://github.com/argoproj/argocd-example-apps
    targetRevision: HEAD
    path: guestbook
  destination:
    server: https://<principal-external-ip>:443?agentName=cluster1  # Replace with actual IP and cluster name
    namespace: guestbook
  syncPolicy:
    automated:
      prune: true
EOF
Note: Replace <principal-external-ip> with the external IP of the argocd-agent-principal LoadBalancer service:
kubectl -n argocd get svc argocd-agent-principal
Verify the application is deployed on the managed cluster:
$ kubectl -n argocd get app
NAME        SYNC STATUS   HEALTH STATUS
guestbook   Synced        Healthy
3 - Cluster proxy
Cluster proxy is an OCM addon providing L4 network connectivity from hub cluster to the managed clusters without any additional requirement to the managed cluster’s network infrastructure by leveraging the Kubernetes official SIG sub-project apiserver-network-proxy.
Background
The original architecture of OCM allows a cluster from anywhere to be registered and managed by OCM’s control plane (i.e. the hub cluster) as long as a klusterlet agent can reach hub cluster’s endpoint. So the minimal requirement for the managed cluster’s network infrastructure in OCM is “klusterlet -> hub” connectivity. However, there are still some cases where the components in the hub cluster hope to proactively dail/request the services in the managed clusters which will need the “hub -> klusterlet” connectivity on the other hand. In addition to that, the cases can be even more complex when each of the managed clusters are not in the same network.
Cluster proxy is aiming at seamlessly delivering the outbound L4 requests to the services in the managed cluster’s network without any assumptions upon the infrastructure as long as the clusters are successfully registered. Basically the connectivity provided by cluster proxy is working over the secured reserve proxy tunnels established by the apiserver-network-proxy.
About apiserver-network-proxy
Apiserver-network-proxy is the underlying technique of a Kubernetes' feature called konnectivity egress-selector which is majorly for setting up a TCP-level proxy for kube-apiserver to get access to the node/cluster network. Here are a few terms we need to clarify before we elaborate on how the cluster proxy resolve multi-cluster control plane network connectivity for us:
- Proxy Tunnel: A Grpc long connection that multiplexes and transmits TCP-level traffic from the proxy servers to the proxy agents. Note that there will be only one tunnel instance between each pair of server and agent.
- Proxy Server: An mTLS Grpc server opened for establishing tunnels which is the traffic ingress of proxy tunnel.
- Proxy Agent: A mTLS Grpc agent that maintains the tunnel between the server and is also the egress of the proxy tunnel.
- Konnectivity Client: The SDK library for talking through the tunnel.
Applicable to any Golang client of which the
Dialeris overridable. Note that for non-golang clients, the proxy server also supports HTTP-Connect based proxying as alternative.
Architecture
Cluster proxy runs inside OCM’s hub cluster as an addon manager which is developed based on the Addon-Framework. The addon manager of cluster proxy will be responsible for:
- Managing the installation of proxy servers in the hub cluster.
- Managing the installation of proxy agents in the managed cluster.
- Collecting healthiness and the other stats consistently in the hub cluster.
The following picture shows the overall architecture of cluster proxy:
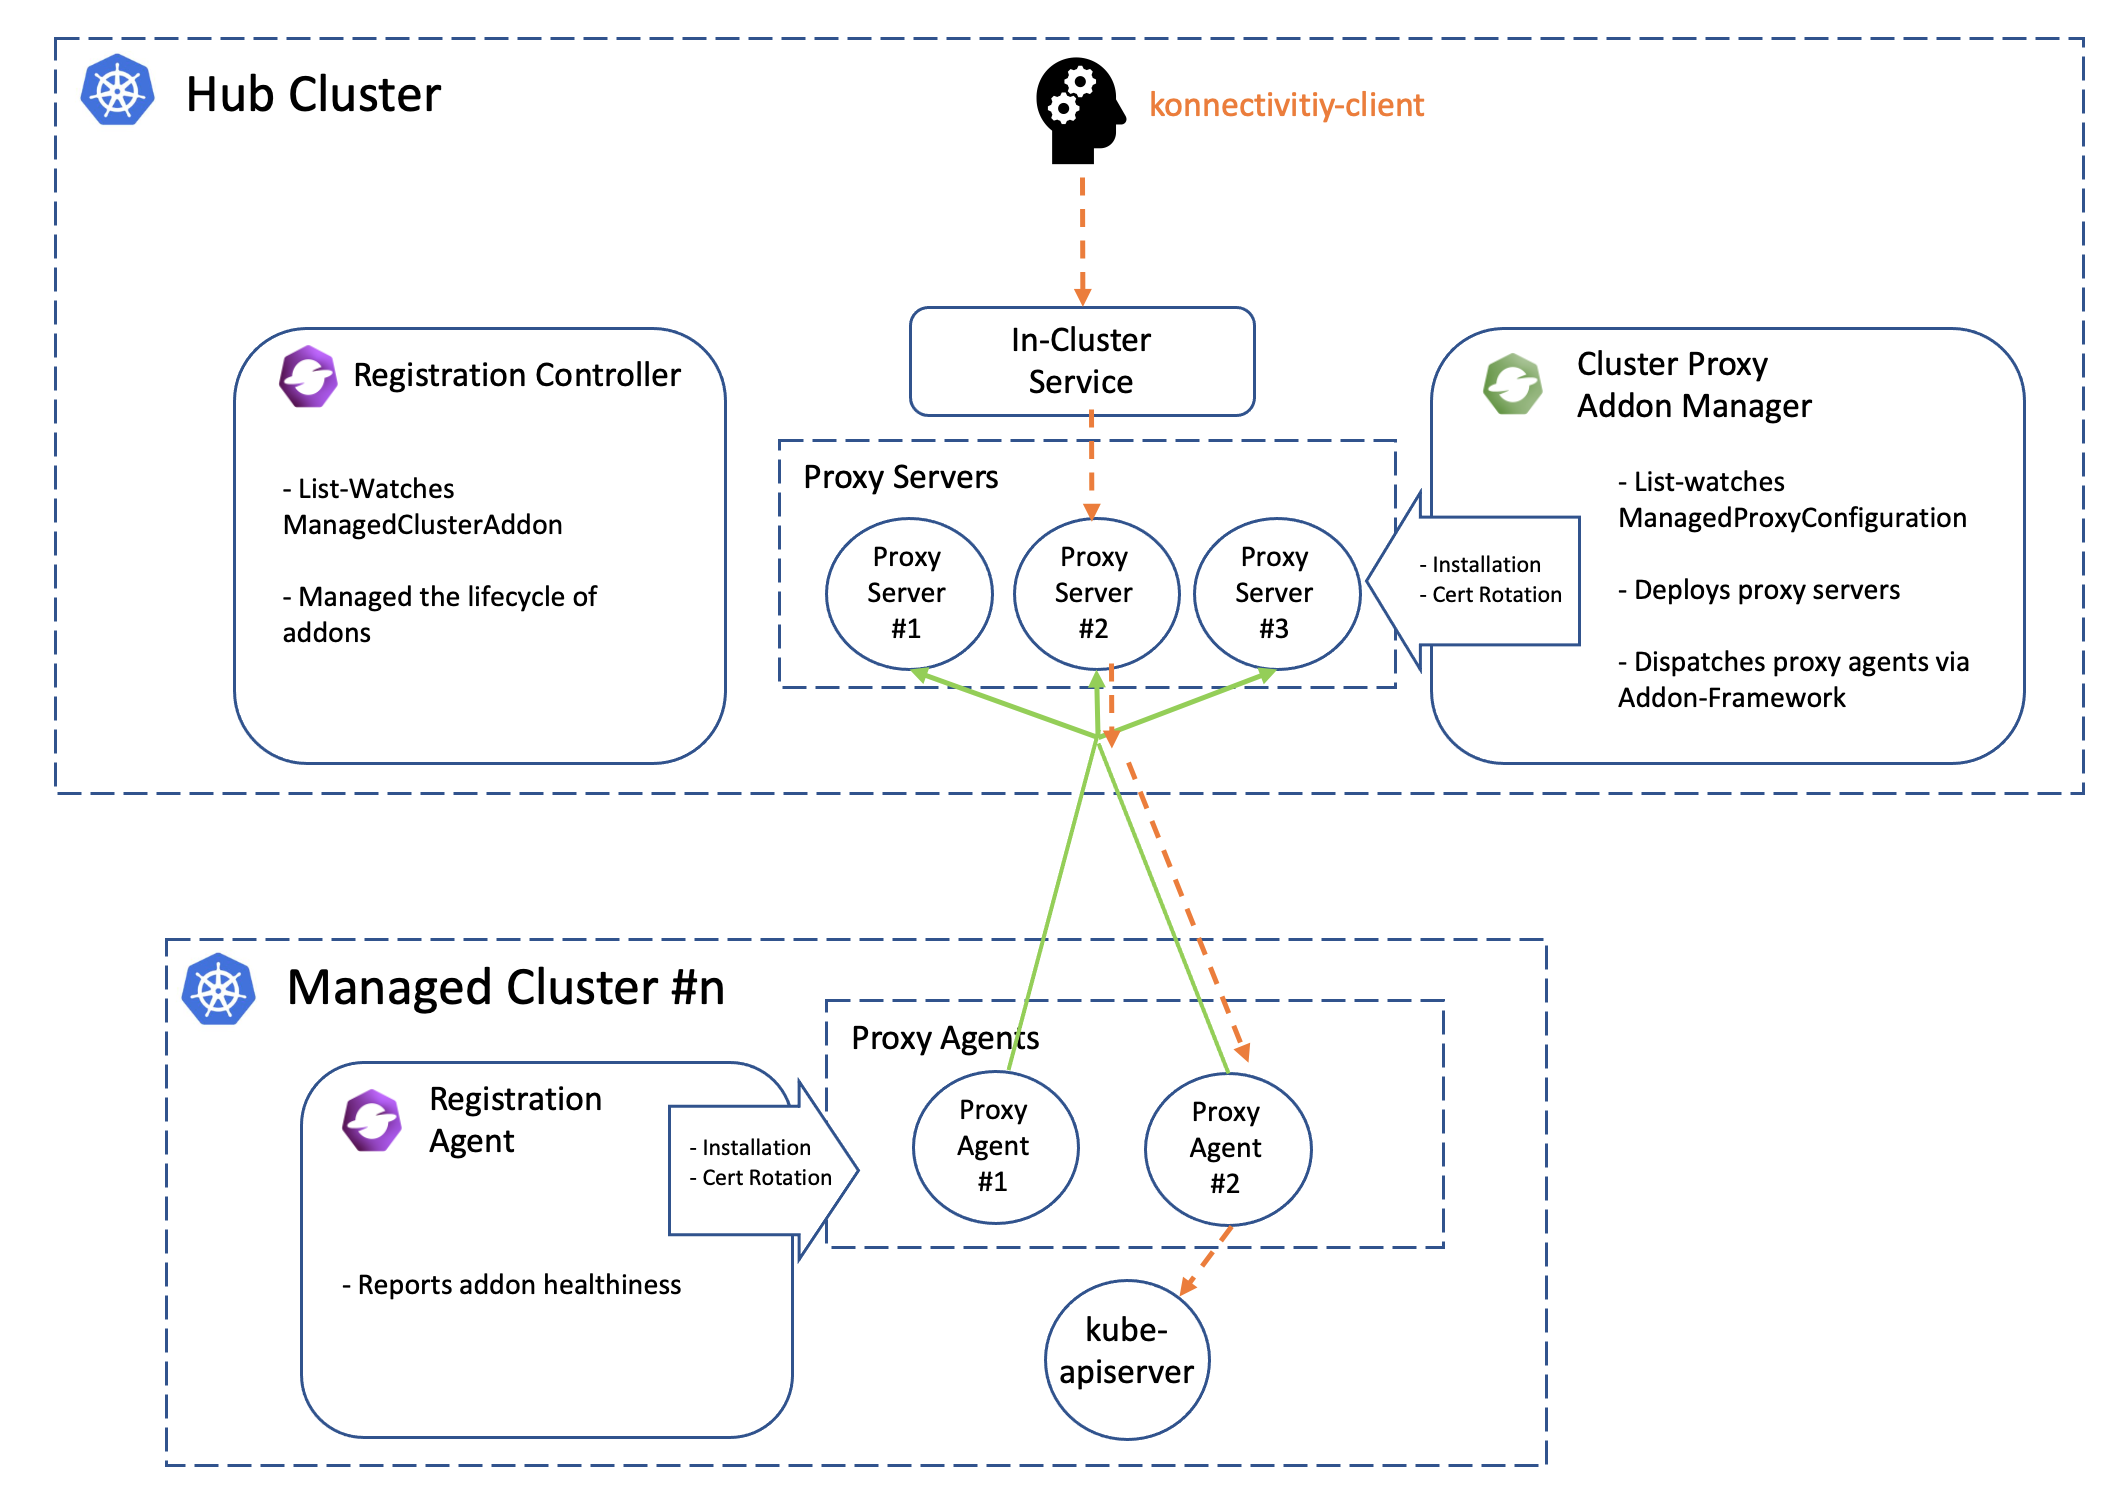
Note that the green lines in the picture above is the active proxy tunnels between proxy servers and agents, and HA setup is natively supported by apiserver-network-proxy both for the servers and the agents. The orange dash line started by the konnectivity client is the path of how the traffic flows from the hub cluster to arbitrary managed clusters. Meanwhile the core components including registration and work will help us manage the lifecycle of all the components distributed in the multiple managed clusters, so the hub admin won’t need to directly operate the managed clusters to install or configure the proxy agents no more.
Prerequisite
You must meet the following prerequisites to install the cluster-proxy:
-
Ensure your
open-cluster-managementrelease is greater thanv0.5.0. -
Ensure
kubectlis installed. -
Ensure
helmis installed.
Installation
To install the cluster proxy addon to the OCM control plane, run:
$ helm repo add ocm https://open-cluster-management.io/helm-charts
$ helm repo update
$ helm search repo ocm
NAME                              	CHART VERSION	APP VERSION	DESCRIPTION
ocm/cluster-proxy                 	v0.1.1       	1.0.0      	A Helm chart for Cluster-Proxy
...
Then run the following helm command to install the cluster-proxy addon:
$ helm install -n open-cluster-management-addon --create-namespace \
    cluster-proxy ocm/cluster-proxy
Note: If you’re using a non-Kind cluster, for example, an Openshift cluster,
you need to configure the ManagedProxyConfiguration by setting proxyServer.entrypointAddress
in the values.yaml to the address of the proxy server.
To do this at install time, you can run the following command:
$ helm install -n open-cluster-management-addon --create-namespace \
    cluster-proxy ocm/cluster-proxy \
    --set "proxyServer.entrypointAddress=<address of the proxy server>"
After the installation, you can check the deployment status of the cluster-proxy addon by running the following command:
$ kubectl -n open-cluster-management-addon get deploy
NAME                                   READY   UP-TO-DATE   AVAILABLE   AGE
cluster-proxy                          3/3     3            3           24h
cluster-proxy-addon-manager            1/1     1            1           24h
...
Then the addon manager of cluster-proxy will be created into the hub cluster
in the form of a deployment named cluster-proxy-addon-manager. As is also
shown above, the proxy servers will also be created as deployment resource
called cluster-proxy.
By default, the addon manager will be automatically discovering the addition or removal the managed clusters and installs the proxy agents into them on the fly. To check out the healthiness status of the proxy agents, we can run:
$  kubectl get managedclusteraddon -A
NAMESPACE     NAME                     AVAILABLE   DEGRADED   PROGRESSING
<cluster#1>   cluster-proxy            True
<cluster#2>   cluster-proxy            True
The proxy agent distributed in the managed cluster will be periodically renewing the lease lock of the addon instance.
Usage
Command-line tools
Using the clusteradm to check the status of the cluster-proxy addon:
$ clusteradm proxy health
CLUSTER NAME    INSTALLED    AVAILABLE    PROBED HEALTH    LATENCY
<cluster#1>     True         True         True             67.595144ms
<cluster#2>     True         True         True             85.418368ms
Example code
An example client in the cluster proxy repo shows us how to dynamically talk to the kube-apiserver of a managed cluster from the hub cluster by simply prescribing the name of the target cluster. Here’s also a TL;DR code snippet:
// 1. instantiate a dialing tunnel instance.
// NOTE: recommended to be a singleton in your golang program.
tunnel, err := konnectivity.CreateSingleUseGrpcTunnel(
    context.TODO(),
    <your proxy server endpoint>,
    grpc.WithTransportCredentials(grpccredentials.NewTLS(<your proxy server TLS config>)),
)
if err != nil {
    panic(err)
}
...
// 2. Overriding the Dialer to tunnel. Dialer is a common abstraction
// in Golang SDK.
cfg.Dial = tunnel.DialContext
Another example will be cluster-gateway which is an aggregated apiserver optionally working over cluster-proxy for routing traffic to the managed clusters dynamically in HTTPs protocol.
Note that by default the client credential for konnectivity client will be persisted as secrets resources under the namespace where the addon-manager is running. With that being said, to mount the secret to the systems in the other namespaces, the users are expected to copy the secret on their own manually.
More insights
Troubleshooting
The installation of proxy servers and agents are prescribed by the custom resource called “managedproxyconfiguration”. We can check it out by the following commands:
$ kubectl get managedproxyconfiguration cluster-proxy -o yaml
apiVersion: proxy.open-cluster-management.io/v1alpha1
kind: ManagedProxyConfiguration
metadata: ...
spec:
  proxyAgent:
    image: <expected image of the proxy agents>
    replicas: <expected replicas of proxy agents>
  proxyServer:
    entrypoint:
      loadBalancerService:
        name: proxy-agent-entrypoint
      type: LoadBalancerService # Or "Hostname" to set a fixed address
                                # for establishing proxy tunnels.
    image: <expected image of the proxy servers>
    inClusterServiceName: proxy-entrypoint
    namespace: <target namespace to install proxy server>
    replicas: <expected replicas of proxy servers>
  authentication: # Customize authentication between proxy server/agent
status:
  conditions: ...
Related materials
See the original design proposal for reference.
4 - Managed service account
Managed Service Account is an OCM addon enabling a hub cluster admin to manage service account across multiple clusters on ease. By controlling the creation and removal of the service account, the addon agent will project and rotate the corresponding token back to the hub cluster which is very useful for the Kube API client from the hub cluster to request against the managed clusters.
Background
Normally there are two major approaches for a Kube API client to authenticate and access a Kubernetes cluster:
- Valid X.509 certificate-key pair
- Service account bearer token
The service account token will be automatically persisted as a secret resource inside the hosting Kubernetes clusters upon creation, which is commonly used for the “in-cluster” client. However, in terms of OCM, the hub cluster is completely an external system to the managed clusters, so we will need a local agent in each managed cluster to reflect the tokens consistently to the hub cluster so that the Kube API client from hub cluster can “push” the requests directly against the managed cluster. By delegating the multi-cluster service account management to this addon, we can:
- Project the service account token from the managed clusters to the hub cluster with custom API audience.
- Rotate the service account tokens dynamically.
- Homogenize the client identities so that we can easily write a static RBAC policy that applies to multiple managed clusters.
Prerequisite
You must meet the following prerequisites to install the managed service account:
-
Ensure your
open-cluster-managementrelease is greater thanv0.5.0. -
Ensure
kubectlis installed. -
Ensure
helmis installed.
Installation
To install the managed service account addon to the OCM control plane, run:
$ helm repo add ocm https://open-cluster-management.io/helm-charts
$ helm repo update
$ helm search repo ocm
NAME                              	CHART VERSION	APP VERSION	DESCRIPTION
ocm/managed-serviceaccount          <...>           1.0.0       A Helm chart for Managed ServiceAccount Addon
...
Then run the following helm command to continue the installation:
$ helm install -n open-cluster-management-addon --create-namespace \
    managed-serviceaccount  ocm/managed-serviceaccount
$ kubectl -n open-cluster-management-addon get pod
NAME                                                    READY   STATUS    RESTARTS   AGE
managed-serviceaccount-addon-manager-5m9c95b7d8-xsb94   1/1     Running   1          4d4h
...
By default, the addon manager will be automatically discovering the addition or removal the managed clusters and installs the managed serviceaccount agents into them on the fly. To check out the healthiness status of the managed serviceaccount agents, we can run:
$ kubectl get managedclusteraddon -A
NAMESPACE         NAME                     AVAILABLE   DEGRADED   PROGRESSING
<cluster name>    managed-serviceaccount   True
Usage
To exercise the new ManagedServiceAccount API introduced by this addon, we
can start by applying the following sample resource:
$ export CLUSTER_NAME=<cluster name>
$ kubectl create -f - <<EOF
apiVersion: authentication.open-cluster-management.io/v1alpha1
kind: ManagedServiceAccount
metadata:
  name: my-sample
  namespace: ${CLUSTER_NAME}
spec:
  rotation: {}
EOF
Then the addon agent in each of the managed cluster is responsible for
executing and refreshing the status of the ManagedServiceAccount, e.g.:
$ kubectl describe ManagedServiceAccount -n cluster1
...
  status:
    conditions:
    - lastTransitionTime: "2021-12-09T09:08:15Z"
      message: ""
      reason: TokenReported
      status: "True"
      type: TokenReported
    - lastTransitionTime: "2021-12-09T09:08:15Z"
      message: ""
      reason: SecretCreated
      status: "True"
      type: SecretCreated
    expirationTimestamp: "2022-12-04T09:08:15Z"
    tokenSecretRef:
      lastRefreshTimestamp: "2021-12-09T09:08:15Z"
      name: my-sample
The service account will be created in the managed cluster (assume the name is cluster1):
$ kubectl get sa my-sample -n open-cluster-management-managed-serviceaccount --context kind-cluster1
NAME        SECRETS   AGE
my-sample   1         9m57s
The corresponding secret will also be created in the hub cluster, which is visible via:
$ kubectl -n <your cluster> get secret my-sample
NAME        TYPE     DATA   AGE
my-sample   Opaque   2      2m23s
Related materials
Repo: https://github.com/open-cluster-management-io/managed-serviceaccount
See the design proposal at: https://github.com/open-cluster-management-io/enhancements/tree/main/enhancements/sig-architecture/19-projected-serviceaccount-token
5 - Multicluster Control Plane
What is Multicluster Control Plane
The multicluster control plane is a lightweight Open Cluster Manager (OCM) control plane that is easy to install and has a small footprint. It can be running anywhere with or without a Kubernetes environment to serve the OCM control plane capabilities.
Why use Multicluster Control Plane
-
Some Kubernetes environments do not have CSR (e.g., EKS) so that the standard OCM control plane cannot be installed. The multicluster control plane can be able to install in these environments and expose the OCM control plane API via loadbalancer.
-
Some users may want to run multiple OCM control planes to isolate the data. The typical case is that the user wants to run one OCM control plane for production and another OCM control plane for development. The multicluster control plane is able to be installed in different namespaces in a single cluster. Each multicluster control plane is running independently and serving the OCM control plane capabilities.
-
Some users may want to run the OCM control plane without a Kubernetes environment. The multicluster control plane can run in a standalone mode, for example, running in a VM. Expose the control plane API to the outside so the managed clusters can register to it.
How to use Multicluster Control Plane
Start the standalone multicluster control plane
You need build multicluster-controlplane in your local host. Follow the below steps to build the binary and start the multicluster control plane.
git clone https://github.com/open-cluster-management-io/multicluster-controlplane.git
cd multicluster-controlplane
make run
Once the control plane is running, you can access the control plane by using kubectl --kubeconfig=./_output/controlplane/.ocm/cert/kube-aggregator.kubeconfig.
You can customize the control plane configurations by creating a config file and using the environment variable CONFIG_DIR to specify your config file directory. Please check the repository documentation for details.
Install via clusteradm
Install clusteradm CLI tool
It’s recommended to run the following command to download and install the
latest release of the clusteradm command-line tool:
curl -L https://raw.githubusercontent.com/open-cluster-management-io/clusteradm/main/install.sh | bash
Install multicluster control plane
You can use clusteradm init to deploy the multicluster control plane in your Kubernetes environment.
- Set the environment variable KUBECONFIG to your cluster kubeconfig path. For instance, create a new KinD cluster and deploy multicluster control plane in it.
export KUBECONFIG=/tmp/kind-controlplane.kubeconfig
kind create cluster --name multicluster-controlplane
export mc_cp_node_ip=$(kubectl get nodes -o=jsonpath='{.items[0].status.addresses[?(@.type=="InternalIP")].address}')
- Run following command to deploy a control plane
clusteradm init --singleton=true --set route.enabled=false --set nodeport.enabled=true --set nodeport.port=30443 --set apiserver.externalHostname=$mc_cp_node_ip --set apiserver.externalPort=30443 --singleton-name multicluster-controlplane
Refer to the repository documentation for how to customize the control plane configurations.
- Get the control plane kubeconfig by running the following command:
kubectl -n multicluster-controlplane get secrets multicluster-controlplane-kubeconfig -ojsonpath='{.data.kubeconfig}' | base64 -d > /tmp/multicluster-controlplane.kubeconfig
Join a cluster to the multicluster control plane
You can use clusteradm to join a cluster. For instance, take the KinD cluster as an example, run the following command to join the cluster to the control plane:
kind create cluster --name cluster1 --kubeconfig /tmp/kind-cluster1.kubeconfig
clusteradm --kubeconfig=/tmp/multicluster-controlplane.kubeconfig get token --use-bootstrap-token
clusteradm --singleton=true --kubeconfig /tmp/kind-cluster1.kubeconfig join --hub-token <controlplane token> --hub-apiserver https://$mc_cp_node_ip:30443/ --cluster-name cluster1
clusteradm --kubeconfig=/tmp/multicluster-controlplane.kubeconfig accept --clusters cluster1
Verify the cluster join
Run this command to verify the cluster join:
kubectl --kubeconfig=/tmp/multicluster-controlplane.kubeconfig get managedcluster
NAME       HUB ACCEPTED   MANAGED CLUSTER URLS                  JOINED   AVAILABLE   AGE
cluster1   true           https://cluster1-control-plane:6443   True     True        5m25s
You should see the managedcluster joins to the multicluster control plane. Congratulations!
6 - FleetConfig Controller
What is the FleetConfig Controller
The (https://github.com/open-cluster-management-io/lab/tree/main/fleetconfig-controller) introduces 2 new custom resources to the OCM ecosystem: Hub and Spoke . It reconciles Hub and Spoke resources to declaratively manage the lifecycle of Open Cluster Management (OCM) multi-clusters.
The fleetconfig-controller will initialize an OCM hub and one or more spoke clusters; add, remove, and upgrade clustermanagers and klusterlets when their bundle versions change, manage their feature gates, and uninstall all OCM components properly whenever a Hub or Spoke is deleted.
The controller is a lightweight wrapper around clusteradm. Anything you can accomplish imperatively via a series of clusteradm commands can now be accomplished declaratively using the fleetconfig-controller.
fleetconfig-controller is built as an OCM AddOn, and will install an agent in each spoke cluster to manage Day 2 operations. AddOn mode can be optionally disabled if required.
Quick Start
Prerequisites
- Helm v3.17+
Installation
The controller is installed via Helm.
helm repo add ocm https://open-cluster-management.io/helm-charts
helm repo update ocm
helm install fleetconfig-controller ocm/fleetconfig-controller -n fleetconfig-system --create-namespace
By default the Helm chart will also produce a Hub and 1 Spoke (hub-as-spoke) to orchestrate, however that behaviour can be disabled. Refer to the chart README for full documentation.
Support Matrix
Support for orchestration of OCM multi-clusters varies based on the Kubernetes distribution and/or cloud provider.
| Kubernetes Distribution | Support Level |
|---|---|
| Vanilla Kubernetes | ✅ Fully Supported |
| Amazon EKS | ✅ Fully Supported |
| Google GKE | ✅ Fully Supported |
| Azure AKS | 🚧 On Roadmap |