A few general guide about operating the open-cluster-management’s control plane and the managed clusters.
This is the multi-page printable view of this section. Click here to print.
Administration
- 1: Monitoring OCM using OpenTelemetry Collector Addon and Prometheus-Operator
- 2: Upgrading your OCM environment
- 3: Feature Gates
1 - Monitoring OCM using OpenTelemetry Collector Addon and Prometheus-Operator
In this page, we provide a way to monitor your OCM environment using OpenTelemetry Collector Addon and Prometheus-Operator.
Overview
The OpenTelemetry Collector Addon is a pluggable addon for Open Cluster Management (OCM) that automates the deployment and management of OpenTelemetry collector on managed clusters. Built on the addon-framework, it provides observability and metrics collection capabilities across your multi-cluster environment.
┌─────────────────┐    ┌──────────────────┐    ┌──────────────────┐
│   Hub Cluster   │    │ Managed Cluster  │    │ Managed Cluster  │
│                 │    │                  │    │                  │
│ ┌─────────────┐ │    │ ┌──────────────┐ │    │ ┌──────────────┐ │
│ │ Prometheus  │ │◄───┤ │ OTEL         │ │    │ │ OTEL         │ │
│ │ (Remote     │ │    │ │ Collector    │ │    │ │ Collector    │ │
│ │ Write)      │ │    │ │              │ │    │ │              │ │
│ └─────────────┘ │    │ └──────────────┘ │    │ └──────────────┘ │
│                 │    │        │         │    │        │         │
│ ┌─────────────┐ │    │ ┌──────▼──────┐  │    │ ┌──────▼──────┐  │
│ │ OTEL Addon  │ │    │ │ Node Metrics│  │    │ │ Node Metrics│  │
│ │ Manager     │ │    │ │ cAdvisor    │  │    │ │ cAdvisor    │  │
│ └─────────────┘ │    │ └─────────────┘  │    │ └─────────────┘  │
└─────────────────┘    └──────────────────┘    └──────────────────┘
Before you get started
- You must have an OCM environment set up. You can also follow our recommended quick start guide to set up a playground OCM environment.
- You must have Helm 3.x installed.
- You have kubectl configured to access your hub cluster.
And then install the OpenTelemetry addon with automatic Prometheus stack and certificate generation:
# Clone the repository
git clone https://github.com/open-cluster-management-io/addon-contrib.git
cd addon-contrib/open-telemetry-addon

# Install everything (certificates, prometheus, addon)
oc config use-context kind-hub # run it in hub cluster
make install-all
Refer to the OpenTelemetry Collector Addon README for more configuration options and verification steps.
Monitoring the control-plane resource usage
You can use kubectl proxy to proxy the prometheus service to your localhost:
kubectl --namespace monitoring port-forward svc/prometheus-stack-kube-prom-prometheus 9090
Then, open your browser and navigate to https://localhost:9090 to access the Prometheus UI.
The following queries are to monitor the control-plane pods’ cpu usage, memory usage and apirequestcount:
rate(container_cpu_usage_seconds_total{namespace=~"open-cluster-management.*"}[3m])
container_memory_working_set_bytes{namespace=~"open-cluster-management.*"}
rate(apiserver_request_total{resource=~"managedclusters|managedclusteraddons|managedclustersetbindings|managedclustersets|addonplacementscores|placementdecisions|placements|manifestworks|manifestworkreplicasets"}[1m])
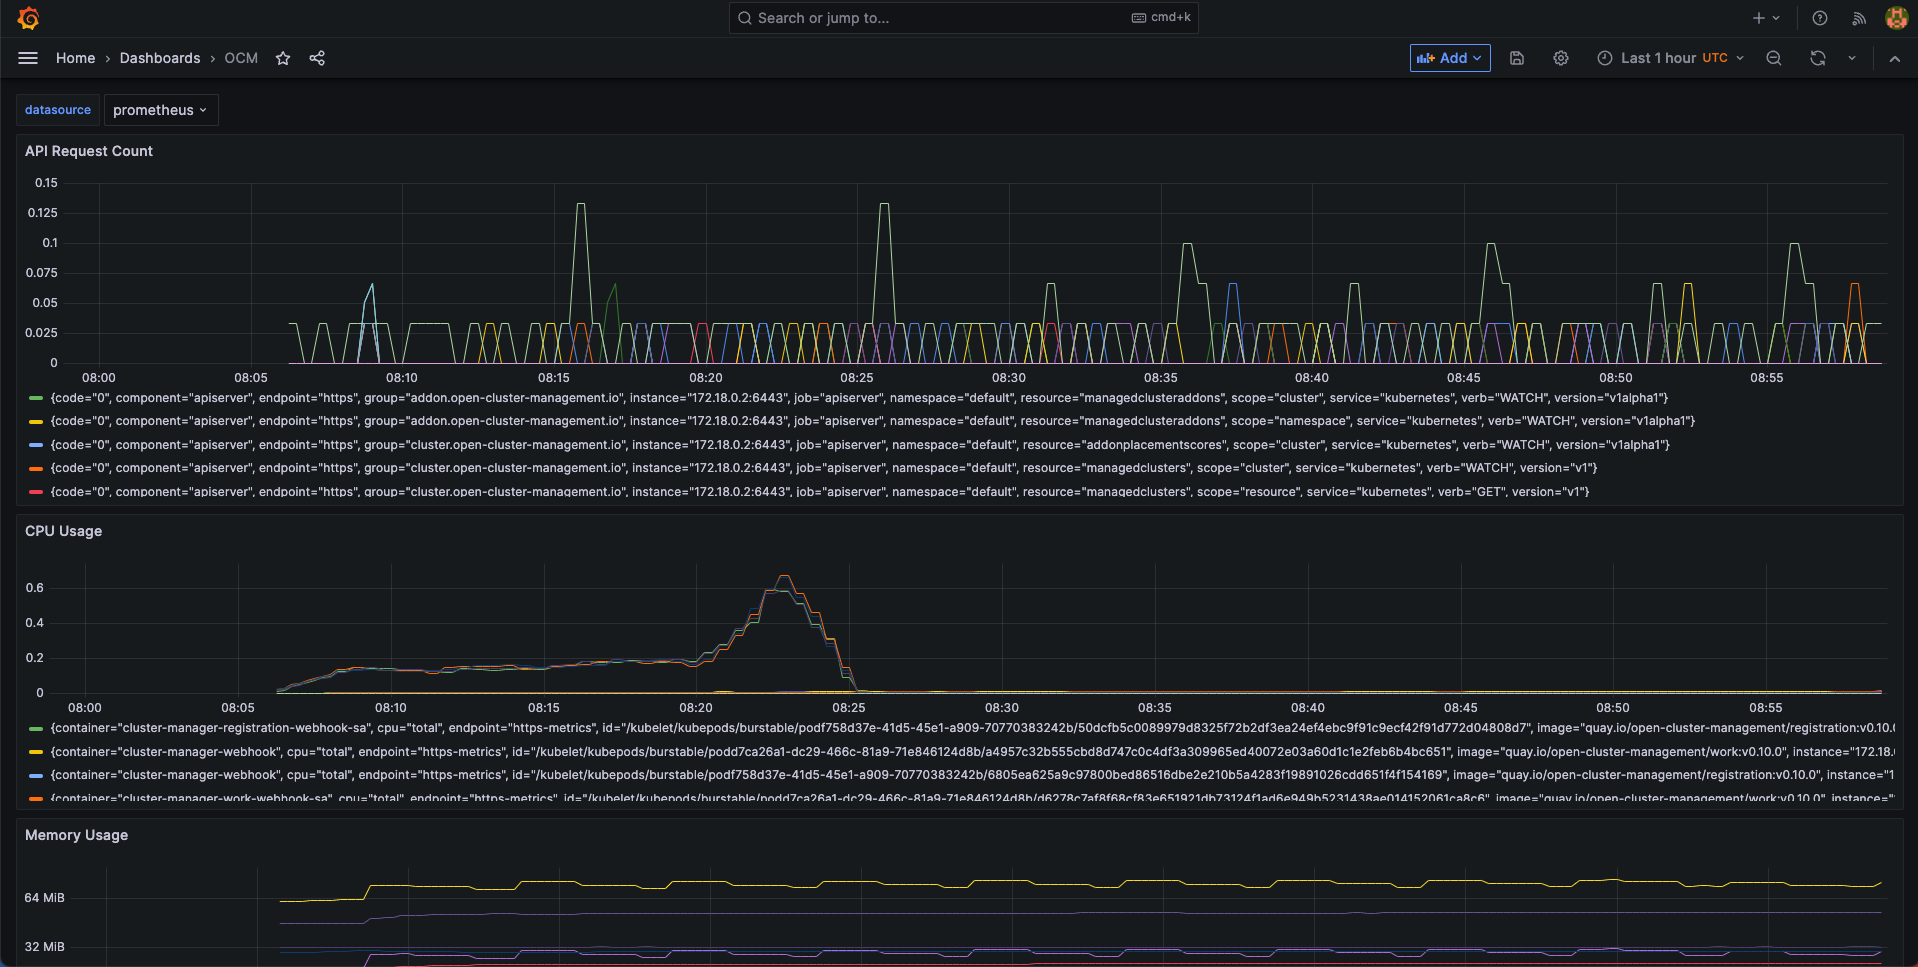
Visualized with Grafana
We provide an initial grafana dashboard for you to visualize the metrics. But you can also customize your own dashboard.
First, use the following command to proxy grafana service:
kubectl --namespace monitoring port-forward svc/prometheus-stack-grafana 80
Next, open the grafana UI in your browser on localhost:80. Get Grafana ‘admin’ user password by running:
kubectl --namespace monitoring get secrets prometheus-stack-grafana -o jsonpath="{.data.admin-password}" | base64 -d ; echo
Click the “Import Dashboard” and run the following command to copy a sample dashboard and paste it to the grafana:
curl https://raw.githubusercontent.com/open-cluster-management-io/open-cluster-management-io.github.io/main/content/en/docs/getting-started/administration/assets/grafana-sample.json | pbcopy
Then, you will get a sample grafana dashboard that you can fine-tune further:
2 - Upgrading your OCM environment
This page provides the suggested steps to upgrade your OCM environment including both the hub cluster and the managed clusters. Overall the major steps you should follow are:
- Read the release notes to confirm the latest OCM release version. (Note that some add-ons’ version might be different from OCM’s overall release version.)
- Upgrade your command line tools
clusteradm
Before you begin
You must have an existing OCM environment and there’s supposed to be registration-operator running in your clusters. The registration-operators is supposed to be installed if you’re previously following our recommended quick start guide to set up your OCM. The operator is responsible for helping you upgrade the other components on ease.
Upgrade command-line tool
In order to retrieve the latest version of OCM’s command-line tool clusteradm,
run the following one-liner command:
$ curl -L https://raw.githubusercontent.com/open-cluster-management-io/clusteradm/main/install.sh | bash
Then you’re supposed to see the following outputs:
Getting the latest clusteradm CLI...
Your system is darwin_amd64

clusteradm CLI is detected:
Reinstalling clusteradm CLI - /usr/local/bin/clusteradm...

Installing v0.1.0 OCM clusteradm CLI...
Downloading https://github.com/open-cluster-management-io/clusteradm/releases/download/v0.1.0/clusteradm_darwin_amd64.tar.gz ...
clusteradm installed into /usr/local/bin successfully.

To get started with clusteradm, please visit https://open-cluster-management.io/getting-started/
Also, your can confirm the installed cli version by running:
$ clusteradm version
client		    version	:v0.1.0
server release	version	: ...
Upgrade OCM Components via Command-line tool
Hub Cluster
For example, to upgrade OCM components in the hub cluster, run the following command:
$ clusteradm upgrade clustermanager --bundle-version=0.7.0
Then clusteradm will make sure everything in the hub cluster is upgraded to
the expected version. To check the latest status after the upgrade, continue to
run the following command:
$ clusteradm get hub-info
Managed Clusters
To upgrade the OCM components in the managed clusters, switch the client context
e.g. overriding KUBECONFIG environment variable, then simply run the following
command:
$ clusteradm upgrade klusterlet --bundle-version=0.7.0
To check the status after the upgrade, continue running this command against the managed cluster:
$ clusteradm get klusterlet-info
Upgrade OCM Components via Manual Edit
Hub Cluster
Upgrading the registration-operator
Navigate into the namespace where you installed registration-operator (named “open-cluster-management” by default) and edit the image version of its deployment resource:
$ kubectl -n open-cluster-management edit deployment cluster-manager
Then update the image tag version to your target release version, which is exactly the OCM’s overall release version.
--- image: quay.io/open-cluster-management/registration-operator:<old release>
+++ image: quay.io/open-cluster-management/registration-operator:<new release>
Upgrading the core components
After the upgrading of registration-operator is done, it’s time to upgrade
the working modules of OCM. Go on and edit the clustermanager custom resource
to prescribe the registration-operator to perform the automated upgrading:
$ kubectl edit clustermanager cluster-manager
In the content of clustermanager resource, you’re supposed to see a few
images listed in its spec:
apiVersion: operator.open-cluster-management.io/v1
kind: ClusterManager
metadata: ...
spec:
  registrationImagePullSpec: quay.io/open-cluster-management/registration:<target release>
  workImagePullSpec: quay.io/open-cluster-management/work:<target release>
  # NOTE: Placement release versioning differs from the OCM root version, please refer to the release note.
  placementImagePullSpec: quay.io/open-cluster-management/placement:<target release>
Replacing the old release version to the latest and commit the changes will
trigger the process of background upgrading. Note that the status of upgrade
can be actively tracked via the status of clustermanager, so if anything goes
wrong during the upgrade it should also be reflected in that status.
Managed Clusters
Upgrading the registration-operator
Similar to the process of upgrading hub’s registration-operator, the only difference you’re supposed to notice when upgrading the managed cluster is the name of deployment. Note that before running the following command, you are expected to switch the context to access the managed clusters not the hub.
$ kubectl -n open-cluster-management edit deployment klusterlet
Then repeatedly, update the image tag version to your target release version and commit the changes will upgrade the registration-operator.
Upgrading the agent components
After the registration-operator is upgraded, move on and edit the corresponding
klusterlet custom resource to trigger the upgrading process in your managed
cluster:
$ kubectl edit klusterlet klusterlet
In the spec of klusterlet, what is expected to be updated is also its image
list:
apiVersion: operator.open-cluster-management.io/v1
kind: Klusterlet
metadata: ...
spec:
  ...
  registrationImagePullSpec: quay.io/open-cluster-management/registration:<target release>
  workImagePullSpec: quay.io/open-cluster-management/work:<target release>
After committing the updates, actively checking the status of the klusterlet
to confirm whether everything is correctly upgraded. And repeat the above steps
to each of the managed clusters to perform a cluster-wise progressive upgrade.
Confirm the upgrade
Getting the overall status of the managed cluster will help you to detect the availability in case any of the managed clusters are running into failure:
$ kubectl get managedclusters
And the upgrading is all set if all the steps above have succeeded.
3 - Feature Gates
Feature gates are a way to enable or disable experimental or optional features in Open Cluster Management (OCM). They provide a safe mechanism to gradually roll out new functionality and maintain backward compatibility.
Overview
OCM uses Kubernetes’ feature gate mechanism to control the availability of features across different components:
- Hub Components: Features running on the hub cluster
- Spoke Components: Features running on managed clusters
Feature gates follow a standard lifecycle:
- Alpha (disabled by default): Experimental features that may change or be removed
- Beta (enabled by default): Well-tested features that are expected to be promoted to GA
- GA (always enabled): Stable features that are part of the core functionality
Available Feature Gates
Registration Features
Hub Registration Features
| Feature Gate | Default | Stage | Description |
|---|---|---|---|
DefaultClusterSet |
true |
Alpha | When it is enabled, it will make registration hub controller to maintain a default clusterset and a global clusterset. Adds clusters without cluster set labels to the default cluster set. All clusters will be included to the global clusterset. |
V1beta1CSRAPICompatibility |
false |
Alpha | When it is enabled, it will make the spoke registration agent to issue CSR requests via V1beta1 api. |
ManagedClusterAutoApproval |
false |
Alpha | When it is enabled, it will approve a managed cluster registration request automatically. |
ResourceCleanup |
true |
Beta | When it is enabled, it will start gc controller to clean up resources in cluster ns after cluster is deleted. |
ClusterProfile |
false |
Alpha | When it is enabled, it will start new controller in the Hub that can be used to sync ManagedCluster to ClusterProfile. |
ClusterImporter |
false |
Alpha | When it is enabled, it will enable the auto import of managed cluster for certain cluster providers, e.g. cluster-api. |
Spoke Registration Features
| Feature Gate | Default | Stage | Description |
|---|---|---|---|
ClusterClaim |
true |
Beta | When it is enabled, will start a new controller in the spoke-agent to manage the cluster-claim resources in the managed cluster. |
ClusterProperty |
false |
Alpha | When it is enabled on the spoke agent, it will use the claim controller to manage the managed cluster property. |
AddonManagement |
true |
Beta | When it is enabled on the spoke agent, it will start a new controllers to manage the managed cluster addons registration and maintains the status of managed cluster addons through watching their leases. |
V1beta1CSRAPICompatibility |
false |
Alpha | Will make the spoke registration agent to issue CSR requests via V1beta1 api. |
MultipleHubs |
false |
Alpha | Enables configuration of multiple hub clusters for high availability. Allows user to configure multiple bootstrapkubeconfig connecting to different hubs via Klusterlet and let agent decide which one to use. |
Work Management Features
Hub Work Features
| Feature Gate | Default | Stage | Description |
|---|---|---|---|
NilExecutorValidating |
false |
Alpha | When it is enabled, it will make the work-webhook to validate ManifestWork even when executor is nil, checking execute-as permissions with default executor. |
ManifestWorkReplicaSet |
false |
Alpha | When it is enabled, it will start new controller in the Hub that can be used to deploy manifestWorks to group of clusters selected by a placement. |
CloudEventsDrivers |
false |
Alpha | When it is enabled, it will enable the cloud events drivers (mqtt or grpc) for the hub controller, so that the controller can deliver manifestworks to the managed clusters via cloud events. |
Spoke Work Features
| Feature Gate | Default | Stage | Description |
|---|---|---|---|
ExecutorValidatingCaches |
false |
Alpha | When it is enabled, it will start a new controller in the work agent to cache subject access review validating results for executors. |
RawFeedbackJsonString |
false |
Alpha | When it is enabled, it will make the work agent to return the feedback result as a json string if the result is not a scalar value. |
Addon Management Features
| Feature Gate | Default | Stage | Description |
|---|---|---|---|
AddonManagement |
true |
Beta | When it is enabled on hub controller, it will start a new controller to process addon automatic installation and rolling out. |
Configuration Methods
1. Command Line Flags
Feature gates can be configured using command line flags when starting OCM components:
# Enable a single feature gate
clusteradm init --feature-gates=DefaultClusterSet=true

# Disable a feature gate
clusteradm init --feature-gates=ClusterClaim=false

# Configure multiple feature gates
clusteradm init --feature-gates=ClusterClaim=false,AddonManagement=true,DefaultClusterSet=false
2. Operator Configuration
Feature gates can be configured through the ClusterManager and Klusterlet custom resources:
ClusterManager Configuration (Hub)
apiVersion: operator.open-cluster-management.io/v1
kind: ClusterManager
metadata:
  name: cluster-manager
spec:
  registrationConfiguration:
    featureGates:
    - feature: DefaultClusterSet
      mode: Enable
    - feature: ManagedClusterAutoApproval
      mode: Enable
  workConfiguration:
    featureGates:
    - feature: ManifestWorkReplicaSet
      mode: Enable
  addOnManagerConfiguration:
    featureGates:
    - feature: AddonManagement
      mode: Enable
Klusterlet Configuration (Spoke)
apiVersion: operator.open-cluster-management.io/v1
kind: Klusterlet
metadata:
  name: klusterlet
spec:
  registrationConfiguration:
    featureGates:
    - feature: ClusterClaim
      mode: Disable
    - feature: AddonManagement
      mode: Enable
  workConfiguration:
    featureGates:
    - feature: ExecutorValidatingCaches
      mode: Enable