This is the multi-page printable view of this section. Click here to print.
Concepts
- 1: Architecture
- 2: Cluster Inventory
- 2.1: ClusterClaim
- 2.2: ManagedCluster
- 2.3: ManagedClusterSet
- 3: Work Distribution
- 3.1: ManifestWork
- 3.2: ManifestWorkReplicaSet
- 4: Content Placement
- 4.1: Placement
- 5: Add-On Extensibility
- 5.1: Add-ons
1 - Architecture
This page is an overview of open cluster management.
Overview
Open Cluster Management (OCM) is a powerful, modular, extensible platform for Kubernetes multi-cluster orchestration. Learning from the past failed lessons of building Kubernetes federation systems in the Kubernetes community, in OCM we will be jumping out of the legacy centric, imperative architecture of Kubefed v2 and embracing the “hub-agent” architecture which is identical to the original pattern of “hub-kubelet” from Kubernetes. Hence, intuitively in OCM our multi-cluster control plane is modeled as a “Hub” and on the other hand each of the clusters being managed by the “Hub” will be a “Klusterlet” which is obviously inspired from the original name of “kubelet”. Here’s a more detailed clarification of the two models we will be frequently using throughout the world of OCM:
-
Hub Cluster: Indicating the cluster that runs the multi-cluster control plane of OCM. Generally the hub cluster is supposed to be a light-weight Kubernetes cluster hosting merely a few fundamental controllers and services.
-
Klusterlet: Indicating the clusters that are being managed by the hub cluster. Klusterlet might also be called “managed cluster” or “spoke cluster”. The klusterlet is supposed to actively pull the latest prescriptions from the hub cluster and consistently reconcile the physical Kubernetes cluster to the expected state.
“Hub-spoke” architecture
Benefiting from the merit of “hub-spoke” architecture, in abstraction we are de-coupling most of the multi-cluster operations generally into (1) computation/decision and (2) execution, and the actual execution against the target cluster will be completely off-loaded into the managed cluster. The hub cluster won’t directly request against the real clusters, instead it just persists its prescriptions declaratively for each cluster, and the klusterlet will be actively pulling the prescriptions from the hub and doing the execution. Hence, the burden of the hub cluster will be greatly relieved because the hub cluster doesn’t need to either deal with flooding events from the managed clusters or be buried in sending requests against the clusters. Imagine in a world where there’s no kubelet in Kubernetes and its control plane is directly operating the container daemons, it will be extremely hard for a centric controller to manage a cluster of 5k+ nodes. Likewise, that’s how OCM tries to breach the bottleneck of scalability, by dividing and offloading the execution into separated agents. So it’s always feasible for a hub cluster to accept and manage thousands of clusters.
Each klusterlet will be working independently and autonomously, so they have a weak dependency on the availability of the hub cluster. If the hub goes down (e.g. during maintenance or network partition) the klusterlet or other OCM agents working in the managed cluster are supposed to keep actively managing the hosting cluster until it re-connects. Additionally if the hub cluster and the managed clusters are owned by different admins, it will be easier for the admin of the managed cluster to police the prescriptions from the hub control plane because the klusterlet is running as a “white-box” as a pod instance in the managed cluster. Upon any accident, the klusterlet admin can quickly cut off the connection with the hub cluster without shutting the whole multi-cluster control plane down.

The “hub-agent” architecture also minimized the requirements in the network for registering a new cluster to the hub. Any cluster that can reach the endpoint of the hub cluster will be able to be managed, even a random KinD sandbox cluster on your laptop. That is because the prescriptions are effectively pulled from the hub instead of pushing. In addition to that, OCM also provides a addon named “cluster-proxy” which automatically manages a reverse proxy tunnel for proactive access to the managed clusters by leveraging on the Kubernetes’ subproject konnectivity.
Modularity and extensibility
Not only OCM will bring you a fluent user-experience of managing a number of
clusters on ease, but also it will be equally friendly to further customization
or second-time development. Every functionality working in OCM is expected to
be freely-pluggable by modularizing the atomic capability into separated
building blocks, except for the mandatory core module named registration
which is responsible for controlling the lifecycle of a managed controller
and exporting the elementary ManagedCluster model.
Another good example surfacing our modularity will be the placement, a standalone module focusing at dynamically selecting the proper list of the managed clusters from the user’s prescription. You can build any advanced multi-cluster orchestration on the top of placement, e.g. multi-cluster workload re-balancing, multi-cluster helm charts replication, etc. On the other hand if you’re not satisfied by the current capacities from our placement module, you can quickly opt-out and replace it with your customized ones, and reach out to our community so that we can converge in the future if possible.
Concepts
Cluster registering: “double opt-in handshaking”
Practically the hub cluster and the managed cluster can be owned/maintained by different admins, so in OCM we clearly separated the roles and make the cluster registration require approval from the both sides defending from unwelcome requests. In terms of terminating the registration, the hub admin can kick out a registered cluster by denying the rotation of hub cluster’s certificate, on the other hand from the perspective of a managed cluster’s admin, he can either brutally deleting the agent instances or revoking the granted RBAC permissions for the agents. Note that the hub controller will be automatically preparing the environment for the newly registered cluster and cleaning up neatly upon kicking a managed cluster.
Cluster registration security model
The worker cluster admin can list and read any managed cluster’s CSR, but those CSR cannot be used to impersonate due to the fact that CSR only contains the certificate. The client authentication requires both the key and certificate. The key is stored in each managed cluster, and it will not be transmitted across the network.
The worker cluster admin cannot approve his or her own cluster registration by default. Two separate RBAC rules are needed to approve a cluster registration. The permission to approve the CSR and the permission to accept the managed cluster. Only the cluster admin on hub has both permissions and can accept the cluster registration request. The second accept permission is gated by a webhook.
Cluster namespace
Kubernetes has a native soft multi-tenancy isolation in the granularity of
its namespace resources, so in OCM, for each of the managed cluster we will
be provisioning a dedicated namespace for the managed cluster and grants
sufficient RBAC permissions so that the klusterlet can persist some data
in the hub cluster. This dedicated namespace is the “cluster namespace” which
is majorly for saving the prescriptions from the hub. e.g. we can create
ManifestWork in a cluster namespace in order to deploy some resources towards
the corresponding cluster. Meanwhile, the cluster namespace can also be used
to save the uploaded stats from the klusterlet e.g. the healthiness of an
addon, etc.
Addons
Addon is a general concept for the optional, pluggable customization built over
the extensibility from OCM. It can be a controller in the hub cluster, or just
a customized agent in the managed cluster, or even the both collaborating
in peers. The addons are expected to implement the ClusterManagementAddon or
ManagedClusterAddOn API of which a detailed elaboration can be found here.
Building blocks
The following is a list of commonly-used modules/subprojects that you might be interested in the journey of OCM:
Registration
The core module of OCM manages the lifecycle of the managed clusters. The registration controller in the hub cluster can be intuitively compared to a broker that represents and manages the hub cluster in terms of cluster registration, while the registration agent working in the managed cluster is another broker that represents the managed cluster. After a successful registration, the registration controller and agent will also be consistently probing each other’s healthiness. i.e. the cluster heartbeats.
Work
The module for dispatching resources from the hub cluster to the managed
clusters, which can be easily done by writing a ManifestWork resource into
a cluster namespace. See more details about the API here.
Placement
Building custom advanced topology across the clusters by either grouping
clusters via the labels or the cluster-claims. The placement module is
completely decoupled from the execution, the output from placement will
be merely a list of names of the matched clusters in the PlacementDecision
API, so the consumer controller of the decision output can reactively
discover the topology or availability changes from the managed clusters by
simply list-watching the decision API.
Application lifecycle
The application lifecycle defines the processes that are used to manage application resources on your managed clusters. A multi-cluster application uses a Kubernetes specification, but with additional automation of the deployment and lifecycle management of resources to individual clusters. A multi-cluster application allows you to deploy resources on multiple clusters, while maintaining easy-to-reconcile service routes, as well as full control of Kubernetes resource updates for all aspects of the application.
Governance and risk
Governance and risk is the term used to define the processes that are used to manage security and compliance from the hub cluster. Ensure the security of your cluster with the extensible policy framework. After you configure a hub cluster and a managed cluster, you can create, modify and delete policies on the hub and apply policies to the managed clusters.
Registration operator
Automating the installation and upgrading of a few built-in modules in OCM. You can either deploy the operator standalone or delegate the registration operator to the operator lifecycle framework.
2 - Cluster Inventory
2.1 - ClusterClaim
What is ClusterClaim?
ClusterClaim is a cluster-scoped API available to users on a managed cluster it allows users to define key-value metadata on managed clusters.
These objects are collected by the klusterlet agent and synchronized to the status.clusterClaims field of the corresponding ManagedCluster object on the hub cluster. This mechanism enables centralized inventory management and property-based cluster filtering across your fleet.
Usage
ClusterClaim is used to specify additional properties of the managed cluster like
the clusterID, version, vendor and cloud provider. We defined some reserved ClusterClaims
like id.k8s.io which is a unique identifier for the managed cluster.
ClusterClaim Types and Collection Rule
There are two types of ClusterClaims collected from managed clusters.
-
Reserved ClusterClaimsare system defined claims with predefined names that identify fundamental cluster attributes (e.g., id.k8s.io for cluster ID, kubeversion.open-cluster-management.io for Kubernetes version). These are automatically populated. -
Custom ClusterClaimsare user-defined claims for custom metadata (e.g., environment, cost-center, compliance-tier).
Collection Behavior
All ClusterClaims are reported to the hub except when.
-
The
ClusterClaimwith the labelopen-cluster-management.io/spoke-onlywill not be synced to the status ofManagedCluster. -
Only a limited number of custom claims are synchronized (default: 20). Excess claims are truncated.
In addition to the reserved ClusterClaims, users can also customize 20 ClusterClaims by default.
The maximum count of customized ClusterClaims can be configured via the flag
max-custom-cluster-claims of registration agent on the managed cluster.
Configuring ClusterClaims via Klusterlet API
The collection and naming of ClusterClaims can now be configured directly through the Klusterlet API, providing declarative control over claim management.
API Configuration Structure
apiVersion: operator.open-cluster-management.io/v1
kind: Klusterlet
spec:
  clusterClaimConfiguration:
    # Maximum number of custom ClusterClaims allowed (default: 20)
    maxCustomClusterClaims: 50
    # Custom suffixes for reserved ClusterClaim names
    reservedClusterClaimSuffixes:
      - "mycompany.com"
Configuration Options
-
maxCustomClusterClaims(integer, default: 20) controls the maximum number of custom ClusterClaims synchronized to the hub. Increase this value if your environment requires reporting more than 20 custom attributes per cluster. -
reservedClusterClaimSuffixes(array of strings) specifies custom suffixes to identify additional reserved claims. Claims matching these suffixes are treated as reserved claims. For example, ifreservedClusterClaimSuffixesis set tomycompany.com, claims likeid.mycompany.com,name.mycompany.com, andanything.mycompany.comwill be treated as reserved.
Example
1. Creating a Reserved ClusterClaim
Here is a ClusterClaim example specifying a id.k8s.io:
apiVersion: cluster.open-cluster-management.io/v1alpha1
kind: ClusterClaim
metadata:
  name: id.k8s.io
spec:
  value: myCluster
2. Creating Custom Cluster Claims
apiVersion: cluster.open-cluster-management.io/v1alpha1
kind: ClusterClaim
metadata:
  name: claim-1
spec:
  value: "custom-claim-1"
---
apiVersion: cluster.open-cluster-management.io/v1alpha1
kind: ClusterClaim
metadata:
  name: claim-2
spec:
  value: "custom-claim-2"
3. Spoke-Only ClusterClaim (Not Synced)
apiVersion: cluster.open-cluster-management.io/v1alpha1
kind: ClusterClaim
metadata:
  name: claim-3
  annotations:
    open-cluster-management.io/spoke-only: "true"
spec:
  value: "custom-claim-3"
4. Using Custom Reserved ClusterClaim Suffixes
You can configure custom suffixes to treat specific ClusterClaims as reserved. This is useful when you want to define organization-specific reserved claims.
First, configure the Klusterlet with your custom suffix:
apiVersion: operator.open-cluster-management.io/v1
kind: Klusterlet
spec:
  clusterClaimConfiguration:
    reservedClusterClaimSuffixes:
      - "mycompany.com"
Then create ClusterClaims using your custom suffix:
apiVersion: cluster.open-cluster-management.io/v1alpha1
kind: ClusterClaim
metadata:
  name: id.mycompany.com
spec:
  value: id
---
apiVersion: cluster.open-cluster-management.io/v1alpha1
kind: ClusterClaim
metadata:
  name: name.mycompany.com
spec:
  value: name
---
apiVersion: cluster.open-cluster-management.io/v1alpha1
kind: ClusterClaim
metadata:
  name: region.mycompany.com
spec:
  value: region
These claims will be treated as reserved claims and will not count against the maxCustomClusterClaims limit.
5. Viewing ClusterClaims on the Hub
After applying the ClusterClaim above to any managed cluster, the value of the ClusterClaim
is reflected in the ManagedCluster on the hub cluster:
apiVersion: cluster.open-cluster-management.io/v1
kind: ManagedCluster
metadata: ...
spec: ...
status:
  clusterClaims:
    - name: id.k8s.io
      value: myCluster
    - name: claim-1
      value: custom-claim-1
    - name: claim-2
      value: custom-claim-2
    - name: id.mycompany.com #Treated as a reserved claim
      value: id
    - name: name.mycompany.com #Treated as a reserved claim
      value: name
    - name: region.mycompany.com #Treated as a reserved claim
      value: region
About-API Support in Open Cluster Management
Open Cluster Management (OCM) supports the use of ClusterProperty via the
about-api,
which allows administrators to define and expose cluster-scoped properties. These properties are
synced to the managed cluster’s ManagedCluster status and can coexist with
ClusterClaim but take precedence if a same-named property exists.
Enabling the Feature
To enable the ClusterProperty feature on the spoke cluster, the ClusterProperty feature gate must be
set on the Klusterlet component. This can be done by setting the feature gate in the Klusterlet configuration:
featureGates:
  ClusterProperty: "true"
Ensure that the feature gate is enabled appropriately based on your cluster management strategy.
Using ClusterProperty
Creating a ClusterProperty
Cluster administrators can create a ClusterProperty custom resource in the spoke cluster. The following
is an example YAML for creating a ClusterProperty:
apiVersion: about.k8s.io/v1alpha1
kind: ClusterProperty
metadata:
  name: example-property
spec:
  value: "example-value"
Once created, the ClusterProperty will be automatically synced to the hub cluster and reflected within
the ManagedCluster resource’s status.
Syncing Existing Properties
After enabling the feature, any existing ClusterProperty resources will be synced to the ManagedCluster
status on the hub cluster.
Example: If example-property with value example-value already exists on the spoke cluster, its value
will populate into the ManagedCluster as:
status:
  clusterClaims:
    - name: "example-property"
      value: "example-value"
Handling Conflicts with ClusterClaim
In case a ClusterClaim resource with the same name as a ClusterProperty exists, the ClusterProperty
will take precedence and the corresponding ClusterClaim will be ignored.
Updating ClusterProperties
Updating the value of an existing ClusterProperty will automatically reflect the change in the managed
cluster’s status:
spec:
  value: "updated-value"
Deleting ClusterProperties
When a ClusterProperty is deleted from the spoke cluster, its corresponding entry in the ManagedCluster
status is removed:
kubectl delete clusterproperty example-property
This will result in the removal of the example-property from the ManagedCluster status on the hub cluster.
Additional Notes
- Both
ClusterPropertyandClusterClaimcan co-exist, withClusterPropertytaking precedence in naming conflicts. - The feature uses the existing OCM infrastructure for status synchronization, ensuring minimal disruption to ongoing operations.
- Ensure compatibility and testing in your environment before enabling the
ClusterPropertyfeature gate in production settings.
2.2 - ManagedCluster
What is ManagedCluster?
ManagedCluster is a cluster scoped API in the hub cluster representing the
registered or pending-for-acceptance Kubernetes clusters in OCM. The
klusterlet agent
working in the managed cluster is expected to actively maintain/refresh the
status of the corresponding ManagedCluster resource on the hub cluster.
On the other hand, removing the ManagedCluster from the hub cluster indicates
the cluster is denied/exiled from the hub cluster. The following is the
introduction of how the cluster registration lifecycle works under the hood:
Cluster registration and acceptance
Bootstrapping registration
Firstly, the cluster registration process should be initiated by the registration agent which requires a bootstrap kubeconfig e.g.:
apiVersion: v1
kind: Secret
metadata:
  name: bootstrap-hub-kubeconfig
  namespace: open-cluster-management-agent
type: Opaque
data:
  kubeconfig: <base64-encoded kubeconfig>
A minimal RBAC permission required for the subject in the bootstrap kubeconfig will be:
CertificateSigningRequest’s “get”, “list”, “watch”, “create”, “update”.ManagedCluster’s “get”, “list”, “create”, “update”
Note that ideally the bootstrap kubeconfig is supposed to live for a short time (hour-ish) after being signed by the hub cluster so that it won’t be abused by unwelcome clients.
Last but not least, you can always live an easier life by leveraging OCM’s
command-line tool clusteradm to manage the whole registration process.
Approving registration
When we’re registering a new cluster into OCM, the registration agent will be
starting by creating an unaccepted ManagedCluster into the hub cluster along
with a temporary CertificateSigningRequest (CSR)
resource. The cluster will be accepted by the hub control plane, if the
following requirements are met:
- The CSR is approved and signed by any certificate provider setting filling
.status.certificatewith legit X.509 certificates. - The
ManagedClusterresource is approved by setting.spec.hubAcceptsClientto true in the spec.
Note that the cluster approval process above can be done by one-line:
$ clusteradm accept --clusters <cluster name>
Upon the approval, the registration agent will observe the signed certificate and persist them as a local secret named “hub-kubeconfig-secret” (by default in the “open-cluster-management-agent” namespace) which will be mounted to the other fundamental components of klusterlet such as the work agent. In a word, if you can find your “hub-kubeconfig-secret” successfully present in your managed cluster, the cluster registration is all set!
Overall the registration process in OCM is called double opt-in mechanism,
which means that a successful cluster registration requires both sides of
approval and commitment from the hub cluster and the managed cluster. This
will be especially useful when the hub cluster and managed clusters are
operated by different admins or teams. In OCM, we assume the clusters are
mutually untrusted in the beginning then set up the connection between them
gracefully with permission and validity under control.
Note that the functionality mentioned above are all managed by OCM’s registration sub-project, which is the “root dependency” in the OCM world. It includes an agent in the managed cluster to register to the hub and a controller in the hub cluster to coordinate with the agent.
Cluster heartbeats and status
By default, the registration will be reporting and refreshing its healthiness
state to the hub cluster on a one-minute basis, and that interval can be easily
overridden by setting .spec.leaseDurationSeconds on the ManagedCluster.
In addition to that, a few commonly-used information will also be reflected
in the status of the ManagedCluster, e.g.:
  status:
    version:
      kubernetes: v1.20.11
    allocatable:
      cpu: 11700m
      ephemeral-storage: "342068531454"
      hugepages-1Gi: "0"
      hugepages-2Mi: "0"
      memory: 17474228Ki
      pods: "192"
    capacity:
      cpu: "12"
      ephemeral-storage: 371168112Ki
      hugepages-1Gi: "0"
      hugepages-2Mi: "0"
      memory: 23777972Ki
      pods: "192"
    conditions: ...
Cluster taints and tolerations
To support filtering unhealthy/not-reporting clusters and keep workloads from being placed in unhealthy or unreachable clusters, we introduce the similar concept of taint/toleration in Kubernetes. It also allows user to add a customized taint to deselect a cluster from placement. This is useful when the user wants to set a cluster to maintenance mode and evict workload from this cluster.
In OCM, Taints and Tolerations work together to allow users to control the selection of managed clusters more flexibly.
Taints of ManagedClusters
Taints are properties of ManagedClusters, they allow a Placement to repel a set of ManagedClusters. A Taint includes the following fields:
- Key (required). The taint key applied to a cluster. e.g. bar or foo.example.com/bar.
- Value (optional). The taint value corresponding to the taint key.
- Effect (required). The Effect of the taint on Placements that do not
tolerate the taint. Valid effects are
NoSelect. It means Placements are not allowed to select a cluster unless they tolerate this taint. The cluster will be removed from the placement decision if it has already been selected by the Placement.PreferNoSelect. It means the scheduler tries not to select the cluster, rather than prohibiting Placements from selecting the cluster entirely. (This is not implemented yet, currently clusters with effectPreferNoSelectwill always be selected.)NoSelectIfNew. It means Placements are not allowed to select the cluster unless: 1) they tolerate the taint; 2) they have already had the cluster in their cluster decisions;
- TimeAdded (required). The time at which the taint was added. It is set automatically and the user should not to set/update its value.
Builtin taints to reflect the status of ManagedClusters
There are two builtin taints, which will be automatically added to ManagedClusters, according to their conditions.
cluster.open-cluster-management.io/unavailable. The taint is added to a ManagedCluster when it is not available. To be specific, the cluster has a condition ‘ManagedClusterConditionAvailable’ with status of ‘False’. The taint has the effectNoSelectand an empty value. Example,apiVersion: cluster.open-cluster-management.io/v1 kind: ManagedCluster metadata: name: cluster1 spec: hubAcceptsClient: true taints: - effect: NoSelect key: cluster.open-cluster-management.io/unavailable timeAdded: '2022-02-21T08:11:54Z'cluster.open-cluster-management.io/unreachable. The taint is added to a ManagedCluster when it is not reachable. To be specific,-
- The cluster has no condition ‘ManagedClusterConditionAvailable’;
-
- Or the status of condition ‘ManagedClusterConditionAvailable’ is
‘Unknown’;
The taint has the effect
NoSelectand an empty value. Example,
- Or the status of condition ‘ManagedClusterConditionAvailable’ is
‘Unknown’;
The taint has the effect
apiVersion: cluster.open-cluster-management.io/v1 kind: ManagedCluster metadata: name: cluster1 spec: hubAcceptsClient: true taints: - effect: NoSelect key: cluster.open-cluster-management.io/unreachable timeAdded: '2022-02-21T08:11:06Z'-
Tolerations of Placements
Tolerations are applied to Placements, and allow Placements to select ManagedClusters with matching taints. Refer to Placement Taints/Tolerations to see how it is used for cluster selection.
Cluster removal
A previously registered cluster can opt-out cutting off the connection from either hub cluster or managed cluster. This is helpful for tackling emergency problems in your OCM environment, e.g.:
- When the hub cluster is overloaded, under emergency
- When the managed cluster is intended to detach from OCM
- When the hub cluster is found sending wrong orders to the managed cluster
- When the managed cluster is spamming requests to the hub cluster
Unregister from hub cluster
A recommended way to unregister a managed cluster will flip the
.spec.hubAcceptsClient bit back to false, which will be triggering the hub
control plane to offload the managed cluster from effective management.
Meanwhile, a permanent way to kick a managed cluster from the hub control plane
is simply deleting its ManagedCluster resource.
$ kubectl delete managedcluster <cluster name>
This is also revoking the previously-granted RBAC permission for the managed cluster instantly in the background. If we hope to defer the rejection to the next time when the klusterlet agent is renewing its certificate, as a minimal operation we can remove the following RBAC rules from the cluster’s effective cluster role resource:
# ClusterRole: open-cluster-management:managedcluster:<cluster name>
# Removing the following RBAC rule to stop the certificate rotation.
- apiGroups:
    - register.open-cluster-management.io
  resources:
    - managedclusters/clientcertificates
  verbs:
    - renew
Unregister from the managed cluster
The admin of the managed cluster can disable the prescriptions from hub cluster
by scaling the OCM klusterlet agents to 0. Or just permanently deleting the
agent components from the managed cluster.
Managed Cluster’s certificate rotation
The certificates used by the agents from the managed cluster to talk to the hub control plane will be periodically rotated with an ephemeral and random identity. The following picture shows the automated certificate rotation works.

What’s next?
Furthermore, we can do advanced cluster matching/selecting within a managedclusterset using the placement module.
2.3 - ManagedClusterSet
API-CHANGE NOTE:
The ManagedClusterSet and ManagedClusterSetBinding API v1beta1 version will no longer be served in OCM v0.12.0.
- Migrate manifests and API clients to use the
ManagedClusterSetandManagedClusterSetBindingAPI v1beta2 version, available since OCM v0.9.0. - All existing persisted objects are accessible via the new API.
- Notable changes:
- The default cluster selector type will be
ExclusiveClusterSetLabelin v1beta2, and typeLegacyClusterSetLabelin v1beta1 is removed.
- The default cluster selector type will be
What is ManagedClusterSet?
ManagedClusterSet is a cluster-scoped API in the hub cluster for grouping a
few managed clusters into a “set” so that hub admin can operate these clusters
altogether in a higher level. The concept is inspired by the enhancement
from the Kubernetes SIG-Multicluster. Member clusters in the set are supposed
to have common/similar attributes e.g. purpose of use, deployed regions, etc.
ManagedClusterSetBinding is a namespace-scoped API in the hub cluster to project
a ManagedClusterSet into a certain namespace. Each ManagedClusterSet can be
managed/administrated by different hub admins, and their RBAC permissions can
also be isolated by binding the ManagedClusterSet to a “workspace namespace” in
the hub cluster via ManagedClusterSetBinding.
Note that ManagedClusterSet and “workspace namespace” has an M*N
relationship:
- Bind multiple cluster sets to one workspace namespace indicates that the admin of that namespace can operate the member clusters from both sets.
- Bind one cluster set to multiple workspace namespace indicates that the cluster set can be operated from all the bound namespaces at the same time.
The cluster set admin can flexibly operate the member clusters in the workspace namespace using Placement API, etc.
The following picture shows the hierarchies of how the cluster set works:
Operating ManagedClusterSet using clusteradm
Creating a ManagedClusterSet
Running the following command to create an example cluster set:
$ clusteradm create clusterset example-clusterset
$ clusteradm get clustersets
<ManagedClusterSet>
└── <default>
│   ├── <BoundNamespace>
│   ├── <Status> No ManagedCluster selected
└── <example-clusterset>
│   ├── <BoundNamespace>
│   ├── <Status> No ManagedCluster selected
└── <global>
    └── <BoundNamespace>
    └── <Status> 1 ManagedClusters selected
The newly created cluster set will be empty by default, so we can move on adding member clusters to the set.
Adding a ManagedCluster to a ManagedClusterSet
Running the following command to add a cluster to the set:
$ clusteradm clusterset set example-clusterset --clusters managed1
$ clusteradm get clustersets
<ManagedClusterSet>
└── <default>
│   ├── <BoundNamespace>
│   ├── <Status> No ManagedCluster selected
└── <example-clusterset>
│   ├── <BoundNamespace>
│   ├── <Status> 1 ManagedClusters selected
└── <global>
    └── <BoundNamespace>
    └── <Status> 1 ManagedClusters selected
Note that adding a cluster to a cluster set will require the admin to have “managedclustersets/join” access in the hub cluster.
Now the cluster set contains 1 valid cluster, and in order to operate that cluster set we are supposed to bind it to an existing namespace to make it a “workspace namespace”.
Binding the ManagedClusterSet to a workspace namespace
Running the following command to bind the cluster set to a namespace. Note that the namespace SHALL NOT be an existing “cluster namespace” (i.e. the namespace has the same name of a registered managed cluster).
Note that binding a cluster set to a namespace means that granting access from that namespace to its member clusters. And the bind process requires “managedclustersets/bind” access in the hub cluster which is clarified below.
$ clusteradm clusterset bind example-clusterset --namespace default
$ clusteradm get clustersets
<ManagedClusterSet>
└── <default>
│   ├── <BoundNamespace>
│   ├── <Status> No ManagedCluster selected
└── <example-clusterset>
│   ├── <Status> 1 ManagedClusters selected
│   ├── <BoundNamespace> default
└── <global>
    └── <BoundNamespace>
    └── <Status> 1 ManagedClusters selected
So far we successfully created a new cluster set containing 1 cluster and bound it to a “workspace namespace”.
A glance at the “ManagedClusterSet” API
The ManagedClusterSet is a vanilla Kubernetes custom resource which can be
checked by the command kubectl get managedclusterset <cluster set name> -o yaml:
apiVersion: cluster.open-cluster-management.io/v1beta2
kind: ManagedClusterSet
metadata:
  name: example-clusterset
spec:
  clusterSelector:
    selectorType: ExclusiveClusterSetLabel
  managedNamespaces:
  - name: my-clusterset-ns1
status:
  conditions:
  - lastTransitionTime: "2022-02-21T09:24:38Z"
    message: 1 ManagedClusters selected
    reason: ClustersSelected
    status: "False"
    type: ClusterSetEmpty
The spec.managedNamespaces field is used to specify a list of namespaces that will be automatically created on each member cluster. For a detailed explanation, see the “Setting Managed Namespaces for a ManagedClusterSet” section below.
apiVersion: cluster.open-cluster-management.io/v1beta2
kind: ManagedClusterSet
metadata:
  name: example-openshift-clusterset
spec:
  clusterSelector:
    labelSelector:
      matchLabels:
        vendor: OpenShift
    selectorType: LabelSelector
status:
  conditions:
  - lastTransitionTime: "2022-06-20T08:23:28Z"
    message: 1 ManagedClusters selected
    reason: ClustersSelected
    status: "False"
    type: ClusterSetEmpty
The ManagedClusterSetBinding can also be checked by the command
kubectl get managedclustersetbinding <cluster set name> -n <workspace-namespace> -oyaml:
apiVersion: cluster.open-cluster-management.io/v1beta2
kind: ManagedClusterSetBinding
metadata:
  name: example-clusterset
  namespace: default
spec:
  clusterSet: example-clusterset
status:
  conditions:
  - lastTransitionTime: "2022-12-19T09:55:10Z"
    message: ""
    reason: ClusterSetBound
    status: "True"
    type: Bound
Setting Managed Namespaces for a ManagedClusterSet
A ManagedClusterSet can define one or more managed namespaces. When specified, these namespaces are automatically created on every managed cluster that belongs to the set.
Example: ManagedClusterSet with managed namespaces
apiVersion: cluster.open-cluster-management.io/v1beta2
kind: ManagedClusterSet
metadata:
  name: my-clusterset
spec:
  clusterSelector:
    selectorType: ExclusiveClusterSetLabel
  managedNamespaces:
  - name: my-clusterset-ns1
  - name: my-clusterset-ns2
The managed namespaces are reflected in the status of each ManagedCluster that is part of the set.
Example: ManagedCluster status with managed namespaces
apiVersion: cluster.open-cluster-management.io/v1
kind: ManagedCluster
metadata:
  labels:
    cluster.open-cluster-management.io/clusterset: my-clusterset
  name: cluster1
status:
  managedNamespaces:
  - clusterSet: my-clusterset
    conditions:
    - lastTransitionTime: "2025-09-26T03:15:52Z"
      message: Namespace successfully applied and managed
      reason: NamespaceApplied
      status: "True"
      type: NamespaceAvailable
    name: my-clusterset-ns1
  - clusterSet: my-clusterset
    conditions:
    - lastTransitionTime: "2025-09-26T03:15:52Z"
      message: Namespace successfully applied and managed
      reason: NamespaceApplied
      status: "True"
      type: NamespaceAvailable
    name: my-clusterset-ns2
The NamespaceAvailable condition shows whether the namespace is available on the managed cluster.
Important: Namespaces created on managed clusters are never deleted, even in the following cases:
The namespace is removed from the ManagedClusterSet specification.
The managed cluster leaves the ManagedClusterSet.
The managed cluster is detached from the hub.
Clusterset RBAC permission control
Adding member cluster to a clusterset
Adding a new member cluster to a clusterset requires RBAC permission of
updating the managed cluster and managedclustersets/join subresource. We can
manually apply the following clusterrole to allow a hub user to manipulate
that clusterset:
apiVersion: rbac.authorization.k8s.io/v1
kind: ClusterRole
metadata: ...
rules:
  - apiGroups:
      - cluster.open-cluster-management.io
    resources:
      - managedclusters
    verbs:
      - update
  - apiGroups:
      - cluster.open-cluster-management.io
    resources:
      - managedclustersets/join
    verbs:
      - create
Binding a clusterset to a namespace
The “binding” process of a cluster set is policed by a validating webhook that
checks whether the requester has sufficient RBAC access to the
managedclustersets/bind subresource. We can also manually apply the following
clusterrole to grant a hub user the permission to bind cluster sets:
apiVersion: rbac.authorization.k8s.io/v1
kind: ClusterRole
metadata: ...
rules:
  - apiGroups:
      - cluster.open-cluster-management.io
    resources:
      - managedclustersets/bind
    verbs:
      - create
Default ManagedClusterSet
For easier management, we introduce a ManagedClusterSet called default.
A default ManagedClusterSet will be automatically created initially. Any clusters not specifying a ManagedClusterSet will be added into the default.
The user can move the cluster from the default clusterset to another clusterset using the command:
clusteradm clusterset set target-clusterset --clusters cluster-name
default clusterset is an alpha feature that can be disabled by disabling the feature gate in registration controller as:
- "--feature-gates=DefaultClusterSet=false"
Global ManagedClusterSet
For easier management, we also introduce a ManagedClusterSet called global.
A global ManagedClusterSet will be automatically created initially. The global ManagedClusterSet include all ManagedClusters.
global clusterset is an alpha feature that can be disabled by disabling the feature gate in registration controller as:
- "--feature-gates=DefaultClusterSet=false"
global ManagedClusterSet detail:
apiVersion: cluster.open-cluster-management.io/v1beta2
kind: ManagedClusterSet
metadata:
  name: global
spec:
  clusterSelector:
    labelSelector: {}
    selectorType: LabelSelector
status:
  conditions:
  - lastTransitionTime: "2022-06-20T08:23:28Z"
    message: 1 ManagedClusters selected
    reason: ClustersSelected
    status: "False"
    type: ClusterSetEmpty
3 - Work Distribution
3.1 - ManifestWork
What is ManifestWork
ManifestWork is used to define a group of Kubernetes resources on the hub to be applied to the managed cluster. In the open-cluster-management project, a ManifestWork resource must be created in the cluster namespace. A work agent implemented in work project is run on the managed cluster and monitors the ManifestWork resource in the cluster namespace on the hub cluster.
An example of ManifestWork to deploy a deployment to the managed cluster is shown in the following example.
apiVersion: work.open-cluster-management.io/v1
kind: ManifestWork
metadata:
  namespace: <target managed cluster>
  name: hello-work-demo
spec:
  workload:
    manifests:
      - apiVersion: apps/v1
        kind: Deployment
        metadata:
          name: hello
          namespace: default
        spec:
          selector:
            matchLabels:
              app: hello
          template:
            metadata:
              labels:
                app: hello
            spec:
              containers:
                - name: hello
                  image: quay.io/asmacdo/busybox
                  command:
                    ["sh", "-c", 'echo "Hello, Kubernetes!" && sleep 3600']
Status tracking
Work agent will track all the resources defined in ManifestWork and update its status. There are two types of status in manifestwork. The resourceStatus tracks the status of each manifest in the ManifestWork and conditions reflects the overall status of the ManifestWork. Work agent currently checks whether a resource is Available, meaning the resource exists on the managed cluster, and Applied means the resource defined in ManifestWork has been applied to the managed cluster.
Here is an example.
apiVersion: work.open-cluster-management.io/v1
kind: ManifestWork
metadata: ...
spec: ...
status:
  conditions:
    - lastTransitionTime: "2021-06-15T02:26:02Z"
      message: Apply manifest work complete
      reason: AppliedManifestWorkComplete
      status: "True"
      type: Applied
    - lastTransitionTime: "2021-06-15T02:26:02Z"
      message: All resources are available
      reason: ResourcesAvailable
      status: "True"
      type: Available
  resourceStatus:
    manifests:
      - conditions:
          - lastTransitionTime: "2021-06-15T02:26:02Z"
            message: Apply manifest complete
            reason: AppliedManifestComplete
            status: "True"
            type: Applied
          - lastTransitionTime: "2021-06-15T02:26:02Z"
            message: Resource is available
            reason: ResourceAvailable
            status: "True"
            type: Available
        resourceMeta:
          group: apps
          kind: Deployment
          name: hello
          namespace: default
          ordinal: 0
          resource: deployments
          version: v1
Fine-grained field values tracking
Optionally, we can let the work agent aggregate and report certain fields from
the distributed resources to the hub clusters by setting FeedbackRule for
the ManifestWork:
apiVersion: work.open-cluster-management.io/v1
kind: ManifestWork
metadata: ...
spec:
  workload: ...
  manifestConfigs:
    - resourceIdentifier:
        group: apps
        resource: deployments
        namespace: default
        name: hello
      feedbackRules:
        - type: WellKnownStatus
        - type: JSONPaths
          jsonPaths:
            - name: isAvailable
              path: '.status.conditions[?(@.type=="Available")].status'
The feedback rules prescribe the work agent to periodically get the latest
states of the resources, and scrape merely those expected fields from them,
which is helpful for trimming the payload size of the status. Note that the
collected feedback values on the ManifestWork will not be updated unless
the latest value is changed/different from the previous recorded value.
Currently, it supports two kinds of FeedbackRule:
WellKnownStatus: Using the pre-built template of feedback values for those well-known kubernetes resources.JSONPaths: A valid Kubernetes JSON-Path that selects a scalar field from the resource. Currently supported types are Integer, String, Boolean and JsonRaw. JsonRaw returns only when you have enabled the RawFeedbackJsonString feature gate on the agent. The agent will return the whole structure as a JSON string.
The default feedback value scraping interval is 30 second, and we can override
it by setting --status-sync-interval on your work agent. Too short period can
cause excessive burden to the control plane of the managed cluster, so generally
a recommended lower bound for the interval is 5 second.
Feedback scrape types
By default, the work agent uses a polling mechanism to periodically scrape feedback values from resources.
You can configure the feedback collection mode using the feedbackScrapeType field in manifestConfigs.
There are two available modes:
Poll(default): Periodically scrapes resource status at the interval specified by--status-sync-interval(default 30 seconds). This mode has lower overhead but provides delayed updates.Watch: Uses Kubernetes watch API with dynamic informer registration to get real-time status updates whenever the resource changes. This mode provides immediate feedback but requires more resources on the managed cluster.
Here is an example configuring watch-based feedback for a deployment:
apiVersion: work.open-cluster-management.io/v1
kind: ManifestWork
metadata: ...
spec:
  workload: ...
  manifestConfigs:
    - resourceIdentifier:
        group: apps
        resource: deployments
        namespace: default
        name: hello
      feedbackScrapeType: Watch
      feedbackRules:
        - type: WellKnownStatus
Important considerations for Watch mode:
- Watch mode creates informers for each watched resource, which consumes more memory and API server connections on the managed cluster
- The work agent has a configurable limit on the maximum number of concurrent watches (controlled by the
--max-feedback-watchflag) - If the watch limit is reached, additional resources will automatically fall back to Poll mode
- Watch mode is recommended for resources that change frequently and require real-time status updates
- Poll mode is recommended for resources that change infrequently or when managing a large number of resources
When a ManifestWork is deleted or when feedbackScrapeType changes from Watch to Poll, the work agent automatically cleans up the associated informers to free resources.
In the end, the scraped values from feedback rules will be shown in the status:
apiVersion: work.open-cluster-management.io/v1
kind: ManifestWork
metadata: ...
spec: ...
status:
  resourceStatus:
    manifests:
    - conditions: ...
      resourceMeta: ...
      statusFeedback:
        values:
        - fieldValue:
            integer: 1
            type: Integer
          name: ReadyReplicas
        - fieldValue:
            integer: 1
            type: Integer
          name: Replicas
        - fieldValue:
            integer: 1
            type: Integer
          name: AvailableReplicas
        - fieldValue:
            string: "True"
            type: String
          name: isAvailable
Workload Completion
The workload completion feature allows ManifestWork to track when certain workloads have
completed their execution and optionally perform automatic garbage collection. This is particularly
useful for workloads that are expected to run once and then be cleaned up, such as Jobs or Pods with
specific restart policies.
Overview
OCM traditionally recreates any resources that get deleted from managed clusters as long
as the ManifestWork exists. However, for workloads like Jobs with ttlSecondsAfterFinished or
Pods that exit and get cleaned up by cluster-autoscaler, this behavior is often undesirable.
The workload completion feature addresses this by:
- Tracking completion status of workloads using condition rules
- Preventing updates to completed workloads
- Optionally garbage collecting the entire
ManifestWorkafter completion - Supporting both well-known Kubernetes resources and custom completion logic
Condition Rules
Condition rules are configured in the manifestConfigs section to define how completion should
be determined for specific manifests. You can specify condition rules using the conditionRules field:
apiVersion: work.open-cluster-management.io/v1
kind: ManifestWork
metadata:
  namespace: cluster1
  name: example-job
spec:
  workload:
    manifests:
      - apiVersion: batch/v1
        kind: Job
        metadata:
          name: pi-calculation
          namespace: default
        spec:
          manualSelector: true
          selector:
            matchLabels:
              job: pi-calculation
          template:
            metadata:
              labels:
                job: pi-calculation
            spec:
              containers:
              - name: pi
                image: perl:5.34.0
                command: ["perl", "-Mbignum=bpi", "-wle", "print bpi(2000)"]
              restartPolicy: Never
          backoffLimit: 4
  manifestConfigs:
    - resourceIdentifier:
        group: batch
        resource: jobs
        namespace: default
        name: pi-calculation
      conditionRules:
        - type: WellKnownConditions
          condition: Complete
Well-Known Completions
For common Kubernetes resources, you can use the WellKnownConditions type which provides
built-in completion logic:
Job Completion: A Job is considered complete when it has a condition of type Complete or Failed
with status True.
Pod Completion: A Pod is considered complete when its phase is Succeeded or Failed.
manifestConfigs:
  - resourceIdentifier:
      group: batch
      resource: jobs
      namespace: default
      name: my-job
    conditionRules:
      - type: WellKnownConditions
        condition: Complete
Custom CEL Expressions
For custom resources or more complex completion logic, you can use CEL (Common Expression Language) expressions:
manifestConfigs:
  - resourceIdentifier:
      group: example.com
      resource: mycustomresources
      namespace: default
      name: my-custom-resource
    conditionRules:
      - condition: Complete
        type: CEL
        celExpressions:
          - |
            object.status.conditions.filter(
              c, c.type == 'Complete' || c.type == 'Failed'
            ).exists(
              c, c.status == 'True'
            )
        messageExpression: |
          result ? "Custom resource is complete" : "Custom resource is not complete"
In CEL expressions:
object: The current instance of the manifestresult: Boolean result of the CEL expressions (available in messageExpression)
TTL and Automatic Garbage Collection
You can enable automatic garbage collection of the entire ManifestWork after all workloads
with completion rules have finished by setting ttlSecondsAfterFinished in the deleteOption:
apiVersion: work.open-cluster-management.io/v1
kind: ManifestWork
metadata:
  namespace: cluster1
  name: job-with-cleanup
spec:
  deleteOption:
    ttlSecondsAfterFinished: 300  # Delete 5 minutes after completion
  workload:
    manifests:
      - apiVersion: batch/v1
        kind: Job
        # ... job specification
  manifestConfigs:
    - resourceIdentifier:
        group: batch
        resource: jobs
        namespace: default
        name: my-job
      conditionRules:
        - type: WellKnownConditions
          condition: Complete
Important Notes:
- If
ttlSecondsAfterFinishedis set but no completion rules are defined, theManifestWorkwill never be considered finished - If completion rules are set but no TTL is specified, the
ManifestWorkwill complete but not be automatically deleted - Setting
ttlSecondsAfterFinished: 0makes theManifestWorkeligible for immediate deletion after completion
Completion Behavior
Once a manifest is marked as completed:
- No Further Updates: The work agent will no longer update or recreate the completed manifest, even if the
ManifestWorkspecification changes - ManifestWork Completion: When all manifests with completion rules have completed, the entire
ManifestWorkis considered complete - Mixed Completion: If you want some manifests to complete but not the entire
ManifestWork, set a completion rule with CEL expressionfalsefor at least one other manifest
Status Tracking
Completion status is reflected in both manifest-level and ManifestWork-level conditions:
status:
  conditions:
    - lastTransitionTime: "2025-02-20T18:53:40Z"
      message: "Job is finished"
      reason: "ConditionRulesAggregated"
      status: "True"
      type: Complete
  resourceStatus:
    manifests:
      - conditions:
          - lastTransitionTime: "2025-02-20T19:12:22Z"
            message: "Job is finished"
            reason: "ConditionRuleEvaluated"
            status: "True"
            type: Complete
        resourceMeta:
          group: batch
          kind: Job
          name: pi-calculation
          namespace: default
          ordinal: 0
          resource: jobs
          version: v1
All conditions with the same type from manifest-level are aggregated to ManifestWork-level status.conditions.
Multiple Condition Types
You can define multiple condition rules for different condition types on the same manifest:
manifestConfigs:
  - resourceIdentifier:
      group: example.com
      resource: mycustomresources
      namespace: default
      name: my-resource
    conditionRules:
      - condition: Complete
        type: CEL
        celExpressions:
          - expression: |
              object.status.conditions.exists(
                c, c.type == 'Complete' && c.status == 'True'
              )
        messageExpression: |
          result ? "Resource completed successfully" : "Resource not complete"
      - condition: Initialized
        type: CEL
        celExpressions:
          - expression: |
              object.status.conditions.exists(
                c, c.type == 'Initialized' && c.status == 'True'
              )
        messageExpression: |
          result ? "Resource is initialized" : "Resource not initialized"
Examples
Run a Job once without cleanup:
apiVersion: work.open-cluster-management.io/v1
kind: ManifestWork
metadata:
  namespace: cluster1
  name: one-time-job
spec:
  workload:
    manifests:
      - apiVersion: batch/v1
        kind: Job
        metadata:
          name: data-migration
          namespace: default
        spec:
          template:
            spec:
              containers:
              - name: migrator
                image: my-migration-tool:latest
                command: ["./migrate-data.sh"]
              restartPolicy: Never
  manifestConfigs:
    - resourceIdentifier:
        group: batch
        resource: jobs
        namespace: default
        name: data-migration
      conditionRules:
        - type: WellKnownConditions
          condition: Complete
Run a Job and clean up after 30 seconds:
apiVersion: work.open-cluster-management.io/v1
kind: ManifestWork
metadata:
  namespace: cluster1
  name: temp-job-with-cleanup
spec:
  deleteOption:
    ttlSecondsAfterFinished: 30
  workload:
    manifests:
      - apiVersion: batch/v1
        kind: Job
        metadata:
          name: temp-task
          namespace: default
        spec:
          template:
            spec:
              containers:
              - name: worker
                image: busybox:latest
                command: ["echo", "Task completed"]
              restartPolicy: Never
  manifestConfigs:
    - resourceIdentifier:
        group: batch
        resource: jobs
        namespace: default
        name: temp-task
      conditionRules:
        - type: WellKnownConditions
          condition: Complete
Garbage collection
To ensure the resources applied by ManifestWork are reliably recorded, the work agent creates an AppliedManifestWork on the managed cluster for each ManifestWork as an anchor for resources relating to ManifestWork. When ManifestWork is deleted, work agent runs a Foreground deletion, that ManifestWork will stay in deleting state until all its related resources has been fully cleaned in the managed cluster.
Delete options
User can explicitly choose not to garbage collect the applied resources when a ManifestWork is deleted. The user should specify the deleteOption in the ManifestWork. By default, deleteOption is set as Foreground
which means the applied resources on the spoke will be deleted with the removal of ManifestWork. User can set it to
Orphan so the applied resources will not be deleted. Here is an example:
apiVersion: work.open-cluster-management.io/v1
kind: ManifestWork
metadata: ...
spec:
  workload: ...
  deleteOption:
    propagationPolicy: Orphan
Alternatively, user can also specify a certain resource defined in the ManifestWork to be orphaned by setting the
deleteOption to be SelectivelyOrphan. Here is an example with SelectivelyOrphan specified. It ensures the removal of deployment resource specified in the ManifestWork while the service resource is kept.
apiVersion: work.open-cluster-management.io/v1
kind: ManifestWork
metadata:
  name: selective-delete-work
spec:
  workload: ...
  deleteOption:
    propagationPolicy: SelectivelyOrphan
    selectivelyOrphans:
      orphaningRules:
      - group: ""
        resource: services
        namespace: default
        name: helloworld
Resource Race and Adoption
It is possible to create two ManifestWorks for the same cluster with the same resource defined.
For example, the user can create two Manifestworks on cluster1, and both Manifestworks have the
deployment resource hello in default namespace. If the content of the resource is different, the
two ManifestWorks will fight, and it is desired since each ManifestWork is treated as equal and
each ManifestWork is declaring the ownership of the resource. If there is another controller on
the managed cluster that tries to manipulate the resource applied by a ManifestWork, this
controller will also fight with work agent.
When one of the ManifestWork is deleted, the applied resource will not be removed no matter
DeleteOption is set or not. The remaining ManifestWork will still keep the ownership of the resource.
To resolve such conflict, user can choose a different update strategy to alleviate the resource conflict.
CreateOnly: with this strategy, the work-agent will only ensure creation of the certain manifest if the resource does not exist. work-agent will not update the resource, hence the ownership of the whole resource can be taken over by anotherManifestWorkor controller.ServerSideApply: with this strategy, the work-agent will run server side apply for the certain manifest. The default field manager iswork-agent, and can be customized. If anotherManifestWorkor controller takes the ownership of a certain field in the manifest, the originalManifestWorkwill report conflict. User can prune the originalManifestWorkso only field that it will own maintains.ReadOnly: with this strategy, the work-agent will not apply manifests onto the cluster, but it still can read resource fields and return results when feedback rules are defined. Only metadata of the manifest is required to be defined in the spec of theManifestWorkwith this strategy.
An example of using ServerSideApply strategy as following:
- User creates a
ManifestWorkwithServerSideApplyspecified:
apiVersion: work.open-cluster-management.io/v1
kind: ManifestWork
metadata:
  namespace: <target managed cluster>
  name: hello-work-demo
spec:
  workload: ...
  manifestConfigs:
    - resourceIdentifier:
        group: apps
        resource: deployments
        namespace: default
        name: hello
      updateStrategy:
        type: ServerSideApply
- User creates another
ManifestWorkwithServerSideApplybut with different field manager.
apiVersion: work.open-cluster-management.io/v1
kind: ManifestWork
metadata:
  namespace: <target managed cluster>
  name: hello-work-replica-patch
spec:
  workload:
    manifests:
      - apiVersion: apps/v1
        kind: Deployment
        metadata:
          name: hello
          namespace: default
        spec:
          replicas: 3
  manifestConfigs:
    - resourceIdentifier:
        group: apps
        resource: deployments
        namespace: default
        name: hello
      updateStrategy:
        type: ServerSideApply
        serverSideApply:
          force: true
          fieldManager: work-agent-another
The second ManifestWork only defines replicas in the manifest, so it takes the ownership of replicas. If the
first ManifestWork is updated to add replicas field with different value, it will get conflict condition and
manifest will not be updated by it.
Instead of creating the second ManifestWork, user can also set HPA for this deployment. HPA will also take the ownership
of replicas, and the update of replicas field in the first ManifestWork will return conflict condition.
Ignore fields in Server Side Apply
To avoid work-agent returning conflict error, when using ServerSideApply as the update strategy, users can specify certain
fields to be ignored, such that when work agent is applying the resource to the ManagedCluster, the change on the
specified fields will not be updated onto the resource.
It is useful when other actors on the ManagedCluster is updating the same field on the resources
that the ManifestWork is owning. One example as below:
apiVersion: work.open-cluster-management.io/v1
kind: ManifestWork
metadata:
  namespace: <target managed cluster>
  name: hello-work-demo
spec:
  workload: ...
  manifestConfigs:
    - resourceIdentifier:
        resource: configmaps
        namespace: default
        name: some-configmap
      updateStrategy:
        type: ServerSideApply
        serverSideApply:
          force: true
          ignoreFields:
            - condition: OnSpokePresent
              jsonPaths:
                - .data
It indicates that when the configmap is applied on the ManagedCluster, any additional change
on the data field will be ignored by the work agent, no matter the change comes from another
actor on the ManagedCluster, or from this or another ManifestWork. It applies as long as the
configmap exists on the ManagedCluster.
Alternatively, user can also set the condition field in the above example to OnSpokeChange, which
indicates that the change of the data field will not be ignored if it comes from this ManifestWork
However, change from other actors on the ManagedCluster will be ignored.
Permission setting for work agent
All workload manifests are applied to the managed cluster by the work-agent, and by default the work-agent has the following permission for the managed cluster:
- clusterRole
admin(instead of thecluster-admin) to apply kubernetes common resources - managing
customresourcedefinitions, but can not manage a specific custom resource instance - managing
clusterrolebindings,rolebindings,clusterroles,roles, including thebindandescalatepermission, this is why we can grant work-agent service account extra permissions using ManifestWork
So if the workload manifests to be applied on the managed cluster exceeds the above permission, for example some
Custom Resource instances, there will be an error ... is forbidden: User "system:serviceaccount:open-cluster-management-agent:klusterlet-work-sa" cannot get resource ...
reflected on the ManifestWork status.
To prevent this, the work-agent needs to be given the corresponding permissions. You can add the permission by creating RBAC resources on the managed cluster directly, or by creating a ManifestWork including the RBAC resources on the hub cluster, then the work-agent will apply the RBAC resources to the managed cluster. As for creating the RBAC resources, there are several options:
- Option 1: Create clusterRoles with label
"open-cluster-management.io/aggregate-to-work": "true"for your to-be-applied resources, the rules defined in the clusterRoles will be aggregated to the work-agent automatically; (Supported since OCM version >= v0.12.0, Recommended) - Option 2: Create clusterRoles with label
rbac.authorization.k8s.io/aggregate-to-admin: "true"for your to-be-applied resources, the rules defined in the clusterRoles will be aggregated to the work-agent automatically; (Deprecated since OCM version >= v0.12.0, use the Option 1 instead) - Option 3: Create role/clusterRole roleBinding/clusterRoleBinding for the
klusterlet-work-saservice account; (Deprecated since OCM version >= v0.12.0, use the Option 1 instead)
Below is an example using ManifestWork to give the work-agent permission for resource machines.cluster.x-k8s.io
- Option 1: Use label
"open-cluster-management.io/aggregate-to-work": "true"to aggregate the permission; Recommended
apiVersion: work.open-cluster-management.io/v1
kind: ManifestWork
metadata:
  namespace: cluster1
  name: permission-set
spec:
  workload:
    manifests:
      - apiVersion: rbac.authorization.k8s.io/v1
        kind: ClusterRole
        metadata:
          name: open-cluster-management:klusterlet-work:my-role
          labels:
            open-cluster-management.io/aggregate-to-work: "true"  # with this label, the clusterRole will be selected to aggregate
        rules:
          # Allow agent to managed machines
          - apiGroups: ["cluster.x-k8s.io"]
            resources: ["machines"]
            verbs: ["get", "list", "watch", "create", "update", "patch", "delete"]
- Option 2: Use clusterRole and clusterRoleBinding; Deprecated since OCM version >= v0.12.0, use the Option 1 instead.
Because the work-agent might be running in a different namespace than the
open-cluster-management-agent
apiVersion: work.open-cluster-management.io/v1
kind: ManifestWork
metadata:
  namespace: cluster1
  name: permission-set
spec:
  workload:
    manifests:
      - apiVersion: rbac.authorization.k8s.io/v1
        kind: ClusterRole
        metadata:
          name: open-cluster-management:klusterlet-work:my-role
        rules:
          # Allow agent to managed machines
          - apiGroups: ["cluster.x-k8s.io"]
            resources: ["machines"]
            verbs: ["get", "list", "watch", "create", "update", "patch", "delete"]
      - apiVersion: rbac.authorization.k8s.io/v1
        kind: ClusterRoleBinding
        metadata:
          name: open-cluster-management:klusterlet-work:my-binding
        roleRef:
          apiGroup: rbac.authorization.k8s.io
          kind: ClusterRole
          name: open-cluster-management:klusterlet-work:my-role
        subjects:
          - kind: ServiceAccount
            name: klusterlet-work-sa
            namespace: open-cluster-management-agent
Treating defaulting/immutable fields in API
The kube-apiserver sets the defaulting/immutable fields for some APIs if the user does not set them. And it may fail to
deploy these APIs using ManifestWork. Because in the reconcile loop, the work agent will try to update the immutable
or default field after comparing the desired manifest in the ManifestWork and existing resource in the cluster, and
the update will fail or not take effect.
Let’s use Job as an example. The kube-apiserver will set a default selector and label on the Pod of Job if the user does
not set spec.Selector in the Job. The fields are immutable, so the ManifestWork will report AppliedManifestFailed
when we apply a Job without spec.Selector using ManifestWork.
apiVersion: work.open-cluster-management.io/v1
kind: ManifestWork
metadata:
  namespace: cluster1
  name: exmaple-job
spec:
  workload:
    manifests:
      - apiVersion: batch/v1
        kind: Job
        metadata:
          name: pi
          namespace: default
        spec:
          template:
            spec:
              containers:
              - name: pi
                image: perl:5.34.0
                command: ["perl",  "-Mbignum=bpi", "-wle", "print bpi(2000)"]
              restartPolicy: Never
          backoffLimit: 4
There are 2 options to fix this issue.
- Specify the fields manually if they are configurable. For example, set
spec.manualSelector=trueand your own labels in thespec.selectorof the Job, and set the same labels for the containers.
apiVersion: work.open-cluster-management.io/v1
kind: ManifestWork
metadata:
  namespace: cluster1
  name: exmaple-job-1
spec:
  workload:
    manifests:
      - apiVersion: batch/v1
        kind: Job
        metadata:
          name: pi
          namespace: default
        spec:
          manualSelector: true
          selector:
            matchLabels:
              job: pi
          template:
            metadata:
              labels:
                job: pi
            spec:
              containers:
              - name: pi
                image: perl:5.34.0
                command: ["perl",  "-Mbignum=bpi", "-wle", "print bpi(2000)"]
              restartPolicy: Never
          backoffLimit: 4
- Set the updateStrategy ServerSideApply in the
ManifestWorkfor the API.
apiVersion: work.open-cluster-management.io/v1
kind: ManifestWork
metadata:
  namespace: cluster1
  name: exmaple-job
spec:
  manifestConfigs:
    - resourceIdentifier:
        group: batch
        resource: jobs
        namespace: default
        name: pi
      updateStrategy:
        type: ServerSideApply
  workload:
    manifests:
      - apiVersion: batch/v1
        kind: Job
        metadata:
          name: pi
          namespace: default
        spec:
          template:
            spec:
              containers:
              - name: pi
                image: perl:5.34.0
                command: ["perl",  "-Mbignum=bpi", "-wle", "print bpi(2000)"]
              restartPolicy: Never
          backoffLimit: 4
Dynamic identity authorization
All manifests in ManifestWork are applied by the work-agent using the mounted service account to raise requests
against the managed cluster by default. And the work agent has very high permission to access the managed cluster which
means that any hub user with write access to the ManifestWork resources will be able to dispatch any resources that
the work-agent can manipulate to the managed cluster.
The executor subject feature(introduced in release 0.9.0) provides a way to clarify the owner identity(executor) of the ManifestWork before it
takes effect so that we can explicitly check whether the executor has sufficient permission in the managed cluster.
The following example clarifies the owner “executor1” of the ManifestWork, so before the work-agent applies the
“default/test” ConfigMap to the managed cluster, it will first check whether the ServiceAccount “default/executor1”
has the permission to apply this ConfigMap
apiVersion: work.open-cluster-management.io/v1
kind: ManifestWork
metadata:
  namespace: cluster1
  name: example-manifestwork
spec:
  executor:
    subject:
      type: ServiceAccount
      serviceAccount:
        namespace: default
        name: executor1
  workload:
    manifests:
      - apiVersion: v1
        data:
          a: b
        kind: ConfigMap
        metadata:
          namespace: default
          name: test
Not any hub user can specify any executor at will. Hub users can only use the executor for which they have an
execute-as(virtual verb) permission. For example, hub users bound to the following Role can use the “executor1”
ServiceAccount in the “default” namespace on the managed cluster.
apiVersion: rbac.authorization.k8s.io/v1
kind: Role
metadata:
  name: cluster1-executor1
  namespace: cluster1
rules:
- apiGroups:
  - work.open-cluster-management.io
  resources:
  - manifestworks
  verbs:
  - execute-as
  resourceNames:
  - system:serviceaccount:default:executor1
For backward compatibility, if the executor is absent, the work agent will keep using the mounted service account to
apply resources. But using the executor is encouraged, so we have a feature gate NilExecutorValidating to control
whether any hub user is allowed to not set the executor. It is disabled by default, we can use the following
configuration to the ClusterManager to enable it. When it is enabled, not setting executor will be regarded as using
the “/klusterlet-work-sa” (namespace is empty, name is klusterlet-work-sa) virtual service account on the managed
cluster for permission verification, which means only hub users with “execute-as” permissions on the
“system:serviceaccount::klusterlet-work-sa” ManifestWork are allowed not to set the executor.
spec:
  workConfiguration:
    featureGates:
    - feature: NilExecutorValidating
      mode: Enable
Work-agent uses the SubjectAccessReview API to check whether an executor has permission to the manifest resources, which
will cause a large number of SAR requests to the managed cluster API-server, so we provided a new feature gate
ExecutorValidatingCaches(in release 0.10.0) to cache the result of the executor’s permission to the manifest
resource, it only works when the managed cluster uses
RBAC mode authorization,
and is disabled by default as well, but can be enabled by using the following configuration for Klusterlet:
spec:
  workConfiguration:
    featureGates:
    - feature: ExecutorValidatingCaches
      mode: Enable
Enhancement proposal: Work Executor Group
3.2 - ManifestWorkReplicaSet
What is ManifestWorkReplicaSet
ManifestWorkReplicaSet is an aggregator API that uses ManifestWork and Placement to automatically create ManifestWork resources for clusters selected by Placement. It simplifies multi-cluster workload distribution by eliminating the need to manually create individual ManifestWork resources for each target cluster.
Feature Enablement
ManifestWorkReplicaSet is in alpha release and is not enabled by default. To enable this feature, you must configure the cluster-manager instance on the hub cluster.
Edit the cluster-manager CR:
$ oc edit ClusterManager cluster-manager
Add the workConfiguration field to enable the ManifestWorkReplicaSet feature gate:
kind: ClusterManager
metadata:
  name: cluster-manager
spec:
   ...
  workConfiguration:
    featureGates:
    - feature: ManifestWorkReplicaSet
      mode: Enable
Verify the feature is enabled successfully:
$ oc get ClusterManager cluster-manager -o yaml
Confirm that the cluster-manager-work-controller deployment appears in the status under status.generations:
kind: ClusterManager
metadata:
  name: cluster-manager
spec:
   ...
status:
   ...
  generations:
    ...
  - group: apps
    lastGeneration: 2
    name: cluster-manager-work-webhook
    namespace: open-cluster-management-hub
    resource: deployments
    version: v1
  - group: apps
    lastGeneration: 1
    name: cluster-manager-work-controller
    namespace: open-cluster-management-hub
    resource: deployments
    version: v1
Overview
Here’s a simple example to get started with ManifestWorkReplicaSet.
This example deploys a CronJob and Namespace to a group of clusters selected by Placement.
apiVersion: work.open-cluster-management.io/v1alpha1
kind: ManifestWorkReplicaSet
metadata:
  name: mwrset-cronjob
  namespace: ocm-ns
spec:
  placementRefs:
    - name: placement-rollout-all # Name of a created Placement
      rolloutStrategy:
        type: All
  manifestWorkTemplate:
    deleteOption:
      propagationPolicy: SelectivelyOrphan
      selectivelyOrphans:
        orphaningRules:
          - group: ''
            name: ocm-ns
            namespace: ''
            resource: Namespace
    manifestConfigs:
      - feedbackRules:
          - jsonPaths:
              - name: lastScheduleTime
                path: .status.lastScheduleTime
              - name: lastSuccessfulTime
                path: .status.lastSuccessfulTime
            type: JSONPaths
        resourceIdentifier:
          group: batch
          name: sync-cronjob
          namespace: ocm-ns
          resource: cronjobs
    workload:
      manifests:
        - kind: Namespace
          apiVersion: v1
          metadata:
            name: ocm-ns
        - kind: CronJob
          apiVersion: batch/v1
          metadata:
            name: sync-cronjob
            namespace: ocm-ns
          spec:
            schedule: '* * * * *'
            concurrencyPolicy: Allow
            suspend: false
            jobTemplate:
              spec:
                backoffLimit: 2
                template:
                  spec:
                    containers:
                      - name: hello
                        image: 'quay.io/prometheus/busybox:latest'
                        args:
                          - /bin/sh
                          - '-c'
                          - date; echo Hello from the Kubernetes cluster
The placementRefs field uses the Rollout Strategy API to control how ManifestWork resources are applied to the selected clusters.
In the example above, the placementRefs references placement-rollout-all with a rolloutStrategy of All, which means the workload will be deployed to all selected clusters simultaneously.
Rollout Strategy
ManifestWorkReplicaSet supports three rollout strategy types to control how workloads are distributed across clusters. For detailed rollout strategy documentation, see the Placement rollout strategy section.
Note: The placement reference must be in the same namespace as the ManifestWorkReplicaSet.
- All: Deploy to all selected clusters simultaneously
  placementRefs:
    - name: placement-rollout-all # Name of a created Placement
      rolloutStrategy:
        type: All
- Progressive: Gradual rollout with configurable parameters
  placementRefs:
    - name: placement-rollout-progressive # Name of a created Placement
      rolloutStrategy:
        type: Progressive
        progressive:
          minSuccessTime: 5m
          progressDeadline: 10m
          maxFailures: 5%
          mandatoryDecisionGroups:
          - groupName: "prod-canary-west"
          - groupName: "prod-canary-east"
- ProgressivePerGroup: Progressive rollout per decision group
  placementRefs:
    - name: placement-rollout-progressive-per-group # Name of a created Placement
      rolloutStrategy:
        type: ProgressivePerGroup
        progressivePerGroup:
          progressDeadline: 10m
          maxFailures: 2
Rollout Mechanism
The ManifestWorkReplicaSet rollout process is based on the Applied, Progressing and Degraded conditions of each ManifestWork. Progressing and Degraded conditions are not built-in but must be defined using Custom CEL Expressions in the manifestConfigs section.
Condition Requirements
-
Applied condition (required): Indicates whether the ManifestWork has been successfully applied to the managed cluster by the work agent.
- This is a built-in condition that is automatically set by the work agent.
- The rollout controller checks this condition first to ensure the work has been properly applied before evaluating other conditions.
- If the
Appliedcondition is missing, has Status=False/Unknown, or has a stale ObservedGeneration, it will never proceed to the next cluster. - This ensures that rollout decisions are based on current status information, not stale data from previous generations.
-
Progressing condition (required): Tracks whether the ManifestWork is currently being applied to the cluster. The rollout controller uses this condition to determine if a cluster deployment is in progress or completed.
- For rollout strategies
ProgressiveandProgressivePerGroup, this is a required condition to determine if the rollout can proceed to the next cluster. - When the
Progressingcondition isFalse(andAppliedis ready), the deployment is considered complete and succeeded, and the rollout will continue to the next cluster based onminSuccessTime. - If this condition is not defined or has a stale ObservedGeneration, the rollout will never proceed to the next cluster.
- For rollout strategies
-
Degraded condition (optional): Indicates if the ManifestWork has failed or encountered issues.
- This is an optional condition used only to determine failure states.
- If the
Degradedcondition status isTrue, the rollout may stop or count towardsmaxFailures. - If this condition is not defined, the workload is assumed to never be degraded.
- If this condition exists but has a stale ObservedGeneration, the rollout will wait for it to catch up to avoid using stale status information.
Rollout Status Determination:
The rollout controller determines the status of each ManifestWork based on the combination of Applied, Progressing and Degraded condition values:
| Applied | Progressing | Degraded | Rollout Status | Description |
|---|---|---|---|---|
False |
Any | Any | ToApply | Work has not been applied or condition is stale |
True |
True |
True |
Failed | Work is progressing but degraded |
True |
True |
False or not set |
Progressing | Work is being applied and is healthy |
True |
False |
False or not set |
Succeeded | Work has been successfully applied |
True |
Unknown/Not set | Any | Progressing | Conservative fallback: treat as still progressing |
Example: Progressive Rollout with Custom Conditions
This example demonstrates a progressive rollout with custom CEL expressions that define Progressing and Degraded conditions for a Deployment:
apiVersion: work.open-cluster-management.io/v1alpha1
kind: ManifestWorkReplicaSet
metadata:
  name: mwrset
  namespace: default
spec:
  placementRefs:
    - name: placement-test # Name of a created Placement
      rolloutStrategy:
        type: Progressive
        progressive:
          minSuccessTime: 1m
          progressDeadline: 10m
          maxFailures: 5%
          maxConcurrency: 1
  manifestWorkTemplate:
    workload:
      manifests:
        - apiVersion: apps/v1
          kind: Deployment
          metadata:
            name: hello
            namespace: default
          spec:
            selector:
              matchLabels:
                app: hello
            template:
              metadata:
                labels:
                  app: hello
              spec:
                containers:
                  - name: hello
                    image: busybox
                    command:
                      ["sh", "-c", 'echo "Hello, Kubernetes!" && sleep 36000']
    manifestConfigs:
      - resourceIdentifier:
          group: apps
          resource: deployments
          namespace: default
          name: hello
        conditionRules:
          - condition: Progressing
            type: CEL
            celExpressions:
              - |
                !(
                  (object.metadata.generation == object.status.observedGeneration) &&
                  has(object.status.conditions) &&
                  object.status.conditions.exists(c, c.type == 'Progressing' && c.status == 'True' && c.reason == 'NewReplicaSetAvailable')
                )
            messageExpression: |
              result ? "Applying" : "Completed"
          - condition: Degraded
            type: CEL
            celExpressions:
              - |
                (object.metadata.generation == object.status.observedGeneration) &&
                (has(object.status.readyReplicas) && has(object.status.replicas) && object.status.readyReplicas < object.status.replicas)
            messageExpression: |
              result ? "Degraded" : "Healthy"
Status tracking
The PlacementSummary shows the number of manifestWorks applied to the placement’s clusters based on the placementRef’s rolloutStrategy and total number of clusters. The manifestWorkReplicaSet Summary aggregate the placementSummaries showing the total number of applied manifestWorks to all clusters.
The manifestWorkReplicaSet has three status conditions;
- PlacementVerified verify the placementRefs status; not exist or empty cluster selection.
- PlacementRolledOut verify the rollout strategy status; progressing or complete.
- ManifestWorkApplied verify the created manifestWork status; applied, progressing, degraded or available.
The manifestWorkReplicaSet determines the ManifestWorkApplied condition status based on the resource state (applied or available) of each manifestWork.
Here is an example.
apiVersion: work.open-cluster-management.io/v1alpha1
kind: ManifestWorkReplicaSet
metadata:
  name: mwrset-cronjob
  namespace: ocm-ns
spec:
  placementRefs:
    - name: placement-rollout-all
      ...
    - name: placement-rollout-progressive
      ...
    - name: placement-rollout-progressive-per-group
      ...
  manifestWorkTemplate:
     ...
status:
 conditions:
   - lastTransitionTime: '2023-04-27T02:30:54Z'
     message: ''
     reason: AsExpected
     status: 'True'
     type: PlacementVerified
   - lastTransitionTime: '2023-04-27T02:30:54Z'
     message: ''
     reason: Progressing
     status: 'False'
     type: PlacementRolledOut
   - lastTransitionTime: '2023-04-27T02:30:54Z'
     message: ''
     reason: AsExpected
     status: 'True'
     type: ManifestworkApplied
 placementSummary:
 - name: placement-rollout-all
   availableDecisionGroups: 1 (10 / 10 clusters applied)
   summary:
     applied: 10
     available: 10
     progressing: 0
     degraded: 0
     total: 10
 - name: placement-rollout-progressive
   availableDecisionGroups: 3 (20 / 30 clusters applied)
   summary:
     applied: 20
     available: 20
     progressing: 0
     degraded: 0
     total: 20
 - name: placement-rollout-progressive-per-group
   availableDecisionGroups: 4 (15 / 20 clusters applied)
   summary:
     applied: 15
     available: 15
     progressing: 0
     degraded: 0
     total: 15
 summary:
   applied: 45
   available: 45
   progressing: 0
   degraded: 0
   total: 45
4 - Content Placement
4.1 - Placement
CHANGE NOTE:
-
The
PlacementandPlacementDecisionAPI v1alpha1 version will no longer be served in OCM v0.9.0.- Migrate manifests and API clients to use the
PlacementandPlacementDecisionAPI v1beta1 version, available since OCM v0.7.0. - All existing persisted objects are accessible via the new API.
- Notable changes:
- The field
spec.prioritizerPolicy.configurations.nameinPlacementAPI v1alpha1 is removed and replaced byspec.prioritizerPolicy.configurations.scoreCoordinate.builtInin v1beta1.
- The field
- Migrate manifests and API clients to use the
-
Clusters in terminating state will not be selected by placements from OCM v0.14.0.
Overall
Placement concept is used to dynamically select a set of managedClusters
in one or multiple ManagedClusterSet so that higher level
users can either replicate Kubernetes resources to the member clusters or run
their advanced workload i.e. multi-cluster scheduling.
The “input” and “output” of the scheduling process are decoupled into two
separated Kubernetes API Placement and PlacementDecision. As is shown in
the following picture, we prescribe the scheduling policy in the spec of
Placement API and the placement controller in the hub will help us to
dynamically select a slice of managed clusters from the given cluster sets.
The selected clusters will be listed in PlacementDecision.
Following the architecture of Kubernetes’ original scheduling framework, the multi-cluster scheduling is logically divided into two phases internally:
- Predicate: Hard requirements for the selected clusters.
- Prioritize: Rank the clusters by the soft requirements and select a subset among them.
Select clusters in ManagedClusterSet
By following the previous section about
ManagedClusterSet, now we’re supposed to have one or multiple valid cluster
sets in the hub clusters. Then we can move on and create a placement in the
“workspace namespace” by specifying predicates and prioritizers in the
Placement API to define our own multi-cluster scheduling policy.
Notes:
- Clusters in terminating state will not be selected by placements.
Predicates
In the predicates section, you can select clusters by labels, clusterClaims, or CEL expressions.
Label or ClusterClaim Selection
For instance, you can select 3 clusters with label purpose=test and
clusterClaim platform.open-cluster-management.io=aws as seen in the following
examples:
apiVersion: cluster.open-cluster-management.io/v1beta1
kind: Placement
metadata:
  name: placement1
  namespace: ns1
spec:
  numberOfClusters: 3
  clusterSets:
    - prod
  predicates:
    - requiredClusterSelector:
        labelSelector:
          matchLabels:
            purpose: test
        claimSelector:
          matchExpressions:
            - key: platform.open-cluster-management.io
              operator: In
              values:
                - aws
Note that the distinction between label-selecting and claim-selecting is elaborated in this page about how to extend attributes for the managed clusters.
CEL Expression Selection
apiVersion: cluster.open-cluster-management.io/v1beta1
kind: Placement
metadata:
  name: placement1
  namespace: ns1
spec:
  numberOfClusters: 3
  clusterSets:
    - prod
  predicates:
  - requiredClusterSelector:
      celSelector:
        celExpressions:
          # Select clusters by Kubernetes version listed in managedCluster.Status.version.kubernetes.
          - managedCluster.status.version.kubernetes == "v1.31.0"
          # Select clusters by info stored in clusterClaims.
          - managedCluster.status.clusterClaims.exists(c, c.name == "kubeversion.open-cluster-management.io" && c.value == "v1.31.0")
          # Use CEL Standard macros and Standard functions on the managedCluster fields.
          - managedCluster.metadata.labels["version"].matches('^1\\.(30|31)\\.\\d+$')
          # Use Kubernetes semver library functions isLessThan and isGreaterThan to select clusters by version comparison.
          - semver(managedCluster.metadata.labels["version"]).isGreaterThan(semver("1.30.0"))
          # Use OCM customized function scores to select clusters by AddonPlacementScore.
          - managedCluster.scores("resource-usage-score").filter(s, s.name == 'memNodeAvailable').all(e, e.value > 0)
The CEL expressions provide more flexible and powerful selection capabilities with built-in libraries. For more detailed usage of CEL expressions, refer to:
Taints/Tolerations
To support filtering unhealthy/not-reporting clusters and keep workloads from being placed in unhealthy or unreachable clusters, we introduce the similar concept of taint/toleration in Kubernetes. It also allows user to add a customized taint to deselect a cluster from placement. This is useful when the user wants to set a cluster to maintenance mode and evict workload from this cluster.
In OCM, Taints and Tolerations work together to allow users to control the selection of managed clusters more flexibly.
Taints are properties of ManagedClusters, they allow a Placement to repel a set of ManagedClusters in predicates stage.
Tolerations are applied to Placements, and allow Placements to select ManagedClusters with matching taints.
The following example shows how to tolerate clusters with taints.
-
Tolerate clusters with taint
Suppose your managed cluster has taint added as below.
apiVersion: cluster.open-cluster-management.io/v1
kind: ManagedCluster
metadata:
  name: cluster1
spec:
  hubAcceptsClient: true
  taints:
    - effect: NoSelect
      key: gpu
      value: "true"
      timeAdded: '2022-02-21T08:11:06Z'
By default, the placement won’t select this cluster unless you define tolerations.
apiVersion: cluster.open-cluster-management.io/v1beta1
kind: Placement
metadata:
  name: placement1
  namespace: ns1
spec:
  tolerations:
    - key: gpu
      value: "true"
      operator: Equal
With the above tolerations defined, cluster1 could be selected by placement because of the
key: gpuandvalue: "true"match. -
Tolerate clusters with taint for a period of time
TolerationSecondsrepresents the period of time the toleration tolerates the taint. It could be used for the case like, when a managed cluster gets offline, users can make applications deployed on this cluster to be transferred to another available managed cluster after a tolerated time.apiVersion: cluster.open-cluster-management.io/v1 kind: ManagedCluster metadata: name: cluster1 spec: hubAcceptsClient: true taints: - effect: NoSelect key: cluster.open-cluster-management.io/unreachable timeAdded: '2022-02-21T08:11:06Z'If define a placement with
TolerationSecondsas below, then the workload will be transferred to another available managed cluster after 5 minutes.apiVersion: cluster.open-cluster-management.io/v1alpha1 kind: Placement metadata: name: placement1 namespace: ns1 spec: tolerations: - key: cluster.open-cluster-management.io/unreachable operator: Exists tolerationSeconds: 300
In tolerations section, it includes the
following fields:
- Key (optional). Key is the taint key that the toleration applies to.
- Value (optional). Value is the taint value the toleration matches to.
- Operator (optional). Operator represents a key’s relationship to the
value. Valid operators are
ExistsandEqual. Defaults toEqual. A toleration “matches” a taint if the keys are the same and the effects are the same, and the operator is:Equal. The operator is Equal and the values are equal.Exists. Exists is equivalent to wildcard for value, so that a placement can tolerate all taints of a particular category.
- Effect (optional). Effect indicates the taint effect to match. Empty means
match all taint effects. When specified, allowed values are
NoSelect,PreferNoSelectandNoSelectIfNew. (PreferNoSelectis not implemented yet, currently clusters with effectPreferNoSelectwill always be selected.) - TolerationSeconds (optional). TolerationSeconds represents the period of
time the toleration (which must be of effect
NoSelect/PreferNoSelect, otherwise this field is ignored) tolerates the taint. The default value is nil, which indicates it tolerates the taint forever. The start time of counting the TolerationSeconds should be theTimeAddedin Taint, not the cluster scheduled time orTolerationSecondsadded time.
Prioritizers
Score-based prioritizer
In prioritizerPolicy section, you can define the policy of prioritizers.
The following example shows how to select clusters with prioritizers.
-
Select a cluster with the largest allocatable memory.
apiVersion: cluster.open-cluster-management.io/v1beta1
kind: Placement
metadata:
  name: placement1
  namespace: ns1
spec:
  numberOfClusters: 1
  prioritizerPolicy:
    configurations:
      - scoreCoordinate:
          builtIn: ResourceAllocatableMemory
The prioritizer policy has default mode additive and default prioritizers
SteadyandBalance.In the above example, the prioritizers actually come into effect are
Steady,BalanceandResourceAllocatableMemory.And the end of this section has more description about the prioritizer policy mode and default prioritizers.
-
Select a cluster with the largest allocatable CPU and memory, and make placement sensitive to resource changes.
apiVersion: cluster.open-cluster-management.io/v1beta1
kind: Placement
metadata:
  name: placement1
  namespace: ns1
spec:
  numberOfClusters: 1
  prioritizerPolicy:
    configurations:
      - scoreCoordinate:
          builtIn: ResourceAllocatableCPU
        weight: 2
      - scoreCoordinate:
          builtIn: ResourceAllocatableMemory
        weight: 2
The prioritizer policy has default mode additive and default prioritizers
SteadyandBalance, and their default weight is 1.In the above example, the prioritizers actually come into effect are
Steadywith weight 1,Balancewith weight 1,ResourceAllocatableCPUwith weight 2 andResourceAllocatableMemorywith weight 2. The cluster score will be a combination of the 4 prioritizers score. SinceResourceAllocatableCPUandResourceAllocatableMemoryhave higher weight, they will be weighted more in the results, and make placement sensitive to resource changes.And the end of this section has more description about the prioritizer weight and how the final score is calculated.
-
Select two clusters with the largest addon score CPU ratio, and pin the placement decisions.
apiVersion: cluster.open-cluster-management.io/v1beta1
kind: Placement
metadata:
  name: placement1
  namespace: ns1
spec:
  numberOfClusters: 2
  prioritizerPolicy:
    mode: Exact
    configurations:
      - scoreCoordinate:
          builtIn: Steady
        weight: 3
      - scoreCoordinate:
          type: AddOn
          addOn:
            resourceName: default
            scoreName: cpuratio
In the above example, explicitly define the mode as exact. The prioritizers actually come into effect are
Steadywith weight 3 and addon score cpuratio with weight 1. Go into the Extensible scheduling section to learn more about addon score.
The prioritizerPolicy section includes the following fields:
modeis eitherExact,Additiveor"", where""isAdditiveby default.- In
Additivemode, any prioritizer not explicitly enumerated is enabled in its defaultConfigurations, in whichSteadyandBalanceprioritizers have the weight of 1 while other prioritizers have the weight of 0.Additivedoesn’t require configuring all prioritizers. The defaultConfigurationsmay change in the future, and additional prioritization will happen. - In
Exactmode, any prioritizer not explicitly enumerated is weighted as zero.Exactrequires knowing the full set of prioritizers you want, but avoids behavior changes between releases.
- In
configurationsrepresents the configuration of prioritizers.scoreCoordinaterepresents the configuration of the prioritizer and score source.typedefines the type of the prioritizer score. Type is eitherBuiltIn,AddOnor “”, where "" isBuiltInby default. When the type isBuiltIn, aBuiltInprioritizer name must be specified. When the type isAddOn, need to configure the score source inAddOn.builtIndefines the name of aBuiltInprioritizer. Below are the validBuiltInprioritizer names.Balance: balance the decisions among the clusters.Steady: ensure the existing decision is stabilized.ResourceAllocatableCPU: sort clusters based on the allocatable CPU.ResourceAllocatableMemory: sort clusters based on the allocatable memory.
addOndefines the resource name and score name.AddOnPlacementScoreis introduced to describe addon scores, go into the Extensible scheduling section to learn more about it.resourceNamedefines the resource name of theAddOnPlacementScore. The placement prioritizer selectsAddOnPlacementScoreCR by this name.scoreNamedefines the score name insideAddOnPlacementScore.AddOnPlacementScorecontains a list of score name and score value,scoreNamespecifies the score to be used by the prioritizer.
weightdefines the weight of the prioritizer. The value must be ranged in [-10,10]. Each prioritizer will calculate an integer score of a cluster in the range of [-100, 100]. The final score of a cluster will be sum(weight * prioritizer_score). A higher weight indicates that the prioritizer weights more in the cluster selection, while 0 weight indicates that the prioritizer is disabled. A negative weight indicates wanting to select the last ones.
Extensible scheduling
In placement resource based scheduling, in some cases the prioritizer needs extra data (more than the default value provided by ManagedCluster) to calculate the score of the managed cluster. For example, schedule the clusters based on cpu or memory usage data of the clusters fetched from a monitoring system.
So we provide a new API AddOnPlacementScore to support a more extensible way
to schedule based on customized scores.
- As a user, as mentioned in the above section, can specify the score in placement yaml to select clusters.
- As a score provider, a 3rd party controller could run on either hub or managed
cluster, to maintain the lifecycle of
AddOnPlacementScoreand update score into it.
Extend the multi-cluster scheduling capabilities with placement introduces how to implement a customized score provider.
Refer to the enhancements to learn more.
PlacementDecisions
A slice of PlacementDecision will be created by placement controller in the
same namespace, each with a label of
cluster.open-cluster-management.io/placement={placement name}.
PlacementDecision contains the results of the cluster selection as seen in the
following examples.
apiVersion: cluster.open-cluster-management.io/v1beta1
kind: PlacementDecision
metadata:
  labels:
    cluster.open-cluster-management.io/placement: placement1
  name: placement1-decision-1
  namespace: default
status:
  decisions:
    - clusterName: cluster1
    - clusterName: cluster2
    - clusterName: cluster3
The status.decisions lists the top N clusters with the highest score and ordered
by names. The status.decisions changes over time, the scheduling result update
based on what endpoints exist.
The scheduling result in the PlacementDecision API is designed to
be paginated with its page index as the name’s suffix to avoid “too large
object” issue from the underlying Kubernetes API framework.
PlacementDecision can be consumed by another operand to decide how the
workload should be placed in multiple clusters.
Decision strategy
The decisionStrategy section of Placement can be used to divide the created
PlacementDecision into groups and define the number of clusters per decision group.
Assume an environment has 310 clusters, 10 of which have the label prod-canary-west and 10 have the label prod-canary-east. The following example demonstrates how to group the clusters with the labels prod-canary-west and prod-canary-east into 2 groups, and group the remaining clusters into groups with a maximum of 150 clusters each.
apiVersion: cluster.open-cluster-management.io/v1beta1
kind: Placement
metadata:
  name: placement1
  namespace: default
spec:
  clusterSets:
    - global
  decisionStrategy:
    groupStrategy:
      clustersPerDecisionGroup: 150
      decisionGroups:
      - groupName: prod-canary-west
        groupClusterSelector:
          labelSelector:
            matchExpressions:
              - key: prod-canary-west
                operator: Exists
      - groupName: prod-canary-east
        groupClusterSelector:
          labelSelector:
            matchExpressions:
              - key: prod-canary-east
                operator: Exists
The decisionStrategy section includes the following fields:
decisionGroups: Represents a list of predefined groups to put decision results. Decision groups will be constructed based on thedecisionGroupsfield at first. The clusters not included in thedecisionGroupswill be divided to other decision groups afterwards. Each decision group should not have the number of clusters larger than theclustersPerDecisionGroup.groupName: Represents the name to be added as the value of label keycluster.open-cluster-management.io/decision-group-nameof createdPlacementDecisions.groupClusterSelector: Defines the label selector to select clusters subset by label.
clustersPerDecisionGroup: A specific number or percentage of the total selected clusters. The specific number will divide the placementDecisions to decisionGroups, the max number of clusters in each group equal to that specific number.
With this decision strategy defined, the placement status will list the group result,
including the decision group name and index, the cluster count, and the corresponding
PlacementDecision names.
status:
...
  decisionGroups:
  - clusterCount: 10
    decisionGroupIndex: 0
    decisionGroupName: prod-canary-west
    decisions:
    - placement1-decision-1
  - clusterCount: 10
    decisionGroupIndex: 1
    decisionGroupName: prod-canary-east
    decisions:
    - placement1-decision-2
  - clusterCount: 150
    decisionGroupIndex: 2
    decisionGroupName: ""
    decisions:
    - placement1-decision-3
    - placement1-decision-4
  - clusterCount: 140
    decisionGroupIndex: 3
    decisionGroupName: ""
    decisions:
    - placement1-decision-5
    - placement1-decision-6
  numberOfSelectedClusters: 310
The PlacementDecision will have labels cluster.open-cluster-management.io/decision-group-name
and cluster.open-cluster-management.io/decision-group-index to indicate which group name
and group index it belongs to.
apiVersion: cluster.open-cluster-management.io/v1beta1
kind: PlacementDecision
metadata:
  labels:
    cluster.open-cluster-management.io/placement: placement1
    cluster.open-cluster-management.io/decision-group-index: "0"
    cluster.open-cluster-management.io/decision-group-name: prod-canary-west
  name: placement1-decision-1
  namespace: default
...
Topology-aware spreading with decision groups
Decision groups can be used to distribute workloads across failure domains (zones, regions, cloud providers) for disaster tolerance and high availability. By defining decision groups based on topology labels, you can control how clusters are distributed across your infrastructure.
For detailed examples and use cases of topology-aware workload spreading, see Spread workload across failure domains.
Rollout Strategy
Rollout Strategy API facilitate the use of placement decision strategy with OCM workload applier APIs such as Policy, Addon and ManifestWorkReplicaSet to apply workloads.
    placements:
    - name: placement-example
      rolloutStrategy:
        type: Progressive
        progressive:
          mandatoryDecisionGroups:
          - groupName: "prod-canary-west"
          - groupName: "prod-canary-east"
          maxConcurrency: 25%
          minSuccessTime: 5m
          progressDeadline: 10m
          maxFailures: 2
The Rollout Strategy API provides three rollout types;
- All: means apply the workload to all clusters in the decision groups at once.
- Progressive: means apply the workload to the selected clusters progressively per cluster. The workload will not be applied to the next cluster unless one of the current applied clusters reach the successful state and haven’t breached the MaxFailures configuration.
- ProgressivePerGroup: means apply the workload to decisionGroup clusters progressively per group. The workload will not be applied to the next decisionGroup unless all clusters in the current group reach the successful state and haven’t breached the MaxFailures configuration.
The RollOut Strategy API also provides rollOut config to fine-tune the workload apply progress based on the use-case requirements;
- MinSuccessTime: defined in seconds/minutes/hours for how long workload applier controller will wait from the beginning of the rollout to proceed with the next rollout, assuming a successful state had been reached and MaxFailures hasn’t been breached. Default is 0 meaning the workload applier proceeds immediately after a successful state is reached.
- ProgressDeadline: defined in seconds/minutes/hours for how long workload applier controller will wait until the workload reaches a successful state in the spoke cluster. If the workload does not reach a successful state after ProgressDeadline, the controller will stop waiting and workload will be treated as “timeout” and be counted into MaxFailures. Once the MaxFailures is breached, the rollout will stop. Default value is “None”, meaning the workload applier will wait for a successful state indefinitely.
- MaxFailures: defined as the maximum percentage of or number of clusters that can fail in order to proceed with the rollout. Fail means the cluster has a failed status or timeout status (does not reach successful status after ProgressDeadline). Once the MaxFailures is breached, the rollout will stop. Default is 0 means that no failures are tolerated.
- MaxConcurrency: is the max number of clusters to deploy workload concurrently. The MaxConcurrency can be defined only in case rollout type is progressive.
- MandatoryDecisionGroups: is a list of decision groups to apply the workload first. If mandatoryDecisionGroups not defined the decision group index is considered to apply the workload in groups by order. The MandatoryDecisionGroups can be defined only in case rollout type is progressive or progressivePerGroup.
Troubleshooting
If no PlacementDecision generated after you creating Placement, you can run below commands to troubleshoot.
Check the Placement conditions
For example:
$ kubectl describe placement <placement-name>
Name:         demo-placement
Namespace:    default
Labels:       <none>
Annotations:  <none>
API Version:  cluster.open-cluster-management.io/v1beta1
Kind:         Placement
...
Status:
  Conditions:
    Last Transition Time:       2022-09-30T07:39:45Z
    Message:                    Placement configurations check pass
    Reason:                     Succeedconfigured
    Status:                     False
    Type:                       PlacementMisconfigured
    Last Transition Time:       2022-09-30T07:39:45Z
    Message:                    No valid ManagedClusterSetBindings found in placement namespace
    Reason:                     NoManagedClusterSetBindings
    Status:                     False
    Type:                       PlacementSatisfied
  Number Of Selected Clusters:  0
...
The Placement has 2 types of condition, PlacementMisconfigured and PlacementSatisfied.
- If the condition
PlacementMisconfiguredis true, means your placement has configuration errors, the message tells you more details about the failure. - If the condition
PlacementSatisfiedis false, means noManagedClustersatisfy this placement, the message tells you more details about the failure. In this example, it is because noManagedClusterSetBindingsfound in placement namespace.
Check the Placement events
For example:
$ kubectl describe placement <placement-name>
Name:         demo-placement
Namespace:    default
Labels:       <none>
Annotations:  <none>
API Version:  cluster.open-cluster-management.io/v1beta1
Kind:         Placement
...
Events:
  Type    Reason          Age   From                 Message
  ----    ------          ----  ----                 -------
  Normal  DecisionCreate  2m10s   placementController  Decision demo-placement-decision-1 is created with placement demo-placement in namespace default
  Normal  DecisionUpdate  2m10s   placementController  Decision demo-placement-decision-1 is updated with placement demo-placement in namespace default
  Normal  ScoreUpdate     2m10s   placementController  cluster1:0 cluster2:100 cluster3:200
  Normal  DecisionUpdate  3s      placementController  Decision demo-placement-decision-1 is updated with placement demo-placement in namespace default
  Normal  ScoreUpdate     3s      placementController  cluster1:200 cluster2:145 cluster3:189 cluster4:200
The placement controller will give a score to each filtered ManagedCluster and generate an event for it. When the cluster score
changes, a new event will be generated. You can check the score of each cluster in the Placement events, to know why some clusters with lower score are not selected.
Debug
If you want to know more details of how clusters are selected in each step, you can follow the steps below to access the debug endpoint.
Create clusterrole “debugger” to access debug path and bind this to anonymous user.
kubectl create clusterrole "debugger" --verb=get --non-resource-url="/debug/*"
kubectl create clusterrolebinding debugger --clusterrole=debugger --user=system:anonymous
Export placement 8443 port to local.
kubectl port-forward -n open-cluster-management-hub deploy/cluster-manager-placement-controller 8443:8443
Curl below url to debug one specific placement.
curl -k https://127.0.0.1:8443/debug/placements/<namespace>/<name>
For example, the environment has a Placement named placement1 in default namespace, which selects 2 ManagedClusters, the output would be like:
$ curl -k  https://127.0.0.1:8443/debug/placements/default/placement1
{"filteredPiplieResults":[{"name":"Predicate","filteredClusters":["cluster1","cluster2"]},{"name":"Predicate,TaintToleration","filteredClusters":["cluster1","cluster2"]}],"prioritizeResults":[{"name":"Balance","weight":1,"scores":{"cluster1":100,"cluster2":100}},{"name":"Steady","weight":1,"scores":{"cluster1":100,"cluster2":100}}]}
Future work
In addition to selecting cluster by predicates, we are still working on other advanced features including
5 - Add-On Extensibility
All available Add-Ons are listed in the Add-ons and Integrations section.
5.1 - Add-ons
What is an add-on?
Open-cluster-management has a built-in mechanism named addon-framework to help developers to develop an extension based on the foundation components for the purpose of working with multiple clusters in custom cases.
API Version Note: OCM addon APIs support both v1alpha1 (stored version) and v1beta1. Both versions are automatically converted by Kubernetes. This documentation uses v1alpha1. For API version details, see Enhancement: Addon API v1beta1.
A typical addon should consist of two kinds of components:
-
Addon Agent: A Kubernetes controller in the managed cluster that manages the managed cluster for the hub admins. A typical addon agent is expected to be working by subscribing the prescriptions (e.g. in forms of CustomResources) from the hub cluster and then consistently reconcile the state of the managed cluster like an ordinary Kubernetes operator does.
-
Addon Manager: A Kubernetes controller in the hub cluster that applies manifests to the managed clusters via the ManifestWork API. In addition to resource dispatching, the manager can optionally manage the lifecycle of CSRs for the addon agents or even the RBAC permission bond to the CSRs’ requesting identity.
In general, if a management tool working inside the managed cluster needs to discriminate configuration for each managed cluster, it will be helpful to model its implementation as a working addon agent. The configurations for each agent are supposed to be persisted in the hub cluster, so the hub admin will be able to prescribe the agent to do its job in a declarative way. In abstraction, via the addon we will be decoupling a multi-cluster control plane into (1) strategy dispatching and (2) execution. The addon manager doesn’t actually apply any changes directly to the managed cluster, instead it just places its prescription to a dedicated namespace allocated for the accepted managed cluster. Then the addon agent pulls the prescriptions consistently and does the execution.
In addition to dispatching configurations before the agents, the addon manager will be automatically doing some fiddly preparation before the agent bootstraps, such as:
- CSR applying, approving and signing.
- Injecting and managing client credentials used by agents to access the hub cluster.
- The RBAC permission for the agents both in the hub cluster or the managed cluster.
- Installing strategy.
Architecture
The following architecture graph shows how the coordination between addon manager and addon agent works.
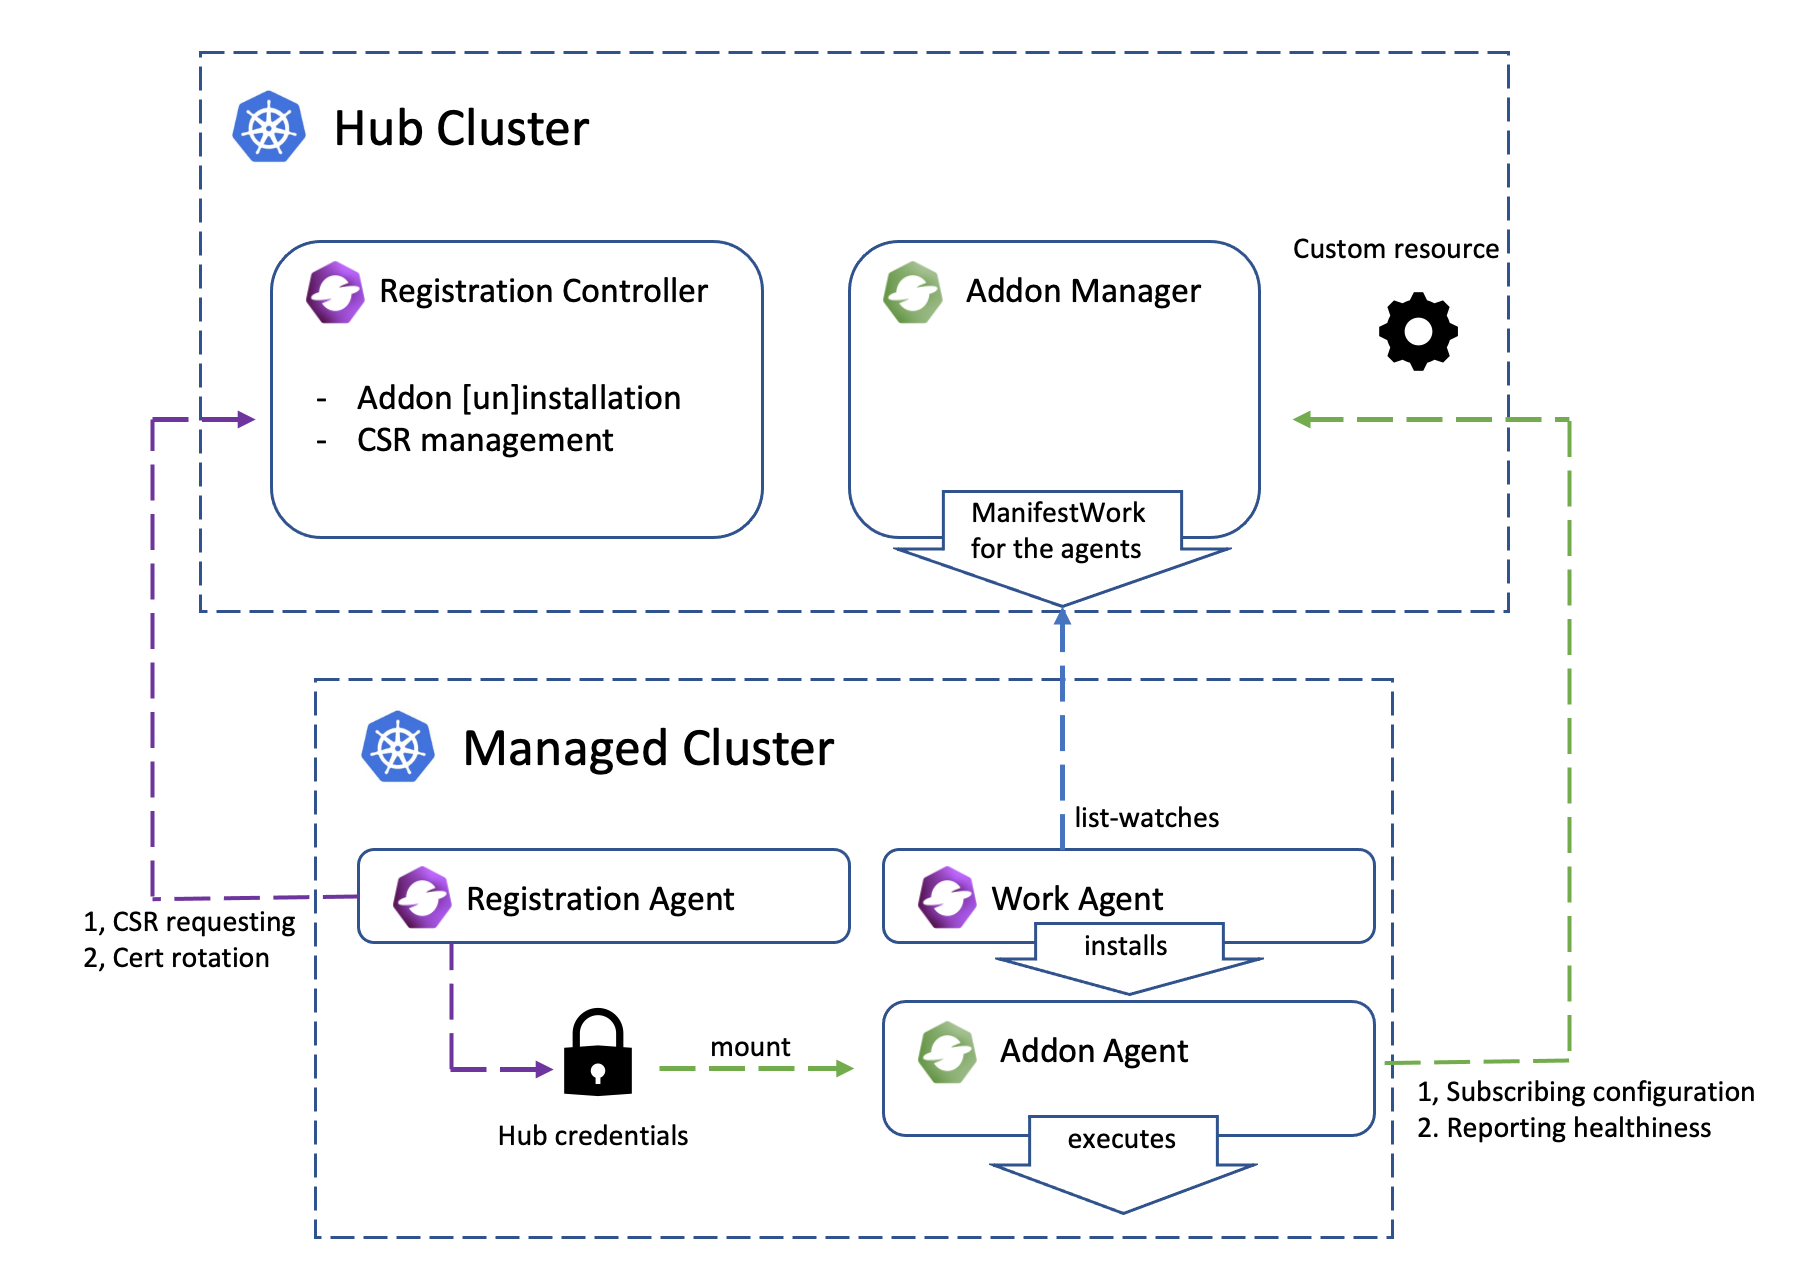
Add-on lifecycle management
Add-on lifecycle management refers to how to enable and disable an add-on on a managed cluster, how to set the add-on installation strategy and rollout strategy.
Please refer to the Add-on management for more details.
Install strategy
InstallStrategy represents that related ManagedClusterAddOns should be installed on certain clusters.
Rollout strategy
With the rollout strategy defined in the ClusterManagementAddOn API, users can
control the upgrade behavior of the addon when there are changes in the configurations.
Add-on configurations
Add-on configurations allow users to customize the behavior of add-ons across managed clusters. They include default configurations applicable to all clusters, specific configurations defined per install strategy for groups of clusters, and individual configurations for each managed cluster. This flexibility ensures that each cluster can be tailored to meet its unique requirements while maintaining a consistent management framework.
Please refer to the Add-on management for more details.
Examples
All available Add-Ons are listed in the Add-ons and Integrations section.
The addon-contrib repository hosts a collection of Open Cluster Management (OCM) addons for staging and testing Proof of Concept (PoC) purposes.
Add-on Development
Add-on framework provides a library for developers to develop an add-ons in open-cluster-management more easily.
Please refer to the add-on development guide for more details.